Recently Intel announced that it will use 45nm Transisitors in Intel's next generation processors, codenamed Penryn. Those processors will be available in the second half of 2007. At preset it is using 65nm Transistors in Intel Processors.
First let us know what is a nanometer?
There are one billion nanometers in one meter. The first Transistor was built by Bell Labs in 1947. We can hold it with our hand. We can not see the 45nm Transistor with our eye. We need a very advanced microscope to see it. More than 30 million 45nm Transistors could fit on the head of a pin. More than 2000 45nm Transistors could fit across the width of a human hair. More than 2 million 45nm Transistors could fit on the period(.). A 45nm Transistor can switch on and off at 300 billion times per second.
When compared to today's 65nm technology, we get 20 % improvement in Transistor switching speed and the power consumption is reduced by 30 percent in transistor switching. Due to smaller size of transistors we will get benefit of twice the transistor density. The transistor gate oxide leakage is reduced by 10 times.
Now let us know the new technology in 45nm Transistors
A Transistor is a switch that process the ones and zeroes. A gate is used to turn the transistor on and off. A dielectric is used under the gate to separate the gate from the channel where the current flows. The dielectric is nothing but a insulator. Today's 65nm Technology has been using silicon dioxide as gate dielectric, polysilicon in gate electrode. The transistor size reduces as the thickness of the dielectric reduces. The transistor speed increases by reducing gate electrode length and by reducing the thickness of the dielectric. But as the gate dielectric gets thinner, electric leakage increases. Today's gate dielectric thickness is 1.2nm(equal to 5 atomic layers). Now at this stage it becomes impossible to reduce thickness of dielectric further. If we reduce the thickness further then electric leakage increases further and the transistors become over heated and in sometimes they may burn.
So inorder to reduce electric leakage we have to use some other material as dielectric instead of silicon dioxide. So Intel is using a hafnium-based high-k material in the gate dielectric in their new 45nm Transistors. But this high-k dielectric is not compatible with polysilicon gate electrode. Intel replaced this polysilicon by special metals. These special metal gates are well compatible with hafnium gate dielectric. This combination improves performance of transistors to high level with very low current leakage.
Intel continues to maintain Moore's Law with this new 45nm technology. According to Moore's Law (Intel co-founder), the number of transistors on a chip doubles about every two years.
The number of transistors on first Microprocessor(4004) to latest Processors increases like below.
2000 transistors in first Processor, 4004
29000 transistors in 8080
134000 transistors in 80286
275000 transistors in 386
3000000 transistors in Pentium
9500000 transistors in Pentium 3
55000000 transistors in Pentium 4
77000000 transistors in Centrino
230000000 transistors in Pentium D
1720000000 transistors in Itanium 2
290000000 transistors in Intel Core 2 duo
580000000 transistors in Intel Core 2 quad
Sunday, February 25, 2007
45 Nanometer Transistor Technology
Wednesday, February 21, 2007
Yahoo Messenger Plug-ins
An Yahoo Messenger plug-in is an html page embedded inside Yahoo Messenger. The html file contains a combination of html tags and Java script API code. The yahoo plugins run inside Yahoo Messenger. Plug-ins are launched from the main messenger window. But some plugins are launched from the conversation window like IndiChat plugin.
What is the use of these Plug-ins?
Each Plug-in has it's own functionality. With the help of plug-ins we can share large files with our contact list, we can view latest movie trailers right from within messenger, we can view the local time of our contacts, we can get live score of cricket matches worldwide, we can chat with our contacts in our regional languages. For example Indian people can chat with their contacts in their own regional languages with the help of IndiChat plug-in. We can do so many things with the available Yahoo Messenger Plug-ins. At present 169 Yahoo Messenger Plug-ins are available. You can also publish your own plug-in to the Yahoo Messenger Plug-in Gallery.
I will explain about a few Plug-ins.
IndiChat
With this plug-in we can converse with our contacts in Indian languages Hindi, Marathi, Tamil, Telugu, Malayalam, Kannada, Bengali, Punjabi and Gujarati. Go to http://gallery.yahoo.com/messenger. Click Get Conversation Plug-ins link. Now click Indichat. then click IndiChat Install Now button. Then first it will load yahoo messenger. So login in to your messenger account with your ID. After you login into your account IndiChat warning window will come. Click yes. Then after some time it will give a message Indichat has been installed. In order to use this plug in, login in to your messenger account then open one of yours contact chat window. In that window you will find Plug-ins tab. Just click that tab. Then click My Plug-ins. You will find IndiChat there. Just click start button. Then you will get IndiChat window like below. You can choose the language you like. Now just type your language words in engish. The plug-in will automatically convert those words to your language. Very simple to use. Remember your contact must also install this IndiChat plug-in.
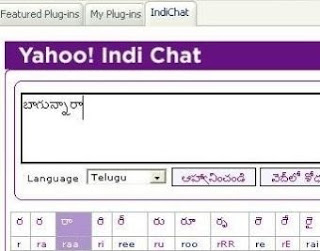
For getting the above telugu word just type “baagunnaaraa”

For getting the above hindi words just type “aap kaisaa hai”
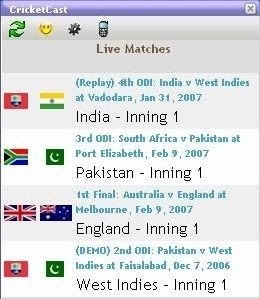
IM Cricket Cast
With this plug-in we will get Live scores of worldwide cricket matches. Go to http://gallery.yahoo.com/messenger. Then click sports section. There you will find this Plug-in. Just click on it. Now click Install Now button. Then first it will load yahoo messenger. So login in to your messenger account with your ID. After you login into your account IM Cricket Cast warning window will come. Click yes. Then after some time it will give a message IM Cricket Cast has been installed. In order to use this plug in, login in to your messenger account. In the main messenger window you will find Add Plug-ins tab. Just click that tab. Now click My Plug-ins tab. There you will find Cricket Cast. Just click Start button. Then come to Messenger main window. Now you will find Cricket scores under Add Plug-ins tab.
Local Time
This plug-in displays the local time of your contacts. You will find this plug-in in Tools and Utilities section. You can install and use this plug-in same as IM Cricket Cast.
Yahoo! Movie Trailer
You can watch the latest movie trailers right from within Messenger. You will find this plug-in in Music and Entertainment section. You can install and use this plug-in same as IM Cricket Cast.
EBay
You can browse the ebay market place right from within Messenger. You will find this plug-in in Shopping section. You can install and use this plug-in same as IM Cricket Cast.
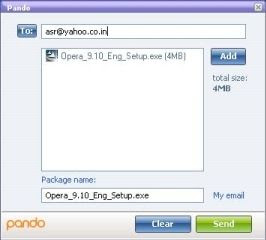
Pando
We can share large files or folders with our contacts by this plug-in. You will find this plug-in in Tools and Utilities section. You can install and use this plug-in same as IM Cricket Cast.
I have explained only a few Plug-ins. At present 169 Plug-ins are available. Visit Yahoo gallery page and install the yahoo plugins you like.
http://gallery.yahoo.com/messenger
Monday, February 19, 2007
Opera, The faster, safer and beautiful Browser
Opera Features:
Tabbed browsing
We can open multiple web pages within the same application window. There is no need to open multiple application windows for multiple web pages. So with Tabbed browsing we can surf the web faster and easier.
There is a Trash Can at upper right corner of the Opera browser. You can retrieve accidentally closed tabs from the Trash Can. Blocked pop ups can also be retrieved from the Trash Can.
Security
In every month Phishers are sending 6 billion Phishing emails worldwide. Phishers steal your personal Identity data like user accounts,passwords etc and financial account credentials like credit card,bank accounts information etc.
Opera's advanced fraud protection protects you against web sites that try to steal your personal information. Opera supports security protocols. Opera supports Secure Socket Layer (SSL) versions 2 and 3, and TLS. Opera offers automatic 256-bit encryption, the highest available security of any Web browser.
You can enable fraud protection like below.
Open Preferences from Tools Menu. Then click Advanced tab. Then click security. Now you will observe enable fraud protection. Just put a tick mark at enable fraud protection then click o.k.
Opera displays security information inside the address bar. You can observe yellow security bar inside the address bar like below when you open sites like google adsense.

If you click the yellow security bar then it displays security information like below.

Opera gives Cookie control to users. You can accept or reject Cookies as you like. We can configure Opera to clear the history and cache when exiting.
We can block all pop-ups of websites. If you want you can block pop-ups on certain sites only. For example if you want to block pop-ups of rediffmail only. Now Open rediffmail site. Then right click on a blank space inside the rediff site and select Edit site preferences. Now from the drop down menu select Block all Pop ups then click o.k.
You can also block content like Ads or images on any web page. Just open that web page. Then right click on a blank space inside that web page and choose Block Content. Now hold shift then click on Images or Ads you want to block. Then click done. Then that content will be blocked.
Integrated Search
We can search the web from the toolbar of Opera. By default Google search,Opera search and some other searches present in the drop down menu.

You can add your favourite search engines also to the list. If you want to add Yahoo search first open http://search.yahoo.com then right click on the Yahoo's search field then select Create Search. Then you will observe like below.

Now you can set a keyword also for yahoo search engine. For example set Y then click o.k. Now yahoo search engine is also present in the drop down list. Now you can open Yahoo search engine either from the drop down list or by just typing Y in search bar and press enter. In the same manner you can add your favourite search engines to the list.
BitTorrent
You can download large files by simply clicking a Torrent link. There is no need of a separate BitTorrent application.
Widgets
You can download beautiful widgets from http://widgets.opera.com. Widgets are small fun web programs that you can run right from your desktop. With the help of widgets you can access news,weather,play games and so many things. 985 widgets are available currently.
Skins
At present 85 skins are available. With the help of skins, You can give your browser a stylish look you want.
Download skins at
http://my.opera.com/community/customize/skins/
Voice
You can talk to browser with voice commands. Any ordinary browser command can be done by voice. For example with Opera reload command, the browser automatically reloads. With Opera speak command, the browser will read any selected text on it. Opera with voice works only in windows 2000 or windows xp computers. It supports only English language. Opera Voice to work, you need to have a microphone attached to your computer.
How to enable Voice in Opera?
Open Tools menu then select Preferences then select Advanced then select Voice, and check the Enable voice-controlled browsing option. After enabling the option, you will be asked to confirm that you want to download and install the voice libraries for Opera. Select confirm. Opera will do the rest automatically. Now voice is available.
Now open View menu then select Toolbars then select Main Bar. Now Voice tab is available on the tool bar. Now attach microphone to your computer. To initiate a voice command, click the Voice button or press the Scroll Lock key and say the command, for example, Opera reload. After issuing the command, let go of the button. Now the browser automatically reloads the current web page. So many voice commands are available for Opera.
Download Opera
Friday, February 16, 2007
Linux Partitions creation and Installation of RedHat Enterprise Linux WS(2.4.21-4.EL)
First make partitions as explained in the article How can you make partitions with FDISK For Windows/Linux Dualboot? Get ready with 4 C.D's of RedHat Enterprise Linux WS.
Boot the system with Linux first C.D. System will boot from the C.D and you will get RedHat Screen. Just press enter to install RedHat Enterprise Linux. Then it will detect all the hardware in the system. Sometimes it wont detect some hardware like mouse. Then it will display Mouse Not Detected. (In this case just give the details of your mouse type then you can proceed in the graphical installation Mode otherwise you can use text mode installation which does not require a mouse.)
If you get Mouse Not Detected message then with the help of Tab select O.K then press spacebar. It will display all models of mouses. Select your Mouse model with the help of arrow keys. Then with the help of Tab select O.K then press spacebar. Then it will display Device list with ports. Select your device with arrow keys then with the help of Tab select O.K then press spacebar. Then it will detect your mouse and it displays graphical installation mode window. Just click next. Select your language then click next. Select U.S English Keyboard then click next. Now select your Mouse Model, Device then click next. Now it will display Disk partition setup window. Just select Manually partition with Disk Druid then click next. Then it will display existing partitiuons and free space available on the Hard Disk. Now just click the Free under Drive/dev/hda then at bottom it will show free space and Starting,Ending cylinders. (Suppose for example it shows free space of 13201 MB with start cylinder 3189 and end cylinder 4871.) Just double click the free space at the bottom. Then it will display Add Partition window. In Add Partition window select Mount point as root '/'. Select File System type as EXT3. Then select start cylinder(suppose 3189) and end cylinder(suppose 4771, at least leave last 100 cylinders for Linux Swap partition). Now click O.K. It will give a warning message. Just click continue.
Now double click the Free Space at the bottom to create Linux Swap Partition. Then Add Partition window will come. Now select File System type as swap. Select Start cylinder(suppose 4772) and End cylinder(suppose 4869, it must be less than last cylinder 4871) then click O.K. Now click next. Now Boot Loader Configuration window comes. Select your default O.S as DOS then click next. Next select your Host name either Automatically Via DHCP or Manually as you wish. If you select manually then type a host name then click next. Now select Enable Firewall. Also select services like http,ftp as you wish then click next. Select the default language as English Usa then click next. Select your timezone then click next. Type your root password as you wish then click next. After some time it will display Package defaults. Just click next. Again click next to start installation. Then it will install all packages. After some installation it will ask disk 2. Install disk 2 then click o.k. Then after some installtion it will ask disk 3. Insert disk 3 then click o.k. After some installation it will ask disk 4. Insert disk 4 then click o.k. After some installation it will ask disk 1. Insert disk 1 then click o.k. Then after some time Graphical Interface(X) Configuration will come. Select your Vedio hardware type then select video RAM size then click next. Then select your monitor type and Sync's then click next. Now select your Screen Resolution then click next. Now Installation is complete. Remove the C.D from drive then click EXIT.
Now system will reboot and Grub Version 0.93 loader will come on the screen. Now select RedHat Enterprise Linux WS with arrow keys then press enter. After some time welcome screen comes. Just click next. Click Yes to agree the license agreement then click next. Now Date and Time settings will come. If you want you can Enable network Time Protocol. Also you can select a server for time protocol. Then click next. Next It will ask User Account Details. Type your user name,then enter your password then click next. Then it will detect your sound card and display it's details. Click next. Then it will display RedHat Registration choices. Select your choice then click next. It will display Additional CD's details. Just click next. Then it will ask your user name and password details. Enter those details. Now you completed your Linux Installation.
How can you make partitions with FDISK For Windows/Linux Dualboot?
At First in CMOS Settings select First boot device as Floppy. I already explained about this in my previous article How To Format the hard disk?. Keep the 98 start up disk in the Floppy Drive then boot the system with floppy. After booting from floppy system will come to A Prompt. At A:\> type FDISK like below then press enter.
A:\>FDISK
It will display message like this. Do you wish to enable large disk support(Y/N)? [Y]
By default Y is selected. So you just press enter. Then it will display Fdisk Options like this.
1.Create Dos partition or Logical Dos drive
2.Set active partition
3.Delete partition or Logical Dos Drive
4.Display partition information.
Enter choice[1]
If it is a new hard disk select option 1. If it is a hard disk already with partitions then select 3 in order to delete the existing partitions first. You will create new partitions after you delete old partitions only.
If you have old partitions then select option 3 and press enter. Then again it will display delete options like this.
1.Delete primary Dos partition
2.Delete Extended Dos partition
3.Delete Logical Dos Drives in Extended Dos partition
4.Delete Non-Dos partition
Generally we do not have Non Dos partition. So select all the three options one by one. First select option 1 then press enter. Then it will give a warning. Again press enter. Then it asks Volume Label of Primary partition. You can observe the Volume label over the top on the same screen. Just type that name and press enter. Some times there is no name for Volume label. In that case just press enter without typing any name. Now it will ask are you sure? Type Y then press enter. Now Primary Dos partition deleted.
Press Esc to continue. Again it will come to Fdisk Options menu. Select 3 to delete partition and press enter. Now first delete Logical Dos Drives in the extended Dos partition like the same as Primary partition deletion. After deleting all Logical Dos Drives in the extended Dos partition press Esc to continue. Again press Esc to continue. Again it will come to Fdisk Options menu. Select 3 to delete partition and press enter. Now delete Extended Dos partition in the same manner as Primary Dos partition. After deleting Extended Dos partition press Esc to continue. Now again it displays Fdisk Options.
Now you can create New partitions. First select Create Dos partition or Logical Dos Drive then press enter. Now select Create primary Dos partition and press enter. It will verifies drive integrity. Then it will display Do you wish to use the maximum size? Press N then press enter. It will again verifies drive integrity. Then it will ask primary Dos partition size. Type the size as you like then press enter. Now it creates Primary Dos partition. Press Esc to continue. Now Fdisk Options menu comes. Now set the Primary Dos partition as Active partition by selecting option 2 then press enter. Then it displays Enter the number of the partition you want to make active. Type 1 then press enter. Now partition 1 made active. Press Esc. Now fdisk Options menu comes. Select Create Dos partition then press enter. Select Create Extended Dos partition then press enter. It verifies drive integrity. It will ask the partition size for Extended Dos partition. (For Linux installation we must have NON DOS partition of at least 5 GB. So at the time of creating Extended Dos partition, leave 10 GB space for non dos partition and type the remaining space for Extended Dos partition)
So leave 10 GB space for Linux installation and type the remaining space for Extended Dos Partition then press enter. Now Extended Dos Partition created. Press esc. It verifies drive integrity. Now you have to create required logical drives in the Extended Dos Partition. Suppose if you want to create 3 logical drives in the Extended Dos Partition. Now type the first logical drive size then press enter. It verifies drive integrity. Now after verification type the second logical drive size then press enter. Again it verifies drive integrity. Now after verification leave the remaining space for third logical drive then press enter. Now press Esc. Then it comes to Fdisk Options. Now again press Esc to exit Fdisk. It will display a message. Again press Esc to exit Fdisk. It will come to A Prompt.
Now reboot the system without removing the 98 start up disk from the drive. Now system will boot from the 98 start up disk and come to A Prompt. Then for formatting C drive type like this at the A Prompt.
A:\>format C:/S then press enter.
It will give a warning message. Just press Y then press enter. After Format completed then it asks enter a Volume Label. Just press enter. Then it will come to C Prompt. Now you can format D drive by format D: command. You can format E drive by format E: command.
Now you can install Any Windows O.S in primary partition. Then you can install RedHat Linux in Non Dos Partition of the disk. Thus you prepared Windows partitions, NON DOS Linux Partitions by fdisk program.
Tuesday, February 13, 2007
Java Runtime Environment (JRE) 6
Download Java Runtime Environment (JRE) 6
Monday, February 12, 2007
Windows Live OneCare
Before you install Windows Live OneCare, You have to uninstall any existing Antivirus or Firewall program on your computer. You need not uninstall Windows Firewall. Windows Firewall is a component of Windows Operating system. Windows Firewall does not conflict with Windows Live OneCare.
Download Windows Live OneCare
Sunday, February 11, 2007
.NET Framework Version 3.0 Redistributable Package
The .NET Framework 3.0 adds new technologies to the .NET Framework 2.0. The .NET Framework 3.0 add four new components Windows Workflow Foundation, Windows Communication Foundation, Windows CardSpace, and Windows Presentation Foundation.
All .NET Framework 2.0 based-applications will continue to run in .NET Framework Version 3.0 also.
You have to run compatibility test if you are moving to .NET Framework Version 3.0 from .Net Framework version 1.1 or 1.0.
The .NET Framework 3.0 is installed by default on Microsoft Windows Vista. Microsoft Windows XP Home or Microsoft Windows XP Home Professional, with Service Pack 2 or later, Microsoft Windows Server 2003 family with Service Pack 1 or later supports the .NET Framework 3.0
Download .NET Framework Version 3.0
Saturday, February 10, 2007
Download Adobe Flash Player, Adobe Shockwave player
Adobe Flash Player displays web content created by Macromedia Flash. Flash Player displays content created with Macromedia Flash such as web application front ends, high-impact website user interfaces, interactive online advertising, and short-form to long-form animation. Macromedia Flash is also from Adobe. Flash Player 8 and Flash Player 9 support new browsers like Firefox and Safari also. Flash Player is available in so many languages. Flash Player is installed on 98% of Internet-enabled desktops.
Shockwave Player displays web content created by Macromedia Director. The Shockwave Player allows users to view interactive web content like games, business presentations, entertainment, and advertisements from web browsers. By using extensions, developers can extend the capabilities of the Shockwave Player to play back custom-built applications. Nearly 200 million web users have installed the Shockwave Player.
Both are free web players from Adobe. Both the players bring you the best rich media content on the Internet.
Download Latest Adobe Flash Player
Download Latest Shockwave player
Thursday, February 08, 2007
How to uninstall Active Directory of Windows 2003 Server?
Open Run,type DCPROMO then click O.K.

Click next. Click O.K.

Put tick at This is the last domain controller in the domain then click next. Again click next. Now confirm deletion by putting tick at Delete all application directory partitions then click next. Type your administrator password then click next. Again click next. Then deletion will take place like this.

At last you will get window like this.

Just click Finish. Restart your computer now. Your Active Directory will be removed now.
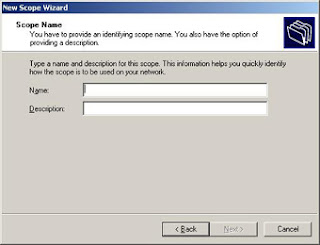
How to create New Scope to DHCP in Win 2003 Server?
From programs select Administrative Tools. Then select DHCP. In DHCP window you will find your computer name under DHCP. Just click your computer then click Action Menu.
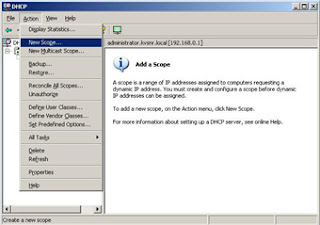
Then click New Scope. Then click next. Type a name and description for this scope.
Give those details and click next. It will ask IP Address range like this.

Enter those details then click next. It will ask Excluded address range. Give those details then click next. Now enter the lease duration details then click next. Now select YES I want to configure these option now. Then click next. Enter your default Gateway then click add then click next.
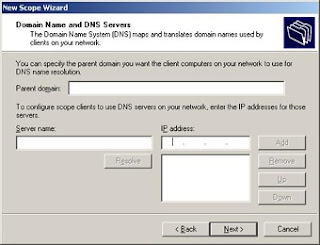
Enter your Domain name in Parent Domain box. Then enter IP Addresses of DNS Servers on your network. After adding IP Addresses of DNS Servers click next. Now enter your Wins Server IP Address(You can give the same server IP Address) then click Add. Then click next. Then select I want to activate this scope now. Then click next. Click Finish.
Next you have to authorize the Server by clicking Action Menu of DHCP then by selecting Authorize like this.
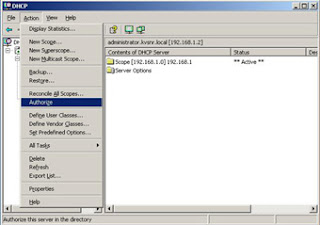
Now under DHCP you will observe Server options. Just click it. On the right side you will find 006 DNS Servers. Double click it. Now enter IP Addresses of your DNS Servers in IP Addresses box then click Add. After adding all IP Addresses of DNS Servers then click APPLY then O.K.
Configure Windows XP client to Windows 2003 DHCP Server:
Right click My Network Places then click properties. Now right click Local Area Connection then click Properties. Double click TCP/IP. Then select Obtain an IP address automatically like this.
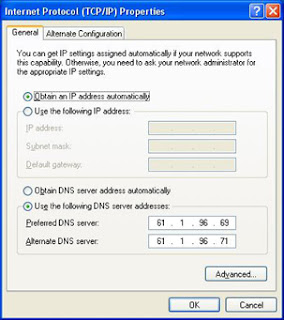
Then click O.K. Again click O.K. Now this client computer will get IP Address,Subnetmask & Gateway from the DHCP Server.
You can view the configuration by using the command Ipconfig/all like this. Click start button then click RUN. Now type CMD in open box then click O.K. You will get Command Prompt window. Then at C:\> just type Ipconfig/all then press enter,you will get all configuration details.
Windows 2003 Server Configuration
From Administrative tools select Configure your server Wizard. Click next. Click next. Then select Typical Configuration for a first server. Click next. It will ask your Active Directory domain name. Remember We have given PRANEEL as work group name at the time if Windows server 2003 installation. So give PRANEEL.LOCAL as Active Directory Domain name. Then click next. Then it will show your NetBios Domain name as PRANEEL and DNS Domain name as PRANEEL.LOCAL. Just click next without changing anything. In the next window enter your DNS Server IP Address. Now click next. Then it will show summary of selections. Just click next. Then it will configure the server by showing like this.

Click O.K. Then it will ask 2003 Server CD. Keep the CD in drive. Then configure your Server Wizard will install and configure DHCP Server. It also configure TCP/IP settings. It also install and configure Active Directory and DNS Server also like this.

After installation and configuration completed,the computer will automatically restarts. After computer is restarted it will display server configuration progress like this.

Now click next. Click finish. Now windows Server 2003 Configuration is completed. DHCP Server,DHCP Scope,DNS Server and TCP/IP settings are all configured by the computer automatically during Configure your Server Wizard.
Now If you want,you can configure DHCP Server,DNS Server settings as you like. You can configure and activate your DHCP scope as you like. Also you can configure TCP/IP settings as you like.
Tuesday, February 06, 2007
Windows 2003 Server Installation
At first in CMOS settings select first Boot Device as C.D Rom. I already explained about this in my previous article How to Format the harddisk?.
So After selecting first Boot Device as CD Rom then keep the Windows Server 2003 CD in the CD Drive then restart the computer. Then system will boot from Windows Server 2003 C.D and it display Press Any Key to boot from C.D. So press any key. Then it will give three options.
Option A Windows 2003 Server Enterprise
Option B Windows 2003 Server Standard
Option C Windows 2003 Server Web Edition
Choose option B then press enter. Then Windows Setup starts. After some time Welcome To Setup screen comes. Press enter to continue. Press F8 for agreeing License Agreement. Then it shows existing partitions and unpartitioned space on your computer. Select the partition in which you want to install Windows 2003 Server then press enter. Then select Format the partition using the NTFS File system and press enter. Then it will show warning message. Press F to format. Then it will format the partitions using the NTFS File system. After that setup is copying files. After some time computer will restart. When it is restarting just remove the 2003 Server CD for 1 to 2 minutes so that computer loads Windows 2003 Server files. Again keep the CD in drive so that setup will copy the necessary files from CD later. After some time Regional and Language Options screen will come. Just click next. Then it will ask your name and organization. Type those details and click next. Then it will ask product key. Type the product key then press enter. Then it will display Licensing Modes. Select the Licensing Mode you want to use. Now select Per Server Licensing Mode and choose 10 concurrent connections then click next. Then it will ask your Computer name and Administrator password. Give those details and click next. Then it will show Date and Time Settings. Select Date & Time Zone as you want and then click next. After installing network details it will show Networking Settings. Just select Typical Settings then click next. Now it will ask your work group name or Domain name. Give those details and click next. Suppose give PRANEEL as work group name then click next. Then it will copy files from Windows 2003 Server C.D. After some installation computer will restart. At the time of restarting take out Windows 2003 Server C.D from CD Drive. After restarting Welcome to windows screen will come. It displays press Control-Alt-Del to begin. So press Control-Alt-Del. Then it asks password details. By default username is Administrator,now you have to type password only then click O.K. You completed Windows server 2003 installation.
How to Configure Windows 2000 Server DHCP Service?
From programs select Administrative tools then select DHCP. Under DHCP select your computer then click Action Menu.

Select New Scope. Click next. Type a name and description for this scope.

After entering those details click next. Then IP Address range window will come.

Enter those details then click next. Add Exclusions window will come. Enter if there are any excluded IP Addresses then click next. Enter lease duration details then click next. Now select Yes,I want to configure these options now then click next. Enter default Gateway then Add it then click next. Then DNS Servers window will come.

Enter parent Domain name and DNS IP Addresses then click next. Now add Win servers IP address then click next. Now select Yes, I want to activate this scope now then click next. Now click Finish.
Now on the Action Menu click Authorize.

Authorization may take a few minutes to complete. For a status update press F5 or click Refresh on the Action menu. Now you completed Configuration of DHCP Server.
Configure Win XP client to DHCP Server 2000
Right click my Network Places then click properties. Right click Local Area Connection then select Properties. Double click TCP/IP. Then select Obtain an IP Address automatically.

Then click O.K. Again click O.K. Now this client computer will get IP Address,Subnet Mask & Gateway from the DHCP Server.
You can view the Configuration by using the command Ipconfig/all like this. Click Start button. Click RUN. Now type CMD in open box then click O.K. You will get command prompt window. Then at C:\> just type Ipconfig/all then press enter. Then You will get all Configuration details.
Sunday, February 04, 2007
How to Configure Windows 2000 Server?
From Programs select Administrative Tools. Now select Configure your Server.

Select the first option if you have one server in your network. Select the second if you have more than one server in your network then click next.

From the menu at the left,choose the services that you want to run on this server. If you want to install Active Directory then click Active Directory. On the right hand side scroll down the window,you will find Start the Active Directory Wizard. Just click Start link.

Now click next. Select Domain Controller for a New Domain then click next. Select Create a New Domain Tree then click next. Select Create a New Forest of Domain Trees then click next. Type the full DNS name for New Domain then click next. Type Domain NetBios name then click next. Again click next. Again click next. Then it will give a message Install and Configure a DNS Server on this Computer,click O.K. Select Yes,Install and Configure DNS then click next. Select Permissions compatible with Pre-Windows 2000 Servers then click next. Type the Administrator password then click next. Again click next. Then it will Configure Active Directory like this.

At last click Finish. Then click restart now button. You completed installation of Active Directory. Now double click My Network Places. Then double click Entire Network. Then click View the Entire Contents. You will observe your Active Directory like this.

Now you finished windows 2000 server configuration.
How to Add Networking Services in Windows 2000 Server?
Before installing Active Directory we have to install networking Services. Networking Services include DHCP,DNS,TCP/IP Services etc. Open Add/Remove programs from control panel. Click Add/Remove Windows Components. Then tick at Networking services. Click next. It will ask windows 2000 Server CD. Put CD in drive then click O.K. Click Finish. Then restart the system. Now install LAN card. Put the Mother Board CD in CD drive. System will show all list of drivers in the CD. Then click on LAN Driver,and install it then restart the system. Now give the TCP/IP Settings such as IP Address,Subnet Mask,Gateway etc in TCP/IP Properties.
Now you can add this Windows 2000 Server to a Work Group like this. Right click my computer. Select properties. In System properties select Network Identification. Now select properties. Now at Work Group type the Work Group name of your network then click O.K. Again click O.K. Again click O.K to reboot the system. Again click O.K. Now click YES to reboot the system.
Windows 2000 Server Installation
Go to CMOS settings then select first Boot Device as CD Rom. Now keep Windows 2000 Server CD in CD Drive then restart the system. System will boot from CD then it displays Press any key to boot from CD. So press any key. Then setup will load files from Windows 2000 Server CD. After some time Welcome to Setup Screen comes. Just press enter to continue. Press F8 for agreeing License Agreement. Now setup will show the existing partitions and unpartitioned space on your computer. Select a partition to install Windows 2000 Server then press enter. Select Format the partition using the NTFS File System,press enter. Press F to format the selected partition. Then Setup will format the partition using NTFS File System. After copying files from CD,system will restart automatically. After some installation just click next. After some installation Regional Settings window will come. Just click next. Type your name and organization name then click next. Enter CD key then click next. Select Per Server Licensing mode and choose concurrent connections as you like then click next. Type your computer name and administrator password then click next. Windows 2000 Components window will come. Then just click next. Then select Date and Time settings as you like then click next. At last click Finish. Then system will restart. You completed windows 2000 server installation.
Saturday, February 03, 2007
Installation & Configuration of Windows NT 4.0 DHCP Server Service
Installation:
Open control panel. Double click on the network program. On Services tab click Add. Then select Microsoft DHCP Server. Then click O.K. It will ask Win NT 4.0 Server C.D. Put the C.D in C.D Drive. Click Continue. Then it will copy files from C.D. Then click close. Then you must restart the computer by clicking YES. Now you completed windows nt 4.0 dhcp server installation.
Configuration:
Click start button. From programs select administrative tools. Then select DHCP manager. Then it will show DHCP Manager on the screen. Now first you have to create the scope. Scope is the range of IP Addresses which the DHCP Server can assign. Every DHCP Server needs at least one scope.
To create scope,double click Local machine under DHCP Servers in DHCP Manager. Then click Scope Menu then click Create. You will get create scope dialogbox like below.

Then specify the Start IP Address,End IP Address. Specify the Subnet Mask. Then finally specify exclusion range Start Address and End Address as you like(You can leave exclusion range IP Addresses also). Then specify Lease duration. Now specify a name to the Scope. Specify a comment then click O.K. Then it will give a message like this: The scope has been created but not yet activated. Activate the scope now? YES or NO. Click YES. Now your scope is activated.
Now set the router(Gateway) IP Address. Double click Local Machine under DHCP Servers in DHCP Manager like this.

Then you will observe IP Address. Just click that then go to DHCP Options Menu. Then click Scope. Click 003 Router. Then click Add. Then click Value. Then click EDIT ARRAY. Then enter gateway address in New IP Address field. Then click Add. Then click O.K. Again click O.K. Again click DHCP options then click GLOBAL. Click 003 Router. Then click Add. Click Value. Click Edit Array. Enter gateway address in New IP Address field. Then click Add. Now click O.K. Again click O.K. Now you completed Router(gateway) Settings.
Configuring DHCP Client:
Right click network neighbourhood then select properties. Double click TCP/IP. Then select Obtain an IP address Automatically. Then click Gateway tab. Remove any IP Address there. Then click O.K. Again click O.K. Now restart the system. Now this DHCP client will request IP Address from DHCP Server. Then DHCP Server will automatically assign IP Address,Subnet mask,Default gateway to client computer that have configured to use DHCP.
Installation and Configuration of Windows NT 4.0 WINS Server
Installation:
Open Control panel. Double click on the Network program. On Services Tab click Add. Then select Windows Internet Name Service. Then click O.K. It will ask Windows NT Server 4.0 C.D. Put the C.D in CD Drive,click continue. Then it will copy files from C.D. Then click close. Then you must restart the syatem by clicking YES. Now you completed windows nt 4.0 wins server installation.
Configuration:
Click the start button. From programs select Administrative Tools. Then select Wins Manager. Select Mappings. Then select Static Mappings. Click Add Mappings. Type name of the client computer and its IP Address. Then click Add. You can Add as many clients as you have. Then click close.. Again click close.
Configuring Wins Client:
Right click networkneighbourhood then click properties. Double click TCP/IP. Click Wins Configuration. Then Enable Wins Resolution. Then at Wins Server Search Order type Windows NT Server 4.0 IP Address. Then click Add. Type the Scope ID in Scope ID box,then click O.K. again click O.K. Now restart your client computer.
Friday, February 02, 2007
Installing and Configuring the Windows NT 4.0 DNS Server Service
Installation:
Open control panel. Double click on the network program. On Services tab click Add and then select Microsoft DNS Server. Now click O.K. then it will ask Win NT 4.0 Server C.D. Keep the C.D in C.D Drive then click continue. Then it will copy files from C.D. Then click close. Then you must restart the computer by clicking YES. Now you completed windows nt 4.0 dns server installation.
Configuration:
Click start button. From programs select Administrative tools then select DNS Manager. Then you will get DNS Manager on the screen. Select DNS then choose NEW SERVER. Enter the IP Address of the DNS Server to add to the list. Here you can give the IP Address of your Windows NT 4.0 Server if you make it as DNS Server. After entering the IP Address click O.K. Then at Server list you will find the IP Address of your Windows NT 4.0 Server.
Configuring DNS Client:
In client computer right click network neighbourhood then click on properties. Then double click TCP/IP. Then click DNS Configuration tab. Then tick Enable DNS. Type the domain name in Domain box. Then at DNS Server Search order enter the IP Address of Windows NT Server 4.0 then click Add. Click O.K. Again click O.K. Then restart the computer. You have completed DNS Client configuration.
How to add Windows 98 client to Windows NT 4.0 Server?
Suppose a Win 98 client is on the same network domain or work group of the Windows NT 4.0 Server. Then you can access the Windows NT 4.0 Server like this.
Suppose you have given Administrator name to Windows NT Server 4.0 and System1 name to Win 98 client.
First give settings to Windows NT Server 4.0. From the start button select Administrative Tools. Select user manager for domains. Then user manager will open. Click on user then select New User ,give user name as USER1. Put tick mark at user cannot change password and also put tick mark at password never expire. You have to delete tick mark at user must change password at next logon. Do not give any password. Now click ADD. Then click close. Now in user manager you will find USER1. You can add as many users as you can.
Now you have to give settings to win98 client like this. Right click network neighbourhood then click properties. Then network window will open like this.

Then double click Client for Microsoft Networks. Then tick on Log On to Windows NT Domain. Also type your domain name in Windows NT Domain box. Then click O.K. Again click O.K. Now you must restart your computer by clicking YES.
After restart it will ask enter your user name,password,domain like this.

At user name type USER1. Do not type any password. At Domain it already shows your domain name. So leave it. Now click O.K.
Now you can access your Windows NT Server 4.0 now. Just double click Network neighbourhood. Then it will show all computers in your network. You can observe your server name Administrator also. Just double click Administrator. Then it will show any shared folders in your Windows NT 4.0 Server. So you can copy anything from those shared folders of Windows NT 4.0 Server.
WIN NT Server 4.0 Printer Installation for Sharing
Double click printer in control panel. Double click Add Printer. Select My computer radio button. Click next. Put tick mark at LPT1 Local Port. Click next. Click Have Disk for printer software. Put the printer C.D in drive then give the path then click O.K. In ADD printer Wizard select radio button Not Shared then click next. Click Finish. If it asks any C.D give the path then printer Icon will be seen in Printers dialog box. Now right click the printor Icon then select Sharing. Then select Shared and at share name dia box give the name then O.K. Then printer will be shared. Now you completed windows nt server 4.0 printer installation for sharing
WIN NT Sound card Driver installation
Keep Win NT C.D in C.D Drive. Double click my Computer. Open Win NT C.D Icon. Double click drvlib. Double click Audio. Double click sbpnp. Double click 1386. You will observe sbpnp. Right click it and choose install. Restart the computer. From control panel select multimedia. Select devices then click ADD. At list of drivers choose Unlisted or Updated driver then click O.k. Next it will ask the path. Put the Mother board C.D in CD Drive then browse the path of sound card drivers then click O.K. Then it will display your sound card driver name. Just click O.k then it will install sound card driver from C.D. After installation is complete just click the Restart Now button. Now you finished windows nt server 4.0 sound card driver installation.
Thursday, February 01, 2007
Windows NT Server 4.0 installation
Go to CMOS settings and select first boot device as CD Rom. I already explained about this in my previous article How to Format the hardDisk.
So after selecting the first boot device as CD Rom,keep the WIN NT C.D in CD Drive and restart the computer. System will boot from C.D and setup starts by loading files from the C.D. After some time Welcome to set up screen comes. Just press enter. Again it will give message like this: Setup has recognized the following mass storage devices in your computer. Just press enter. Again press enter to continue. Now press Pg Dn key for going to down of screen then read license agreement,then press F8 for agreeing rules and conditions. Then setup lists hardware and Software components in your system. Just press enter. Now setup shows existing partitions and spaces available for creating new partitions. Select your partition in which you want to install Win NT then press enter. Next select Leave the current file system intact then press enter(If you want to install only Win NT then you can convert the file system to NTFS here). Again press enter. Again press enter. Then setup will copy files from C.D. After some time press enter to restart the computer when it is prompted to restart the system.
After some installation click next to continue. Then it will ask name,organization details. Enter those details and click next. Enter the CD key information and click next. Then select Per Server Licensing mode and choose concurrent connections as per your requirement then click next. Type computer name and click next. Select Primary domain controller and click next. Type the password then click next. Then it will ask Do you want to create emergency repair disk?. Select NO and click next. Again click next. Again click next. Tick Wired to network options then click next. Tick off Install Microsoft IIS then click next. Then put network adaptor driver diskette in floppy drive and select search from list. Next click Have Disk then type A:\ then click O.K. Then system will show network card software from the floppy. Just click O.k. Then click next. Select TCP/IP protocol. Then click next. Again click next. Again click next. Then system will install network card software. Then it displays: Do you wish to use DHCP? Select NO. Then specify an IP Address,Subnet mask,default Gateway and click APPLY next click O.k. Again click next. Again click next. Then type the Domain name as you wish then click next. Click Finish. Select Time Zone as you wish then click close. Click O.K. At display properties click TEST. Then click O.K. It will display Did you see the test Bitmap properly? Now click YES and click O.K. Again click O.K. After setup is completed then click Restart the Computer. Now you completed windows nt server 4.0 installation.
IMP NOTE: Before installing Display Driver install WIN NT Service pack 6 First. After that install display driver.
For Win98/Win NT dual boot, first install win98 in C drive. Then at the time of Windows NT Server 4.0 installation select D drive for installing Win NT Server 4.0.
How to format Hard disk for installing Win NT Server 4.0?
Windows NT supports only FAT 16 and NTFS File system. So you have to format the hard disk using the FAT 16 file system. For that you need MS Dos Boot Diskette(First Floppy of DOS) and Disk Manager software floppy(DM V 9.46).
At first in CMOS settings select first boot device as Floppy. So after selecting first boot device as Floppy then keep the MS Dos Boot Disk in floppy drive then start the computer. The system will boot from MS Dos boot diskette and it comes to A prompt A:\> Then insert Disk manager diskette in floppy drive then run DM from the prompt. If you are installing Seagate harddisk then run DM at the prompt. If you are installing other than Seagate harddisk then run Dm/x at the prompt like this.
First at the A prompt,with the help of CD command change directory to DM like this.
A:\>CD DM then press enter. Then you will change to DM directory like this.
A:\DM> Now type like this if you are installing a disk other than Seagate.
A:\DM>dm/x then press enter(if your disk is Seagate then type dm only instead of dm/x). Now Welcome to disk manager window comes. Just press enter. Again press any key to continue. Then it will display Have you already run the Discwizard software YES or NO. Choose No then press enter.
Now in disk manager main menu select Advanced Options then press enter. Now select Advanced Disk Installation then press enter. Now it will display Diskmanager found 1 drive YES or NO. Select YES then press enter. Now select Dos/Windows 3.1x then press enter. If it gives message like Do you want to use the ONTRACKED.SYS partitions drives? then choose YES then press enter. Now select Define your own then press enter. Suppose If you use 10 GB hard disk then give first partition size as 2147 MB then press enter. Give second partition size also as 2147 MB then press enter. Give third partition size also as 2147 MB then press enter. Give the remaining space as fourth partition then press enter. Now select Save And Continue then press enter. Now press ALT-C to continue. Then select Fast Format and press enter. It will give warning message then select YES and press enter. Then it will begin formating the hard disk and after sometime it asks Dos Boot Diskette. So insert Ms Dos Boot Disk in drive then press enter. Then it will copy files from boot disk,after sometime it will again ask Disk manager Diskette. So insert Disk Manager diskette in drive and press enter. Then it will complete the harddisk partitions. Again press enter. It will display like this. If you will be installing Dos 6.x,it will over write your present Config.sys file now press any key to continue. It will give another message,now again press any key to continue. Now it will give message Disk manager hard disk installation has successfully completed.
Now remove disk manager diskette from drive A then press Control-Alt-Del. Then system will restart and ask enter new date. So enter date in this format MM-DD-YY(11-24-2006) and press enter. Then enter time in this format Hr:Min:Sec(3:27:32) and press enter. Then it will come to C prompt.
Now for installing CD Drive driver,put the driver floppy in drive then at C prompt type like this.
C:\>A: then press enter. Now it will come to A prompt. If your CD Drive is Samsung then at A prompt type like this.
A:\>CDSETUP press enter. Then it will show CD Rom device driver setup just press enter. Then it will install driver. Press enter after setup is completed. Then it will come to C prompt. Now restart the system. If you formatted your harddisk with C,D,E,F partitions,then CD Drive letter will become G.
Now at C prompt type like this.
C:>G: press enter. But it gives message like this:Invalid Drive Specification. It won't detect CD Drive with a letter. So do like this. Keep Dos Boot Diskette in floppy drive. Then at command prompt type like this.
C:\>path A: and press enter. Next at C prompt type like this.
C:\>EDIT CONFIG.SYS then press enter. Then MS Dos editor will open. With the help of down arrow put the cursor below the screen then type
LASTDRIVE=Z:
Then go to file menu and select save then exit from file menu. Now remove the diskette and reboot the system. Now it will detect CD Drive with letter G.
Now your Hard Disk is ready for installing WINDOWS NT SERVER 4.0. Since the disk is formatted in FAT 16 Format you can install Win 98 in C drive and Windows NT Server 4.0 in D drive as dual boot.