Sunday, December 31, 2006

Text To Speech Software


Read Please software will read any text from your Browser, Email, Word processor, Spreadsheet or any program which displays text.
This Website offers two versions Read Please 2003, Read Please Plus 2003. Read Please 2003 is free where as Read Please Plus 2003 is 30 days trial version. We can download both as a single file. Microsoft text to speech engine software also bundled with them in the same file.
Both works in the same manner. Second one has extra features. We have to copy the text to the clipboard by COPY command. Then Paste it into the Read Please window by PASTE command. Then press PLAY button of Read Please Software. That’s all.
Read Please Plus 2003 has extra options like CLIPPLAY,TOP etc. By clicking CLIPPLAY button Read Please Plus will read any text that is copied to the CLIPBOARD. By clicking TOP button Read Play Plus 2003 will read the text from the beginning.

Download Read Please

Monday, December 18, 2006

How can you delete your un used Yahoo ID permanently?


Any one can simply delete their unused Yahoo ID's. Yahoo provides this facility. After you deactivated your account then You no longer have access to your account. But Yahoo will take 90 days to delete any account from their user database in order to discourage users from engaging in fraudulent activity.

What you will lose after terminating your account?
Naturally you will lose your Yahoo ID,Yahoo Mail Address and Profile Names. Your account data and settings across the yahoo network will be removed also. This includes the contents of your HotJobs, Yahoo Mail, Yahoo Address Book, Yahoo Small Business, Yahoo GeoCities, Yahoo Briefcase, My Yahoo etc. Any paid services that you own with this yahoo ID will also be terminated by account deletion. You may not be able to recover payments remitted for these services and the data associated with these accounts.

IMP Note: Once you delete your Yahoo account then you will not be able to reactivate it. You have to sign up for a new account only.

To delete your Yahoo Account JUST CLICK Here.

What about deletion of unused Rediffmail Account?
There is only one way to deactivate your Rediffmail Account. Simply Do not use that Account for a continuous period of 90 days. Then that account will be automatically deactivated.


Saturday, December 16, 2006

How can you open programs with Numeric Keypad?


Most of us are not using the Numeric Keypad at all. Only PC Gamers are utilizing the Numeric Keypad while playing games. Numeric Keypad Keys are used as Game Control Keys in only a few games,mostly multiplayer games. Almost all remaining games won't use numeric Keypad Keys.

Any one can use Numeric Keypad for opening the programs on the desktop,programs in the programs list. Suppose MS Word is in the programs list. We can open it with Numeric Keypad like this.

First ON the NUM LOCK. Click on start button. Click on All Programs. Then go to MS Word program(Don't click it,it will open) then right click MS Word program and choose Properties option. Now a dialogbox will present on the screen like this.


In the FIG you will observe None in the Short Cut Key box. Just click the mouse at None then press a key on the Numeric Keypad(Suppose Num 4). Now click APPLY then click O.K.

Now you can open MS Word program from the Numeric Keypad at any time by pressing 4 on the Numeric Keypad. Remember that you have to ON the NUM LOCK before pressing Number 4.

Same procedure is applied for opening Short cut programs on the desktop with Numeric Keypad. You have to right click a Short Cut Program then choose properties option. Then follow the same procedure above.


How can you know your Internet Connection Speed?


You can easily know your Internet connection Speed by any of the following Sites.

1. Just CLICK HERE then a website will open. Then just click Speed Meter tab that is at the top of the page. Then it will display your connection speed like this.

2. Just CLICK HERE then a website will open. In that site you will observe a link How Fast is Your ISP. Just click that link. It will display your connection Speed like this.


Are you facing 'PRESS F1 TO CONTINUE' while you start your computer everytime?


Here is the solution to rectify it.

On some computers you will observe the following message when you ON those computers.

CMOS Checksum Error - Defaults Loaded
Press F1 To Continue, DEL To Enter Setup


The above message comes due to three reasons.
1. Due to faulty CMOS Settings.

2. When a new Hardware Component is installed in system then there may be settings for this new Hardware in CMOS. In this case also we face Press F1 To Continue.

We will also face this message when an existing Hardware component is removed from the computer.

The solution for the above two cases is just set the CMOS Settings to Default. Then save those settings and restart the computer. Your problem will be solved.

Still you are facing the same problem then the last reason is this one.

3. CMOS battery is Weak or Fail.

Just replace the battery with new one. Then you won't get message Press F1 To Continue now.

In Win XP Systems when battery is weak you will face BOOT DISK FAILURE problem also. You have to replace the old battery with new one only.


Wednesday, December 13, 2006

Make Your PC Ready for Windows Vista

Windows Vista will be released on January 30 2007.

Minimum System Requirements:
Processor: 800 MHz 32 bit or 64 bit
System memory: 512 MB
GPU: SVGA (800x600)
HDD: 20 GB
HDD Free Space: 15 GB
Optical Drive: CD ROM Drive

A graphics Processor that is DirectX9 cabable is better for good Windows Vista experience.

System Requirements to get an even better Windows Vista Experience:
Processor: 1 GHz 32 bit or 64 bit
System Memory: 1 GB
3D Graphics card: Minimum 128 MB DirectX9 capable card with Pixel Shader 2.0 support and 32 bits per pixel.
HDD: 40 GB
HDD Free Space: 15 GB
Optical Drive: DVD ROM Drive
Audio Output capability
Internet Access capability

Features:

1.Start Menu
The start menu of Windows Vista is faster and more helpful than previous Windows versions. The start menu has a new feature called Instant search which can help you find anything on your PC. The new start menu makes it easy for you to navigate across all of the installed applications on your PC.


2.Security
Windows Vista contains new security features. Your PC will be protected from Worms,Spyware,Viruses and other unwanted software. Windows Vista's security features prevent Malware from installing,find and remove Malware if it has already been installed.

Automatic Updates and Windows Security Center will keep your PC up to date with the latest security patches, and also alert you when your PC needs to install an update. Windows Vista Firewall protect your PC from Hackers. Windows Defender protect your PC from Spyware and other unwanted software.The Malacious Software Removal Tool periodically scans your PC for Viruses. You can also keep your computer healthy by using Windows OneCare antivirus software.

3.Search Folders
Windows Vista introduces a powerful new tool Search Folders that makes it easy to find and organize your files-wherever they may be on your PC. A Search Folder is simply a search that you save. Opening a Search Folder instantly runs that saved search, displaying up-to-date results immediately.

4.Windows Internet Explorer 7.0
Windows Vista has Internet Explorer 7.0 version. I.E 7.0 has new Security and privacy features. Also it has so many features like Tabbed browsing,inline search,and shrink to fit printing etc. All these features makes everyday tasks easier.

5.System Restore
In Windows Vista, System Restore allows recovery from a greater range of changes than in Windows XP. The file filter system for system restore used in previous versions of Windows is replaced with a new approach.

Windows vista provides a backup experience that is easier to use with more choices for storing your backed up information. You can choose to back up to CD-ROM, DVD-ROM, an external hard disk connected to your PC by USB or IEEE 1394, another hard disk on your PC, or to another PC or server connected to your network.

6.Networking
Windows Vista networking is easier to setup,easier to use,and more secure and reliable. We can connect wirelessly to our company's network,copy files between computers,share an internet connection and printers etc.

7.Speech Recognition in Windows Vista
You can interact with your computer using your voice with Windows Speech recognition feature. This is a new feature in Windows Vista. We can dictate documents and e-mails,use voice commands to start and switch between applications,control the operating system and even fill out forms on the web. The accuracy with which Windows Vista recognizes your speech improves each time you use it. Windows Speech Recognition was built using the latest Microsoft speech technologies.

Windows Vista supports speech recognition in English (United States),English (United Kingdom),German, French,Spanish,Japanese,Traditional Chinese and Simplified Chinese languages.

Also there are so many new features in Windows Vista O.S. All we make our PC ready for Windows Vista.


Windows Registry


What is Windows Registry?
Registry is a central hierarchical database used to store settings and options for the 32 bit,64 bit versions of Microsoft Windows operating systems. It stores information necessary to configure the system for one or more users, applications and hardware devices. Whenever a user makes changes to a Control Panel settings, or File Associations, System Policies, or installed software, the changes are reflected and stored in the Registry.

The Registry contains information that Windows continually references during operation, such as profiles for each user, the applications installed on the computer and the types of documents that each can create, property sheet settings for folders and application icons, what hardware exists on the system, and the ports that are being used.

The Registry replaces most of the text-based .ini files used in Windows 3.x and MS-DOS configuration files, such as the Autoexec.bat and Config.sys. Although the Registry is common to several Windows operating systems, there are some differences among them. Registry data is stored in binary files.

Under Windows 95 & 98 Registry database is contained in two hidden files called USER.DAT and SYSTEM.DAT in Windows Directory, for Windows Me there is an additional CLASSES.DAT file, while under Windows NT/2000/XP/Server 2003 the files are contained seperately in the %SystemRoot%\System32\Config directory.

You can not edit the Registry files directly. You can edit the registry by using Registry Editor (Regedit.exe or Regedt32.exe). If you use Registry Editor incorrectly, you can cause serious problems that may require you to reinstall your operating system. Use Registry Editor at your own risk.

Registry Structure
The Registry structure is similar to the directory structure on your hard disk.


There are five main Hives in Registry. Each Hive contains a specific portion of the information stored in the registry. Each Hive contains Keys. Each Key contains other Keys(subkeys) as well as Values. These Values contain the actual information stored in the Registry.

There are 5 types of values. They are String Value, Binary Value(0 or 1), Dword Value(32 bit unsigned integer,number between 0 and 4,294,967,295), Multi String Value, Expandable String Value.

The Main Hives are:

HKEY_CLASSES_ROOT
This Hive contains all of your file association mappings to support the drag and drop feature, OLE information, Windows shortcuts, and core aspects of the Windows user interface. On Windows 2000 and above, HKCR(HKEY_CLASSES_ROOT) is a compilation of HKCU\Software\Classes and HKLM\Software\Classes. If a given value exists in both of the subkeys above, the one in HKCU\Software\Classes is used.

HKEY_CURRENT_USER
This Hive Contains the preferences of the user who is currently logged on. The user's folders, screen colors, and Control Panel settings are stored here. This information is associated with the user's profile. HKCU is a subkey of HKEY_USERS.

HKEY_LOCAL_MACHINE
This Hive Contains local computer's hardware,Software information and settings for any device ever installed in the computer. It Contains all configuration information particular to the local computer(for any user).

HKEY_USERS
This Hive Contains preferences for every user that has logged into the computer. Each user is represented by a SID sub-key.

HKEY_CURRENT_CONFIG
This Hive Contains information about the hardware profile that is used by the local computer at system startup.

The supporting files for all hives except HKEY_CURRENT_USER are in the Systemroot\System32\Config folder on Windows NT 4.0, Windows 2000, Windows XP, and Windows Server 2003 where as the supporting files for HKEY_CURRENT_USER are in the Systemroot\Profiles\Username folder.

We know that there are Five types of Registry Values. Each Value is is stored as one of five data types.

REG_BINARY
This type stores the Value as Raw binary data. Most hardware component information is stored as binary data and is displayed in Registry Editor in hexadecimal format.

REG_DWORD
In this type Data is represented by a number that is 4 bytes long (a 32-bit integer). Many parameters for device drivers and services are this type and are displayed in Registry Editor in binary, hexadecimal, or decimal format.

REG_EXPAND_SZ
This type is a variable legth data string. This data type includes variables that are resolved when a program or service uses the data.

REG_MULTI_SZ
This type is a multiple string. Values that contain lists or multiple values in a form are generally this type. Entries are separated by spaces, commas, or other marks.

REG_SZ
This type is a fixed length test string.

Editing The Registry
You can edit the registry by using Registry Editor (Regedit.exe or Regedt32.exe). If you use Registry Editor incorrectly, you can cause serious problems that may require you to reinstall your operating system. Use Registry Editor at your own risk.

Click on Start button. Now select Run. Now in the Open box type regedit then Registry Editor will be open.


It is just like Windows Explorer. On the left side you will notice Hives. On the right side you will notice Values of currently selected folder. You can expand any Hive or Branch By clicking on plus sign to the left of Hive or Branch.


Just click any Key like above then it's values are displayed on the right side. You can add new Keys also. Just right click any Key,then select New,then select Key. Type a name to the new Key then press enter. Now a new Key is created. We can rename any Value and almost any Key. We can also delete a Key or Value. We can also Import and export Registry Settings to a text file and we can save the file also.

Windows NT 4 and Windows 2000 were distributed with both the Windows 9x REGEDIT.EXE program and Windows NT 3.x's REGEDT32.EXE program.

Regedit.exe did not support permission editing. The only way to access the full functionality of an NT registry was with Regedt32.exe. Regedit.exe only supports string (REG_SZ), binary (REG_BINARY), and DWORD (REG_DWORD) values. Regedt32.exe supports those, plus expandable string (REG_EXPAND_SZ) and multi-string (REG_MULTI_SZ). Attempting to edit unsupported key types with Regedit.exe on Windows 2000 or Windows NT 4 will result in registry corruption and, possibly, an unbootable system.

Windows XP was the first system to integrate these two programs into one, adopting the old REGEDIT.EXE interface and adding the REGEDT32.EXE functionality. The differences listed above are not applicable on Windows XP and newer systems. On XP systems we can Edit Registry with Regedit or Regedt32.


Registry TIPS

Imp Note:
I will update this article regularly so that you can access a number of Registry Tips from this article.
If you use Registry Editor incorrectly, you can cause serious problems that may require you to reinstall your operating system. Use Registry Editor at your own risk.

1.How can you make shortcut to Registry Editor?

Right click on a blank area of the Desktop. Now select NEW then select Shortcut. Now you will observe Create Shortcut Wizard.


In the box type regedit.exe then click next. Now enter a title like Registry Editor then click Finish. Now your Registry editor shortcut will be ready on the desktop. Simply double click it then Registry editor window will be open. Now you need not have to select RUN from Start button in order to open Registry Editor Window.

2.Setting your Folders in accessable to others

With the help of registry settings you can set your folders in accessable to others.
First copy all your Important Files in to a Folder. Then right click that folder and select properties. Now tick read only,hidden options then click APPLY and O.K. Now Doubleclick that folder. Now from Tools menu choose Folder options then click View then select Do not Show Hidden Files and Folders and now click APPLY then click O.K.

Now open Registry Editor Program. Then go to HKEY_CURRENT_USER\Software\Microsoft\
WindowsCurrentVersion\Policies\Explorer
Now create a DWORD Value NoFolderOptions

Now right click NoFolderOptions select Modify then type 1 in Valuedata box then click O.K.

Now Restart your system. Now you can observe that Folder options disappear from Tools Menu of any folder. So nobody can view your folder.

If you want you can disable this Registry setting also. Go to NoFolderOptions as explained above then right click NoFolderOptions select Modify then type 0 in Valuedata box then click O.K and restart the syatem.

Now Folder options appear in Tools Menu of any folder. Now everybody can view your folder.

Monday, December 11, 2006

Edit PDF files with CAD-KAS PDF Editor 2.4


You can Edit PDF files easily with PDF Editor 2.4. You can correct spelling mistakes,Add or Delete words,Add or Delete pictures and vector graphics,add text in any font. You can change the page size also. You can Zoom the text in a PDF file with this PDF Editor. You can save the changes also.

But this is a demo version only. A water mark text line will appear on each page of your PDF file by this demo version. That is the only disadvantage with this demo version. If you like you can purchase full version.

The program runs under: Windows XP/2000/98/ME/NT 4

Try This software.


How can you Know the IP Address of your computer?


Your computer is connected to internet. We all know Internet is not a single network. Internet is a collection of networks. Also You know that every computer is identified by a unique IP Address to others on the network. Remember that this IP address is not the IP Address given by you manually in TCP/IP properties of your Local Area Connection. On the internet others can identify your machine by this unique IP Address only. You can know the IP Address of your computer by this simple method.

Just CLICK HERE to know your IP Address.


Get a Free Gmail Account within Seconds


Gmail is the free Email service provided by Google. With Gmail Account we will get 2810 MB free Email storage space. There are no Banner Advertisements in Gmail. This is the main attraction of Gmail. Still Gmail is in the Beta stage of development. So you can not get Gmail Account directly from the Gmail site. You will get Gmail account by invitation. After you created your Gmail account you can invite your friends from your account. Each Gmail account owner can send 50 invitations to their friends. You will get Gmail invitation by the following ways.

1.Gmail account creation is very simple. Visit the link given by me. Then the site will display a code. You just enter that code in a box provided by them,then click Get Gmail link below that box. Then Gmail account application will be open for you. Just fill the application and get your Gmail account within seconds.

Just CLICK HERE for free Gmail Account.


2.If for any reason if you wont get your Gmail account from the above link,then simply Email me for free Gmail invitation. My Email address is given in the blog under ABOUT ME section. It is snr.karri@gmail.com. As soon as you get a Gmail invitation from anybody use it up quickly. If you think you can use it later,then it will be declared invalid after sometime. Please check your junk mail folder for Gmail invitation if it is not found in inbox.

I will send you invitation as early as possible from my Gmail account.


Sunday, December 03, 2006

Installation of C,C++


From the C.D copy TURBOC,TURBOC2 folders to the C drive.

For installing C++ open TURBOC folder. Double click install file. Then it installs C++ by creating a folder TC in C drive. Then go to command prompt. In Windows XP type CMD in run box then you will go to command prompt. Then give the command
C:\TC\BIN> COPY C:\TC\BGI\*.BGI as shown in the figure below.


Now press enter. Then C++ will be installed in your computer. For C language no installation is needed. It is already in TURBOC2 folder.

How to Run C++,C languages software?

For C++ go to command prompt then give the command
C:\TC\BIN>TC
Then press enter. Then C++ window comes like this. But this window is not fullscreen window.


For C go to command prompt then give the command
C:\TURBOC2>TC
Then press enter. Then C window comes like this. But this window is not fullscreen window.


You can get full screen windows of both C++,C by following the procedure below.

Start the computer with a bootable C.D or Bootable Floppy then system will come to the A prompt A:\> then change directory to C drive by typing command C: at A:\> prompt like this.
A:\>C: then press enter. Then system will come to C prompt like this.
C:\>

For getting C++ window give the following command then press enter.
C:\TC\BIN>TC

For getting C window give the following command then press enter.C:\TURBOC2>TC


What are Domain Controllers,Member Servers,Stand Alone Servers?


Domain Controller:
A domain Controller is a computer that is running Windows NT Server 4.0 or Windows 2000 Server or Windows server 2003 operating system. Also Active Directory must be installed in both Windows 2000 Server and Windows Server 2003.

Domain Controller stores read-write copy of the domain database. Domain Controllers manage communication between users and domains,including user logon processes,authentication and directory searches. They store directory data and synchronize directory data using multimaster replication,ensuring consistency of information over time. Active Directory supports multimaster replication of directory data between all domain controllers in a domain.

Member server:
A Member Server is a computer that is running Windows NT Server 4.0 or Windows 2000 Server or Windows Server 2003 operating system. But Active Directory is not installed in both Windows 2000 Server and Windows Server 2003. A member server belongs to a domain but it is not a domain controller.

They can operate as file servers,application servers,webservers,database servers,firewalls,certificate servers and remote access servers. They does not process network account logons,participate in active directory replication,store domain security policy information.

By installing Active Directory we can promote a member server to a domain controller. Also we can demote a domain controller to a member server by uninstalling Active Directory.

Stand Alone Server:
A Stand Alone Server is a computer that is running Windows NT server 4.0 or Windows 2000 Server or Windows Server 2003 operating system but it is not a member of a domain. It is a member of a workgroup. These servers can share resources with other computers on the network.

Note: Articles on Windows NT,Windows 2000 Server,Windows 2003 Server will come soon on my blog under the same NETWORKING section.


What is Active Directory?


Introduction:
A Server in a Workgroup can supply services such as the internet connection sharing feature,the internet connection firewall,file and print services.

A Server in a Domain can be a domain controller,can supply services such as DNS and DHCP,or can serve as a router or remote access server.

To make windows 2000 server or windows server 2003 a domain controller we must install Active directory. Windows NT 4.0 do not support Active Directory. The Active Directory service is compatible with Windows NT Server 4.0. Active Directory supports the Windows NT LAN Manager protocol used by Windows NT. This enables authorized users and computers from a Windows NT domain to log on and access resources in Windows 2000 or Windows server 2003 domains. To clients running Windows 95,Windows 98,Windows NT that are not running Active Directory client software,a Windows 2000 server or Windows Server 2003 domain appears to be a Windows NT Server 4.0 Domain. Client computers running Windows XP professional,Windows 2000 Professional have the client software built in and can access Active Directory resources normally.

Active Directory:
Active Directory stores information about network objects,such as user accounts and shared printers and provides access to that information. With a single network logon,administrators can manage directory data and organization throughout their network and authorized network users can access resources anywhere on the network. Security is integrated with Active Directory through logon authentication and access control to objects in the directory. Policy based administration eases the management of complex networks also.

Active directory provides a central location for network administration and delegation of administrative authority. Active Directory includes one or more domains,each with one or more domain controllers. So it enables you to scale the directory to meet any network requirements. Users can use desktop tools to search Active Directory. So It privides flexible and global searching.

Active Directory provides Systematic synchronization of directory updates. Updates are distributed throughout the network through secure and cost efficient replication between domain controllers. We can connect to any domain controller remotely from any Windows based computer that has administrative tools installed.

Note: Articles on Windows NT,Windows 2000 Server,Windows 2003 Server will come soon on my blog under the same NETWORKING section.

What is DHCP,NetBIOS Name,WINS,DNS?


Dynamic Host Configuration Protocol(DHCP):
DHCP is a TCP/IP standard designed to reduce the complexity of administering Address configurations by using a Server. The DHCP server centralizes and manages the allocation of TCP/IP configuration by automatically assigning IP Addresses,Subnet Mask and Default gateway to computers that have been configured to use DHCP.

Whenever a DHCP server receives request from a DHCP client then DHCP server selects an IP Address from a pool of addresses defined in database then offers it to the client for a specified period of time. So client receives valid IP Address.

Suppose we manually configuring IP Addresses,Subnet mask and Gateway. Then entering an invalid IP Address or IP Address currently in use can result in network problems. Entering an incorrect Subnet mask can cause communication problems with other networks.

NetBIOS Name:
It is the computer or host name assigned during installation. The Registry stores this name as an entry. We can change this name through the network program in control panel. The name can be 15 characters in length and we can add a 16 character to the name to designate the application that registered the name.

Windows Internet name Service(WINS):
WINS registers NetBIOS computer names and resolve them to IP Addresses. The database of WINS is DYNAMIC. WINS is designed for Microsoft operating systems only.

If the WINS client initiates a NetBIOS command to communicate with another host then the name query request is sent to WINS server. If the WINS server finds a NetBIOS name/IP address mapping for a host in its database then it returns the destination host's IP Address to the WINS client.

Domain Name System(DNS):
DNS is a system for naming computers and network services. These names are organized into a hierarchy of domains. DNS is used in TCP/IP networks,such as the internet,to locate computers and services through user friendly names. When a user enters a DNS name in an application then DNS services can resolve the name to an IP Address.

Suppose there is a mail server on a network. It has it's own numeric Address. For most users it is difficult to remember the numeric address of the server. Then DNS system names this computer with a user friendly name like example.companymail.com. Any one can remember this type of user friendly name very easily. But computers communicate over network by using numeric Addresses. So DNS services can resolve this user friendly name to it's numeric Address.

DNS uses a client server model in which DNS servers(Name servers) contain information about the DNS database and make this information available to clients(Resolvers).

In brief DNS resolves internet names to IP Addresses. DNS database is static and manually updated whenever a new host is added or an existing host is moved to another subnet. DNS is designed for both Microsoft operating systems and Non Microsoft operating systems such as MainFrames running TCP/IP and UNIX based computers.

Note: Articles on Windows NT,Windows 2000 Server,Windows 2003 Server will come soon on my blog under the same NETWORKING section.


FAT/FAT32/NTFS File Systems


Windows NT Server 4.0 supports FAT(FAT 16) and NTFS file systems. It does not support FAT 32 file system. FAT 32 was designed for win 95/98. If you want to install both Win98 and Windows NT Server 4.0 in a computer then use FAT 16 partitions. FAT 16 supports both Win98/Windows NT Server 4.0. For format the hard disk to FAT 16 partitions you need DOS BOOT DISKETTE and disk manager 9.46 softwares.

Windows 2000 Server supports FAT(FAT 16),FAT 32 and NTFS file systems. If you want to install Active directory then you must have NTFS partitions on your server's hard drives.

Windows Server 2003 supports FAT(FAT 16),FAT 32 and NTFS file systems. If you want to install Active directory then you must have NTFS partitions on your server's hard drives.

FAT: FAT system establishes a file allocation table that provides the name of the file and the location of clusters that make up the file on the hard disk. Even if the file is scattered around the disk,the table makes it possible for the FAT to monitor and find all parts of the file.

FAT is the least complicated type of Windows supported file system. FAT has minimal overhead(less than 1 MB). So it is most applicable to drives or partitions under 400 MB. FAT resides at the top of the fixed allocated space on the hard disk. Two copies of Fat are maintained for security purpose. FAT is updated regularly. FAT supports only network shares.

FAT supports read-only,hidden,system and archive file attributes only. FAT uses 8.3 filenaming convention. A filename may be up to eight characters long,then followed by a period (.),then with an extension of up to three characters. All filenames must be created with ASCII character set. They must start with a letter or a number. Names are not case-sensitive.

FAT performance decreases as the size of the volume increases. So FAT file system is not recommended with drives or partitions larger than 400 MB. It is not possible to set security permissions on files in FAT partitions. FAT does not support local security. Under Windows FAT partitions are limited to a maximum size of 4 GB.

FAT 32: It is an extension of the FAT file system. It uses disk space on a disk more efficiently than FAT.

NTFS: NT file system provides the stability and security. NTFS 5 is the newest version of the NT file system. It provides increased security for files and supports more robust file system recovery. NTFS enables setting file and directory control permissions. NTFS supports both local and remote user permissions on both local and shared files or folders.

NTFS uses 255.3 filenaming convention. NTFS file or directory names may be up to 255 characters long,then followed by a period (.),then with an extension of up to three characters. These names are not case-sensitive. They must start with a letter or a number.

NTFS performance does not degrade as the size of the volume increases. NTFS is best used on volumes of 400 MB or more. NTFS has 1-5 MB overhead. So NTFS should not be used on volumes smaller than 400 MB. Since NTFS overhead does not fit on a floppy,we can not format a floppy with NTFS. NTFS supports partition size of 2 terabytes.

Note: Articles on Windows NT,Windows 2000 Server,Windows 2003 Server will come soon on my blog under the same NETWORKING section.


Saturday, December 02, 2006

The PING(Packet Internet Gropher) Utility

The ping utility is used for testing connections. With the help of ping command we can test whether a connection is still active or not. The ping command is available on most operating systems that implement TCP/IP.

The ping command is used to query another system to ensure that a connection is still active. The ping program sends an ICMP message to the remote and waits for a reply. If the destination machine's IP software receives the ICMP request,it issues an echo reply immediately. The sending machine continues to send an echo request until the ping program is terminated. After termination ping displays a set of statistics as shown below.


We can also use PING to isolate network hardware problems and incompatible configurations. You can use the PING like below.

1. Ping the Loopback address to verify that TCP/IP is installed and configured correctly on the local computer.

ping 127.0.0.1

2. Ping the IP Address of the local computer to verify that it was added to the network correctly.

If a computer is on a network and it's IP Address is 192.168.1.3 then use ping command like this.

ping 192.168.1.3

3. Ping the IP Address of the Gateway to verify that the default Gateway is functioning and that you can communicate with a local host on the local network.

If the default Gateway is 192.168.1.1 then use the ping command like this.

ping 192.168.1.1

4. Ping the IP Address of a remote host to verify that you can communicate through a router.
By default PING waits 1000 ms(1 second) for each response to be returned. If it does not receive the response then it will display Request Timed Out message like this.


Note: Articles on Windows NT,Windows 2000 Server,Windows 2003 Server will come soon on my blog under the same NETWORKING section.

How can you clean the LENS of CD,DVD Drives and Writers?


If there are dust particles on the Lens of CD or DVD drives and writers then they won't read Cd's or Dvd's. We can clean the Lens with one or two water drops like this.

First unscrew the Drive from the computer. Take it out from the computer. You will observe 4 screws on one side of the CD Drive. Unscrew those four screws. Then open the iron sheet cover from the drive. Then you will observe like this.


In the above figure you will observe that Door of the CD Drive is locked and front plastic cover is also locked. The screw driver is showing door locking point in the above figure. You can clearly observe it from the figure below.


With the help of screw driver move the locking point to the left. Then door lock will be released. Now you can release the front plastic cover by pressing two small plastic locks on left and right sides of the drive. Now remove the second iron sheet cover also. Then you will observe the CD LENS as shown below.


The CD Lens is in the circled mark(The Door of the CD drive covers the Lens). Now with your finger put one drop of water on the Lens then clean the lens with a clean paper until it dries. Now cleaning Lens is completed. Now arrange the CD drive as usual then Fit it to the computer as usual.

NOTE: After reading this article first observe the cleaning procedure when any experienced person is doing the Lens cleaning. You can easily understand how he is doing the Lens cleaning. After you got confidence then you can also do the same as explained above.


Which 3D card is cheap&best for old AGP 4X Mother Boards to run almost all latest games?


Old PC's have Mother Boards which support AGP 4X 3D cards only. We can use AGP 8X 3D cards also on these boards. But these Old AGP 4X Mother Boards won't support latest 3D cards. If your system has old AGP 4X card then you can not play latest games on this card. Here is the solution to play almost all latest games on your PC.

You can not upgrade your 3D card to latest 3D card as your mother board won't support latest 3D cards. But Your old AGP 4X Mother Board will support AGP 8X 3D cards. The cheap and best card for this type of mother boards is 256 MB DDR GEFORCE FX 5200. This is AGP 8X 3D card.

One more important thing. For almost all latest games to work on this card you have to install atleast 1GB RAM in your system. Also you have to install latest display drivers for all games to work. You can download latest nvidia display drivers from softwares section on the same blog. First check whether your system is working well with 1 GB RAM or not? If your system is O.K with 1 GB RAM then only purchase GEFORCE FX 5200 3D card. Games like FEAR will require atleast 1GB RAM.

Try to purchase the card from local dealer. If it is not available then you can purchase this card from WWW.EBAY.IN site at cheap price. Compare rates of local dealer and EBAY. I think EBAY rates may be cheap.

Monday, November 20, 2006

How To Format The Hard disk By Disk Manager?

Be ready with Bootable C.D and Disk Manager Software(DM) on the same C.D. I Have DM version 9.46(only single floppy). This version formats any disk whether it is Seagate or Samsung or any other one. DM versions below 10 can format up to disk sizes of 40 GB. By using disk manager 10 Plus version we can format High Capacity disks also. Now latest is disk manager 10.45. Later I will tell about 10.45(two floppy's needed). In Seagate site we can get free disk manager 10.45 software. But it formats only Seagate harddisks. For formatting other disks you have to use disk manager 10 Plus versions for those disks. You can get Samsung version disk manager 10.42 from Samsung site freely. For other company disks you have to get disk manager 10 plus versions from those company Websites.

Now I am telling how to format the hard disk using disk manager 9.46 version. Start the Computer. While booting press DEL key then the system automatically goes to CMOS Settings. Select “Advanced Bios Features” and press enter. Select “First Boot Device” and choose CD ROM. Then press F10 key(For save and exit setup) and save CMOS Settings. Now the system is ready to boot from C.D Rom.

Put the Bootable C.D in C.D drive and restart the system. Then system will boot from C.D. Select “Boot from C.d.Rom” and press enter. Select “Start computer with CD Rom support” and press enter. Then computer will go to A:\> Prompt.

Change from A:\> to C.D Drive Prompt.
Example:
A:\>F: press enter (Here F is my C.D drive.). Then it goes to C.D drive prompt like below.
F:\>
By CD command(change directory command) change to DM directory like this.
F:\>CD DM press enter. Now
F:\DM>
Now run DM exe file. If your hard disk is Seagate just type “DM”. If your harddisk is other than Seagate then type “DM/X” like below.
F:\DM>DM/X press enter

Now disk manager runs on the screen. Press enter to continue. It will display “Have you already run the disk wizard software?” Choose NO then press enter. Now choose Advanced options. Choose Advanced disk installation. It will display “disk manager found 1 drive YES or NO”. Choose YES. Then it will display “disk manager format hard disk using the 32 bit FAT choose yes or no”. Choose YES.

Now select a partition option. Select “Option(C) Define your own”. Now give the partition sizes. My Hard disk is 10 GB. So I used 3 partitions C 6 Gb, D 1 Gb, E 3 Gb. After giving partition sizes choose “Save and continue” then press enter. Then it will give two options:
1. Press ALT-C to continue
2. Press any key to cancel
Press Alt-C. Then it will display “Fast format(yes or no)”. Choose YES. Leave the default cluster values. Now it will display“Erase all data on this disk (yes or no)?”. Choose Yes. Then disk manager will format my hard disk into 3 partitions as per the sizes given by me. After formatting completed it will display “Press reset or Control-Alt-Del when ready”. Also it displays “remove any C.D's,Diskettes in drives”.

So first remove bootable C.D. Then press Control-Alt-Del. Then computer will restart and come to command prompt C:\> So now you learnt how to format harddisk.

Upto 40 Gb Hard disks you can format them using disk manager 9.46 software. If you want to format 80 Gb hard disks you can format them using windows xp Installation disk itself or by using disk manager 10 plus versions. Later I will post article regarding that also.

How can you format Any Hard disk larger than 80 GB?

We can format any hard disk with Windows XP C.D irrespective of it's size and manufacturer.

First goto CMOS Setup then select Boot Device priority as C.D.ROM. Then keep Win XP C.D in CD Drive then restart the system. After restarting, it asks Press any key to boot from C.D. Then press any key. Then setup inspects your computer configuration and it takes time.

After inspection is over setup will start ,press enter to continue. Then press F8 to agree the end user license. Then setup will shows the existing partitions and unpartitioned space on your computer.

If suppose your HDD is new one with 40 GB. Then setup shows only unpartitioned space on your computer that is approximately 38201 MB. So to create a partition press C. Then it will ask the size of the partition. Suppose you have given 8000 MB,then press enter. Then It will create partition C for you. Then it shows 30200 MB as unpartitioned space. Now select unpartitioned space then again press C for creating second partition. Suppose you have again given 8000 MB as size then press enter. Then it will create partition D for you. Again select unpartitioned space then again press C for creating third partition. This time you have given the remaining 22191 MB as size and then press enter. Then it will create third partition E. So now you have totally 3 partitions. Still it shows 8 MB unpartitioned space. But we can not create fourth partition with 8 MB. So leave it.

Now we have 3 partitions with sizes 8000MB,8000MB,22191MB respectively. All these are RAW harddisk partitions. Now select partition C for installing Win XP then press enter. After installation of Win XP there are only two RAW harddisk partitions. They are D and E partitions. So after installing Win XP double click my computer. Then right click D drive and select Format then select File system FAT32 then click start. Then it will format D drive. Similarly format E drive also. Now you learnt how to format harddisk of size greater than 80 GB.

Windows XP installation


After formatting the hard disk, kept the win xp cd in cd-drive and restart the system. Then it will boot from win xp c.d and it displays “press any key to boot from cd”. So press any key. Then setup will first inspect your system. After sometime welcome to setup screen comes. Press enter to continue. Then license agreement screen will come. Press F8 to agree. Then it will show existing partitions. Already C is selected as primary partition. So press enter to install win xp in C drive. Then it will give 6 options. Select “leave the current file system intact(no changes)”. Then press enter then setup will starts. After some installation computer will restart. Just before restarting it will show message“remove any diskettes in drives”. Then remove c.d from the drive and restart the computer. Then the computer again installing files after restart. Now again put the cd in cd drive while installation is going on.

After some windows xp installation it will show “Regional and language options”. Just click next. Now it will ask your name and organization. Give the details and click next. Now give the product key and click next. It will ask computer name and password. Give the name and click next. Then give the Time Zone settings,Date & time settings then click next. Then it will install network card software. After some time it will show network settings. Select typical settings and click next. It will ask workgroup. If your computer is on a network then give your workgroup name and click next. Again installation is going on. After some windows xp installation it will again restarts.

Now welcome to Microsoft windows screen come. Click next. Then computer will check for internet connectivity of your computer and gives two options 1. DSL 2. LAN. Choose your appropriate option and give IP address,Subnet mask,Gateway etc., details and click next. Then it will come to registration screen. Registration is optional. So choose whatever option you like and click next. Then it will asks your name and also names of users to this computer. Give those details and click next. Finish screen come. Click finish.
So you just completed windows xp installation.

How to configure Bsnl Broadband internet connection to single computer and to multiple computers for any Windows O.S ?

Bsnl Broadband configuration to single computer:
The department will do all the wiring connectons of ADSL modem,Splitter etc. I will roughly tell about the wiring connections we have to do for getting internet.

My modem is Huawei Smart Ax MT 880. Spiltter is common to all. Now I will roughly tell the wiring connections.

On the back panel of Huawei MT 880 you can observe power suppy point,power on/off button,ethernet port and adsl port.

Splitter has two ports on one side. From one of the ports connect a RJ-11 Telephone cable to adsl port of the Modem. From the second port connect a RJ-11 Telephone cable to our phone instrument.

Splitter has another port on other side. From this port connect a RJ-11 telephone cable to RJ-11 socket.

Connect LAN cable from Ethernet port of Modem to Ethernet port of your computer. Give power supply to modem through the adaptor.

P.C configuration:
Right click My Network Places(In Windows XP My Network Places,In win98 Network Neighbourhood) then select properties. You will get Local Area Connection properties like this.


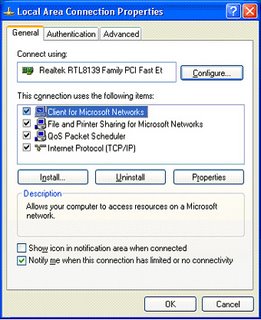
Double click Internet Protocol(TCP/IP). Then you will get TCP/IP properties like this.


Select Use the following IP Address and set the IP address to 192.168.1.x(x is any number between 2 to 255). I have entered IP Address as 192.168.1.7 Now enter Subnet Mask 255.255.255.0,Default gateway 192.168.1.1,Preferred DNS server 61.1.96.69,Alternate DNS server 218.248.255.145.
Note: For Preferred DNS server you can also use 192.168.1.1 instead of 61.1.96.69.

Click OK.

Huawei MT 880/MT 882 CPE Configuration:
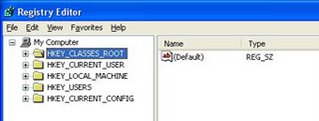
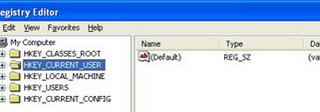
Open internet explorer and type the url http://192.168.1.1 then press enter. You will get like this on the screen.


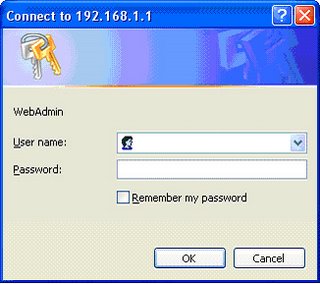
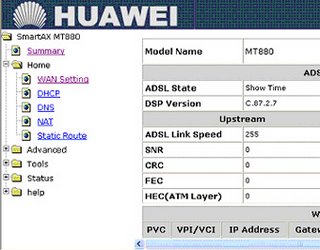
Type user name admin and password also admin then click OK. Then you will get Smart AT 880 window like this.


On the left panel click on HOME then click WAN Setting. You will get window like this.


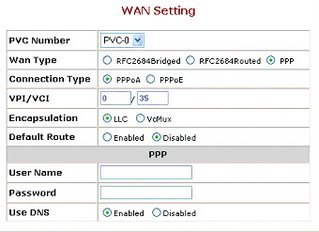
Now locate the parameter Wan Type then select PPP.
Select connection type as PPPOE.
Select the Default Route Enabled.
Enter the User Name and Password provided by Bsnl.
Click on Apply.
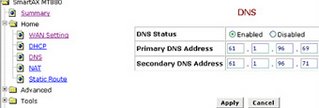
Click on DNS then enter Primary DNS Address 61.1.96.69 and Secondary DNS Address 218.248.255.145 as below.


Next On left panel select Tools then select System Setting. Click on Save & Restart as shown below.


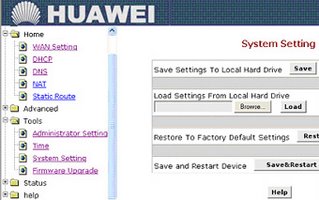
You have completed your Modem Configuration for bsnl broadband internet. It is so simple. Any one can do it.

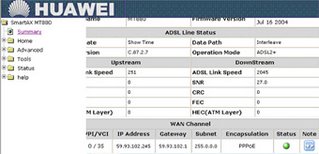
On the left panel if you click Summary then you will observe Green light glowing telling the status of PPPOE like this.


How to share the internet connection among more than one Computer?

Just connect LAN cable from Ethernet port of ADSL Modem to a HUBs first port instead of P.C. All P.C's will be connected to Hub through LAN cables. Configure TCP/IP Settings in all the P.C's with IP address in the range(192.168.1.2 to 192.168.1.255),Default Gateway as 192.168.1.1,Subnet Mask as 255.255.255.0,Preferred DNS server as 61.1.96.69,Alternate DNS server as 218.248.255.145. Remember one important thing that is all computers in LAN must have same workgroup. So set Unique workgroup to all of the computers in the LAN

NOTE: The above configuration settings are same in all Windows operating systems. No PPPOE software is required even for win98 also. So you can configure win98 also as above for internet.

I have explained configuration of Huawei MT882/MT 800 models only. Now I will Briefly explain the configuration of other ADSL Modems. Configuration of other models is also same as above with slight difference.

Dare Global DB 108 ADSL Modem Configuration:

Open the browser and enter the url http://192.168.1.1. Enter user name admin,password admin in login window. Next click on WAN on left panel. Look for the connection with VPI 0 and VCI 35 (pvc-0-35) then click on EDIT button. Then follow the configuration wizard. Select connection type as PPPOE. Enter Dataone user name and password. Click on next and complete the wizard. Finally click on Reboot button on left panel.

Huawei WA1003A Wi-Fi ADSL Modem configuration:

Open the browser and enter the url http://192.168.1.1. Enter user name admin,password admin in login window. Next click on SETUP on menu bar and then click on PVC0 on left panel. Now select the connection type as PPPOE. Enter your dataone user name and password and click on APPLY.

Wi-Fi security Configuration:
Click on ADVANCED on menu bar then select Wireless Security. Select WEP and tick the check box Enable wep Security. Enter the encryption key. You have to enter only hexadecimal numbers 1,2....9,a,b,c,d,e,f and click on Apply. Now click on TOOLS on menu bar ,select System Commands then click on Save all.

Huawei MT 841 ADSL Modem configuration:

Open the browser and enter the url http://192.168.1.1. Enter user name admin,password admin in login window. Click on Basic next Connections on left panel. If you are configuring the modem first time then you have to delete the existing PVC0. For doing this click on EDIT icon(this icon is in the column Note),then scroll down the page and click on delete.

Now click on NEW then enter VPI/VCI value as 0/35,then enter dataone username and password. Click on APPLY. Save the configuration by clicking on Save All on left panel.

Wi-Fi security Configuration:
Click on WLAN on left panel then select WEP. Enter the 13 digit WEP key. You have to enter only hexadecimal numbers 1,2....9,a,b,c,d,e,f and click on Apply. Save the configuration by clicking on Save All.

Huawei MT 800 ADSL Modem configuration:

Open the browser and enter the url http://192.168.1.1. Enter user name admin,password admin in login window. Select and click on ATM Settings on left panel. Locate the parameter Connection Type and select PPP. In the next line select PPPOE. Scroll down the page then enter dataone user name and password and click on Submit. Click on Save & Reboot on left panel. First select Save and click on Submit. Next select Reboot and click on Submit again.

Note: We have configured Wi-Fi Security feature in Huawei WA 1003A and Huawei MT 841 Modems. We have to configure Wi-Fi Security feature in the P.C also. We can configure like this.

Wi-Fi configuration in PC:

Open properties of Wi-Fi Connection in PC. Select the tab Wireless Networks then select the Wi-Fi network name(normall modem model name is the network name) then click on properties. Look for field Data encryption and network ID,select WEP as Data Encryption and enter the network ID which you have entered in ADSL Modem configuration as encryption key.
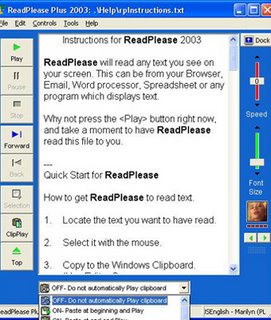
Bsnl Broadband(Dataone) Internet connection Details


For Bsnl broadband connection customer requires Bsnl landline phone,Computer with operating system Linux/win98/winnt/win2000/win xp or higher. You will get maximum speed from Win XP with memory greater than 64 mb. Your computer must have LAN card.

The department supply one ADSL Technology Modem(also called CPE),Splitter,LAN cable,a small RJ-11 Telephone cable and modem adapter. Generally when internet is coming from landline phone then there is noise in the line. So we can not talk with others,cannot receive calls when net is coming from the phone. When we use splitter we can talk with others,can receive calls,when net is coming from the phone. Splitter cancels the noise in the line and separates Voice and Data signals so that we can use the same internet phone for receiving calls and for making calls to others.

Generally bsnl supplies the following CPEs(Modems)
Type 1: Huawei MT 800, Huawei MT 880, Huawei MT 882,DareGlobal DB 108 models. All these models have one Ethernet port and one USB port.

Type 2: Huawei WA1003A. This model has one Ethernet port,one USB port and Wi-Fi module for security purposes.

Type 3: Huawei MT 841. This model has four Ethernet ports,one USB port.

Type 4: Huawei MT 841 with Wi-Fi. This model has four Ethernet ports,one USB port and Wi-Fi module for security purposes.

Bsnl Broadband is based on ADSL Technology. It uses PPPOE protocol for authentication and accounting the user access. The ADSL Modem supplied by bsnl is a multifeatured powerful router. This ADSL Modem can be configured in two modes.

Bridge Mode:
All ADSL Modems by default come with Bridge Mode setting. This is factory's default setting. All these modems uses PPPOE protocol. So we have to install PPPOE client software on our P.C. This software is inbuilt with Windows XP. So for Windows XP systems we need not require this software. But for Other operating systems we require this software. Some PPPOE client softwares are available on the internet for free.

PPPOE Router Mode:
In this mode there is no need to install PPPOE client software on our P.C. This software is inbuilt in modem. In order to get internet we have to give some settings in ADSL Modem and also we have to give some settings to TCP/IP properties of our P.C. In my next article(Bsnl Broadband Configuration) I will clearly explain those settings to you. It is very simple. You can also do the settings to your P.C after reading that article.

In PPPOE Router mode the modem works as a Router and the PPPOE session terminates on WAN port of Router(For understanding Router please read my article “Local Area Network” under NETWORKING section in the same blog). In this mode we can use the advanced features of Router and powerful diagnostic tool for trouble shooting the connection problem. This mode has got all the advanced features like Firewall,IP Address lists,VPN Pass through,NAT,Port Forwarding.

Bsnl Broadband Tariff details:
The following charges are common to all home and business users.

Registration Fees: Rs 100

Installation Charges: Rs 250

Type I Modem Rs 1200,Type II Modem Rs 1800,Type III Modem Rs 1200,Type -IV Modem Rs 1800

Note: Telephone rental as usual.

Home Plans:

Start Up Plan 250:
Bandwidth: 256 Kbps
Monthly charges: Rs 250
Download/upload Limit per Month: 1 GB
Additional usage charges/MB: Rs 0.90
Security Deposit: NIL
Night Unlimited(0200-0800 Hrs): Not available

Home 500 Plan:
Bandwidth: 256 Kbps
Monthly charges: Rs 500
Download/upload Limit per Month: 2.5 GB
Additional usage charges/MB: Rs 0.80
Security Deposit: NIL
Night Unlimited(0200-0800 Hrs): YES

Home 1000 Plan:
Bandwidth: 384 Kbps
Monthly charges: Rs 1000
Download/upload Limit per Month: 5 GB
Additional usage charges/MB: Rs 0.80
Security Deposit: One Month plan charges
Night Unlimited(0200-0800 Hrs): YES

Home UL 900:
Bandwidth: 256 Kbps
Monthly charges: Rs 900
Download/upload Limit per Month: Unlimited
Security Deposit: One Month plan charges

Business Plans:

Business 700 plan:
Bandwidth: 256 Kbps
Single/Multi user: SU
Monthly charges: Rs 700
Download/upload Limit per Month: 4 GB
Additional usage charges/MB: Rs 0.80
Security Deposit: One Month rental

Business 1200 plan:
Bandwidth: 256 Kbps
Single/Multi user: SU
Monthly charges: Rs 1200
Download/upload Limit per Month: 8 GB
Additional usage charges/MB: Rs 0.80
Security Deposit: One Month rental

Business 3000 plan:
Bandwidth: 512 Kbps
Single/Multi user: MU
Monthly charges: Rs 3000
Download/upload Limit per Month: 20 GB
Additional usage charges/MB: Rs 0.50
Security Deposit: One Month rental

Business 5000 plan:
Bandwidth: 1 Mbps
Single/Multi user: MU
Monthly charges: Rs 5000
Download/upload Limit per Month: 35 GB
Additional usage charges/MB: Rs 0.50
Static IP Address(on request): ONE
Web hosting space(on request): 5 MB
Domain Name(on request): ONE
Security Deposit: One Month rental

Business 9000 plan:
Bandwidth: 2 Mbps
Single/Multi user: MU
Monthly charges: Rs 9000
Download/upload Limit per Month: 75 GB
Additional usage charges/MB: Rs 0.50
Static IP Address(on request): ONE
Web hosting space(on request): 5 MB
Domain Name(on request): ONE
Security Deposit: Rs 5000

Most Important Facts you have to remember:

Any data transfer whether it is browsing,mail.chat,voice etc, is counted as download and similarly upload also.

With 1 GB(1024 MB) download limit we can do the following:

An average web page is about 50 kb in size. So we can visit 20,000 web pages for 1GB.

An hour of web surfing will be around 10 MB(with out any other downloads from those pages). So we can surf for 100 Hrs for 1 GB.

An hour of streamed radio will use about 15-20 MB.

An hour of streamed Video will use about 100-150 MB.

An hour of Online game will use about 10-15 MB

We can send 100000 e-mails(without any attachments) for 1 GB limit.

We can download around 350-500 High resolution images(each 2 t0 3 MB size) or 350-500 MP3 Music files for 1 GB limit.


How to make a network printer?


Start the computer to which printer is connected. Swich on the printer also. Now from control panel select “printers and other hardware”. Now select printers & faxes. Now you will find your printer icon here. Right click on the printer icon. You will notice sharing option. Click sharing. Now click “if you understand the security risks but want to share printers without running the wizard,click here”. Now click “just enable printer sharing”. Now click “share this printer”. Then a name appears in share name box. Remember that name. Now click apply then click o.k. Now your printer is ready for sharing on the network. Now hand symbol appears under the printer icon.

Now for connecting this printer to another computer on the same network,first on that client computer. Then Click the start button and open printers and faxes. Then you will find “Add a printer” wizard on the top left corner of the window. Click add a printer. Then click next. Select “a network printer,or a printer attached to another computer” radio button. Now click next. Select “browse for a printer” radio button. Click next. Then in that screen you will find the name of the main computer to which printer is connected. Just double click that. Then you will find the printer name. Select that name and click next. It will give a message “Would you like to continue? Yes or NO”. Click YES. Now click finish. Now printer icon is available in the client computer also. You can give print command from this computer also.

Sunday, November 19, 2006

What are peer to peer,server based networks?


Peer to Peer Networks:

In peer to peer networks each station on the network treats each other station as an equal or peer. This is also called a workgroup.There is no specialized server which provide internet connection sharing,file,print,mail,fax,web,dns,dhcp,database,certificate,
firewall,application,communications,remote access services to all the other stations.

Any printer,hard drive,CD drive,floppy drive, or scanner located on any one station can share access with all the other stations on the network. When you share a resource,such as a printer then the computer that shares the resource becomes the server and the computer that accesses the shared resource becomes the client. In peer to peer networks we can both share resources and access shared resources equally. Our computer can be both a server and a client at the same time.

In peer to peer networks there are generally 10 or fewer workstations. Users act as their own administrator and security. There are security features in peer to peer networks also which will allow you to grant or remove access to shared resources on your computer. Limited growth in peer to peer networks.

Served Based Networks:

These networks have specialized servers which provide internet connection sharing, file,print,mail,fax,web,dns,dhcp,database,certificate, communications,firewall,
application,remote access services to all the other stations. Server based networks supports many users. We can get greater security in server based networks. We can have central administration,centralized backup in server based networks.

Note: Articles on Windows NT,Windows 2000 Server,Windows 2003 Server will come soon on my blog under the same NETWORKING section.

Download Rediff Bol 8.0


With new Rediff Bol 8.0 you can also talk with your friends and family in addition to send SMS messages and instant messages to them.

The new Rediff Bol 8.0 has new feature TALK and SEE. This feature allows you to see and be seen by the person you are chatting with. You can send talkies with Rediff Bol 8.0. You can create your persona with Avatars with Rediff Bol 8.0.

The new Rediff Bol Now in Hindi also.

Download New Rediff Bol 8.0

Author: Rediff.com


Download Yahoo Messenger with voice(8.1)


You can call your friends for free with PC to PC calling in yahoo messenger. Add a friend and then we can talk for hours for free with our friends by just clicking the call button in yahoo messenger. All PC to PC calls world wide are free.

PHONE IN
If we sign up for Phone In then we can receive calls on our computer. We can get own personal phone number for 2.49 dollars per month. If anybody calls that number it rings to our computer. Then we simply click Accept Call and start talking. If we are not online then calls go to voice mail. We can check them anytime for free.

PHONE OUT
If we sign up for Phone Out then we can make calls to landlines and mobile phones. Calls are easy to make,manage and customize around how you phone. Get started for as little as 10 dollars prepaid credit. PC to Phone call rates start as low as 1 cent per minute in the U.S. For London,Canada also call rate is 1 cent per minute. Beijing,Madrid call rate is 1.5 cent per minute. Tokyo,Mexico call rate is 1.9 cent per minute. Bangalore call rate is 9.9 cent per minute. For other countries call rates and for full details visit the following site.

Download Yahoo Messenger 8.1 with voice

Author: Yahoo


Get new Internet Explorer 7.0


Microsoft designs Internet explorer 7.0 with new look and simple.

Internet explorer introduces Tabbed Browsing. With the help of Tabbed Browsing we can open multiple windows in one internet explorer window. Navigation was improved through Tabbed Browsing.

We can search the web from the toolbar of Internet Explorer. We can use our favourite search engine to search the internet.

All of us know that RSS Feeds deliver Latest News and information to us. Internet explorer supports RSS Feeds. So now we can subscribe to RSS Feeds through Internet explorer 7.0 and can get latest news and information.

Internet Explorer 7.0 supports advanced printing. It automatically shrinks text for improved printing so that all the content fits on final printed page. Print options include adjustable margins, customizable page layouts, removable headers and footers, and changeable print space.

Internet Explorer 7.0 has improved security features. Internet Explorer 7.0 provides security through a robust new architecture. Internet Explorer's security features protect you against malicious software like spyware,adware etc. Your personal data will be safe with these new security features.

Inorder to install Internet Explorer 7.0 You must have Licensed O.S

Download Internet Explorer 7.0

Software Developer: Microsoft

GTA Vicecity Stories(PSP version) Details:


GTA Vicecty stories is the newly released PSP GTA game. GTA Vicecity stories offers a significant improvement over GTA Liberty city stories released in last year on PSP. The new title Vice city stories offers lengthy missions with multi objectives. This game has 10 multiplayer modes. Six players can play via adhoc,no online play.

Victor Vance is the hero of the game. He is the brother of Lance Vance of old GTA Vice city character. At First he worked in military under a corrupted, psychotic commanding officer. He picks up drugs for his commanding officer and do illegal activities for his officer. After some time he thrown out of army. Then he enters the crime world and do all the things like the other GTA Series hero's.

In this game we can find improved water effects than any other GTA series game. We can find variety of missions in this game. Like the other GTA games we can find weapons,vehicles,Radio stations etc. we can have new vehicles like peppy jet-ski,off-road ATV etc, in this game.This game has excellent graphics than GTA Liberty city stories. Soundtrack is excellent with tunes from the 80's. You can find more than 100 songs of 80s glory. Overall we can give 9 out of 10. Every PSP owner must own this game. Remember one thing,this game doesnot move the series forward in any meaningful way. I think GTA 4 will move the series forward in a meaningful way. All we wait for GTA 4.


Saturday, November 18, 2006

What is IP Address and Subnet Masks?


IP Address is the set of numbers which uniquely identifies the machine on a network and the network to which it is attached. IP Address identifies the machine's connection to the network but not the machine itself. When a machine's location on the network changes,the IP address also changes. TCP/IP uses this 32 bit IP Address to identify a machine on a network and the network to which it is attached.

The machine on a network is called as Host. Each TCP/IP host is identified by a unique IP Address. Internally each IP Address is separated into two parts network ID and a Host ID.

The network ID identifies a single network segment within the larger internetwork. Internetwork is a network of networks. All machines that are access to the same network have a common network ID. The host ID identifies a TCP/IP node within each network. A node may be a workstation or server or router or other TCP/IP device.

IP Addresses are four sets of 8 bits,totally 32 bits. IP Addresses are usually expressed in decimal notation instead of long binary strings. These 8 bit octets are converted to decimal numbers and separated by periods. For example 192.168.1.2 is an IP Address.

There are 5 IP Address classes. Out of these 5 three classes are used for assignment to TCP/IP nodes. They are Class A,B and C.

The IP Address class defines which bits are used for network ID and host ID parts of each address. It also defines howmany networks and hosts per network can be supported.

For example p.q.r.s represent the four octet values in any IP Address.

For Class A the value of p is 1-126. First octet p represents network ID. The remaining 3 octets q.r.s represents Host ID. Class A supports 126 networks and 16,777,214 hosts per network.

For Class B the value of p is 128-191. First two octets p.q represents network ID. The last two octets r.s represents Host ID. Class B supports 16,384 networks and 65,534 hosts per network.

For Class C the value of p is 192-223. First three octets p.q.r represents network ID. The last octet s represents Host ID. Class C supports 20,97,152 networks and 254 hosts per network.

Subnet Masks:

Subnet Mask is also a 32 bit number. Subnet Mask identifies Network ID and Host ID parts within the IP Address. Subnet Mask uses bit groups of all ones to identify the network ID and uses bit groups of all zeroes to identify the Host ID parts of an IP Address.

For example take IP Address 192.168.1.2 The value of first octet is 192. So this is Class C IP Address. p.q.r represents network ID and s represents Host ID. So for above IP address network ID is 192.168.1 and Host ID is 2.

For the above IP Address Subnet Mask number is 11111111 11111111 11111111 00000000 In decimal notation it is 255.255.255.0

For Class A IP Address Subnet mask is 255.0.0.0
For Class B IP Address Subnet mask is 255.255.0.0

Note: Articles on Windows NT,Windows 2000 Server,Windows 2003 Server will come soon on my blog under the same NETWORKING section.

What is TCP/IP Protocol?


Protocol is a pre defined set of rules. When nations conduct business between them then they follow certain rules so that everything proceeds smoothly. Similarly if one computer is communicating with another one then they both must follow a pre defined set of rules called protocol. If they follow the protocol properly then only message will be transferred from one machine to other,regardless of what type of machines they are and what operating systems they run. Communications are possible with the help of a software that can manage the protocol. That software is nothing but TCP/IP.

TCP/IP is a software based communications protocol that provides network services such as remote logins,remote file transfers, and electronic mail. It transfers information from one machine to another. It provides reliable transfer of data. TCP/IP handle errors in transmission.manage the routing of data,manage the delivery of data and control the transmission by the use of predetermined status signals. TCP/IP was designed with layers. TCP/IP responsible for assembling data passed from higher layer applications into standard packets and ensuring that the data is transferred correctly.

TCP/IP is a combination of two protocols transmission control protocol and Internet protocol. Internet protocol is responsible for moving the packets of data assembled by TCP across networks. It uses a set of unique addresses(IP Addresses)for every device on the network to determine routing and destinations. Internet protocol main tasks are addressing of datagrams of information between computers and managing the fragmentation process of these datagrams. The protocol has a formal definition of the layout of a datagram of information and the information of a header composed of information about the datagram. IP is responsible for the routing of a datagram and determines where it will be sent .

IP does not guarantee datagram's delivery. It has no reliability. It simply handles the routing of datagrams. If problem occurs IP discards the packet and generate an ICMP error message to the sender. But TCP takes the charge if problems occur. TCP provides reliable transfer of data. TCP is responsible for ensuring the transfer of a datagram from the source to the destination machine and receive acknowledge receipt of the datagram from the destination machine.

Note: Articles on Windows NT,Windows 2000 Server,Windows 2003 Server will come soon on my blog under the same NETWORKING section.

What is a Wide Area Network?


Introduction:

A set of computers and peripherals connected together by a medium is called a network. All these devices on the netwok communicate with each other through a protocol. All these devices on a netwok can be in the same room or scattered through a building or scattered in different buildings or different cities. All these devices can be separated by many miles by the use of dedicated telephone lines or microwave etc.

Peripherals are nothing but Printers,Scanners,Modems,Plotters etc.
Protocol is a predefined set of rules.

Wide area network:

If these devices on a network are scattered in different buildings,or different cities and these devices setup into several LAN's that are joined together into a larger structure called a Wide area network(WAN).

A Wan is composed of two or more Lan's. All these Lan's joined by a telephone line or dedicated cable. One or more machines act as the link between each Lan and Wan. These linking machines are called gateways. Depending on tasks perfomed by these linking machines,they are also called as Router and Bridge.

We all know Internet is not a single network. Internet is a collection of networks that communicate with each other through gateways.Gateways act as a relay between networks. It passes data from network to network searching for a destination address. Networks talk to each other through gateways. Gateways perform protocol translation from one network to another.

Bridge connects two or more networks that use the same protocol.

Router forwards datagrams around the network.

Note: Articles on Windows NT,Windows 2000 Server,Windows 2003 Server will come soon on my blog under the same NETWORKING section.

What is a Local Area Network?


Introduction:

A set of computers and peripherals connected together by a medium is called a network. All these devices on the netwok communicate with each other through a protocol. All these devices on a netwok can be in the same room or scattered through a building or scattered in different buildings or different cities. All these devices can be separated by many miles by the use of dedicated telephone lines or microwave etc.

Peripherals are nothing but Printers,Scanners,Modems,Plotters etc.
Protocol is a predefined set of rules.

Local Area Network:

If the devices on a network are located in a single place such as a building or a group of rooms,they are called a local area network. Usually all these devices on the network are connected by a single type of network cable in Lan's.

LAN Topologies:

The main dominant Lan topologies are Bus,Hub(Star) and ring.

Bus Topology:

Bus network consists of a single linear cable called a Bus(or Backbone). Each device is attached to this backbone through a junction box or transceiver. From each transceiver another short cable runs to the device's netwok adapter. Signal bounce is eliminated by a terminator at each end of the bus. Barrel connectors can be used to lengthen the cable. For regenerating signals Repeaters are used.Each device has a special address. Data is sent to all devices on the backbone. Each device examines every packet and accepts only messages addressed to them.

Main advantage of bus network is that it allows for a high speed bus. But performance degrades when more devices are added to the bus. Bus topology is good for small network. The entire network goes down if the backbone goes down.

Hub Topology:

This network uses a main cable called the backplane. From the backplane set of cables goes to hubs. All devices are connected to the ports of these hubs. We can set up small hub network with standard Ethernet cables. Also we can set up large hub network by using a high speed fibre optic backplane.The hub networks are easy to set up and maintain.

In this network all devices are connected by cable segments to a centralized hub. Signal travels through the hub to all the computers. The network functions normally if a computer goes down. This network requires more cable.

Ring Topology:

All the devices are connected on a single circle of cable. No termination required as in Bus topology. For regenerating signals no repeaters are used. The computers act as repeaters. The Ring networks are easy to set up and maintain.

Note: Articles on Windows NT,Windows 2000 Server,Windows 2003 Server will come soon on my blog under the same NETWORKING section.

How to make stock charts open in www.nseindia.com,www.bseindia.com and any other Web sites for Windows Xp users?


For any serious stock investor stock charts are very important. Before buying or selling stocks,stock investors analyze stock charts. After analyzing the charts they will take decision whether to buy,sell or not. So stock charts are one of the key points at the time of buying or selling stocks.

Unfortunately for Windows Xp users stock charts are not opening from nseindia.com,bseindia.com and some other sites. By default Win Xp is bundled with internet Explore 6.0. Unfortunately Sun Micro systems withdrawn support of J2SE Runtime Environment(JRE) to Win Xp. So java applications like stock charts are not opening for windows Xp users.

We have to download that software JRE 5.0 Update 9 for running stock charts. Go to http://java.sun.com site. On the main page you will find Downloads tab. Click downloads. Under Java technology click java SE. In this window you will find Java Run time environment(JRE) 5.0 Update 9. By the side of it you will find Download button. Just click it. In this window click the radio button “Accept license agreement”. Below this button you will find Windows Platform - J2SE Runtime Environment 5.0 Update 9. Below this you will find two files. You can download any one of the two files.

First file will download complete(JRE) 5.0 Update 9 software. After downloading this file you can install it.

Where as second file downloads only application file(245.76 kb). First download it. Then double click that file and install JRE from net. So while installing your computer must be connected to internet.

Thank You for visiting my Blog.

HAPPY INVESTMENT

Submit Site to Google,Yahoo,MSN Search and all other Search Engines. Submission is Free and Easy


Open www.google.com. At the top right hand corner of the page you will find Sign in link. Click that link. Then Google Accounts page will come. First create Google Account. So click create an account now link. Then it will ask your current email address and ask to choose some password for google account. After giving all details click create my account link.

Then Google will send verification link to your email address. First open your email box and click the verification link then only Google will activate your account. So your account is created.

open https://www.google.com/webmasters/sitemap. Then sign in to your account by giving email and password. Then in your account you will find add site box. Type your website in that box and click OK. It will ask site map also. If you have sitemap then give it. If you donot have sitemap then no problem. Forget about Sitemap. Google will take it's own time for indexing your webpages in Google. It depends on your website type,designing etc.

For one of my websites Google has taken just one day for indexing my pages. I have submitted my second site 5 days back. Still Google kept it in pending. So for this site it will take it's own time for indexing my pages.

Check your account regularly whether your site is accepted by Google or not. I will tell you simple check. Open www.google.com. In the search box type your website and click search. If Google shows your site in search results then your site is accepted by Google. If google does not show your site then your site is still not accepted by Google.

For submitting your site to Yahoo, open http://search.yahoo.com. You will find link at the bottom right corner of the page. Click submit your site link. In that page click submit your site for free link. Then it will ask Your yahoo ID and password. Type your yahoo ID and password and sign in. In that page it will ask submit url. Type your complete url and submit it. In the same page you can submit your site feed also. If you donot know your site feed no problem forget about it. Yahoo also take it's own time for indexing your pages.

For submitting your site to MSN Search open www.live.com site. In Live Search box Type your site and click search. In that page it will give message: we did not find your site. In the same page at bottom you will find link send the address to us. Click that link then type your url and submit it. Very simple. MSN also take it's own time for indexing your pages.

For submitting your site to 100+ search Engines, Open http://www.submitplus.com. In that page you will find links Free Top 10!, Free Best 100! First click Free Top 10! Link. Then type your URL and Email in the given boxes and click submit button. Then your site will be submitted to 10 search engines at free of cost.

Now click Best 100 link. Then in that page you will find select your engines. Click on that and choose pages 1-20. Then in another small window it shows 20 search engines with submit links. Submit your site to one by one by giving the details asked by that particular search engine. But in these lists some search engines are paid sites. So leave paid search engines and submit your site to free search engines. Try to submit your site to all given 100 search engines.If you want to submit your site to some more search engines then do like this. Open http://www.google.com. Then in the search box type search engines then click search. Google will show so many search engines. You just open every search engine site and check for submit your site link. Then submit your site to that particular search engine. This only requires a lot of patience. So you can submit your site to a lot of search engines freely. O.K !