Sunday, August 05, 2007

How to install HP LaserJet 1018 Network Printer from Windows 98 SE?


The HP LaserJet 1018 driver CD that comes with the printer supports Windows 98 SE, Windows ME, Windows 2000, Windows XP 32 bit. Recently HP released Windows Vista Drivers also. When you connect the Printer to a Windows 98 SE machine, You can use the printer driver from the CD. The printer will work perfectly with that driver. Suppose you are in a Lan Network or Peer to Peer network. In that network some machines are running on Windows XP and some Machines are running on Windows 98 SE. Your HP LaserJet 1018 is connected to a Windows XP machine. You can access this printer from all other XP machines easily by Add a Printer Wizard. Also you can access this printer from Windows 98 SE machines by Add Printer Wizard. But no prints will come from the printer, if you have given prints from Windows 98 SE machines. I will explain the reason to this problem also give the solution to this problem.

During network printer installation from Windows 98 SE, in Add Printer Wizard you have to select the printer manufacturer and printer model. But HP LaserJet 1018 is one of the latest LaserJet printers from HP. So in Windows 98 SE Add Printer Wizard we can not find this model. This is the problem. Solution is also simple. You have to add this model during Add Printer Wizard. Now I will explain the solution in detail.

Put your HP LaserJet 1018 printer CD in CD drive of your Windows 98 Se machine. Open it. You will find so many Language drivers in the CD. Just open English folder. Now copy Driver folder and paste it into your C or D or E or any local drive. For example put it in E drive.

Start the main computer (XP machine) to which printer is connected. Swich on the printer also. Share your printer as explained now. From control panel select printers and other hardware. Now select printers and faxes. Now you will find your printer icon here. Right click on the printer icon. You will notice sharing option. Click sharing. Now click if you understand the security risks but want to share printers without running the wizard,click here. Now click just enable printer sharing. Now click share this printer. Then a name appears in share name box. Remember that name. Now click apply then click o.k. Now your printer is ready for sharing on the network. Now hand symbol appears under the printer icon.

Start your Windows 98 SE client computer. Open control panel of your Windows 98 SE machine. Now open Printers folder. Now click Add Printer. Now Add Printer Wizard will start. Now click Next. Now select Network printer then click next. Now browse for your Network printer then click O.K. Now it will show network path of your printer. Just click next. Now it will show list of printer manufacturers and printer models as shown below.


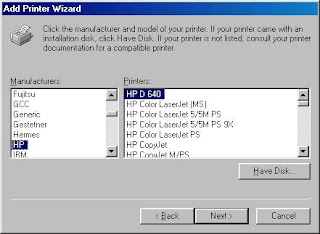
Now click Have Disk. Now browse for Driver folder in E drive (This Driver folder is already copied to E drive). Then click O.K. Now Add Printer Wizard will show HP LaserJet 1018 under Printers. Click next. Then click Finish. Now Add Printer Wizard will install the driver. Now you will get HP LaserJet 1018 printer icon in Printers folder of Control panel. This finishes your network printer installation from Windows 98 SE. Now you can get prints from your client computer.


XnView


XnView is a Free Software utility for viewing and converting graphic files. XnView is very simple to use. XnView supports more than 400 graphics formats. XnView can capture your desktop. XnView can import ClipBoard content also. You can get EXIF data of your digital camera images with XnView. XnView has more features than other Image Viewer related softwares.

How to capture your screen with XnView?
Whenever you run XnView program, XnView Browser window will open. From Tools menu select Capture screen. Then Capture Setup window will open as shown below.


Now you can set Capture Desktop or an active window, or a window. Also you can select Open in XnView or a Directory in your computer to save the captured image. If you select Open in XnView then the captured image will be opened by Xnview automatically, after the image has been captured by XnView. After XnView opens the image, then you can save it in any folder.

How can you Resize, rotate, or crop an Image with XnView?
Run XnView program. Now XnView Browser window will open. Now open an image in your computer by selecting Open from File menu. Then XnView will open the the image in XnView's Image Viewer. Image Viewer contains all the menus of XnView browser, and also two extra menus. They are Image and Filter menus. You have Resize, rotate options in the Image menu. For cropping the image, drag a rectangular marquee on the image then select Crop from Edit menu. Now you will get the image in the rectangular marquee.

Also you can apply so many Filter Effects to the image by selecting Effects from Filter menu.

How can you get EXIF data of your digital camera images with XnView?
EXIF stands for Exchangeable Image File Format. Digital Cameras stores valuable information in EXIF format in Jpeg image files. This information is very useful to camera owners.

The information stored in EXIF format includes Camera Model, Manufacturer, Resolution, Exposure Time, F- Number, ISO Speed ratings, Date taken, Date digitized, Maximum Aperture, Flash status, Focal length, Contrast, Saturation, Sharpness and many more.

After reading the above data for each Jpeg image, Camera owners can adjust their camera settings, so that they can rectify their mistakes. Camera owners can compare their unsuccessful photos to successful photos easily with EXIF data.

You can get EXIF data of your digital camera images very easily with XnView. Just run XnView program. Now XnView Browser window will open. It will display all of your drives on left hand side. If you click any drive, then XnView will display it's contents on the right hand side. For example if your digital camera images are in F drive, then just click F drive. Then XnView will display all images on right hand side. Now just click an image for which you want EXIF data. Then the preview of that image will appear as shown below.


You will observe EXIF tab in the above figure. Just click that tab. Then XnView will display EXIF data of that jpeg image.

So XnView is an excellent Freeware software. Standard Version, Minimal Version and XnView v1.91.2 Complete (Some Plugins/Addons and NConvert) are available in the download page. Try to get complete version.

XnView supports Windows, Mac OS X, Linux x86, Linux ppc, FreeBSD x86, OpenBSD x86, NetBSD x86, Solaris sparc, Solaris x86, Irix mips, HP-UX, and AIX.

Download XnView