UltraVNC 1.0.3 RC6 Beta version with improved Vista support is available to the public. UltraVNC is a powerful free Remote control software to access distant computers. With UltraVNC you can access your computer or your friends or relatives computers from anywhere in the world. UltraVNC displays the screen of a remote computer on your own desktop via internet or network. You can use your mouse and keyboard to control the remote computer.
If you are in the customer support field, then with UltraVNC you can access your customer's computers and can resolve helpdesk issues remotely. UltraVNC is helpful to IT departments, Remote Computer Support companies, Help desk, Remote demonstration, Remote Computer Access, eLearning, and classroom control.
UltraVNC supports Win 95, 98, Me, NT4, 2000, XP, 2003, Windows Vista.
You have to download UltraVNC 1.0.3 RC6 setup file and UltraVNC 1.0.3 RC6 Addons setup file at the location given below. Addons setup file contains Video Driver and Special Service. Special Service is required for Vista but not necessary. Video driver is for W2000, 2003, XP, Vista. Video driver is optional. Video Driver is used to speed up the remote access. UltraVNC 1.0.3 RC6 is enough for all Windows Operating Systems.
For how to install and configure UltraVNC for remote computer access read the article below.
Configure UltraVNC
Download UltraVNC
Saturday, June 30, 2007
UltraVNC, A Free Remote Control Software
Friday, June 29, 2007
NetMeter 1.1.2 Features
NetMeter is a Freeware net traffic meter. Works on all Windows Operating Systems and free of spyware.
Netmeter Graph displays current UL/DL.
Netmeter Graph displays UL/DL Totals. Inorder to set this right click NetMeter then select Options. Now click Graph tab. Now put tickmark at show UL/DL Totals. Then click apply then click O.K.
Netmeter displays the maximum upload/download value left to the Graph.
We can set Traffic Volume Alert in NetMeter. If the Traffic volume (Upload plus Download) reaches the limit then Netmeter alerts you. Inorder to set this limit right click NetMeter then select Options. Now click Notifications. Now put tickmark at Enable traffic volume alert then type the limit in the box then click apply. Then click O.K. After this setting NetMeter alerts you when you reach the limit.
We can also get Totals, Daily Reports, Weekly Reports, Monthly Reports of our Net traffic.(Upload, Download, UL plus DL). For getting these details just right click NetMeter then select Totals.
Download NetMeter
FeedReader 3.0
FeedReader is a free RSS news aggregation software. FeedReader displays any RSS and ATOM news feed (XML). FeedReader reads, collects, and organizes syndicated Web content, and delivers it directly to user desktops. You can get the latest updates from your favourite websites with FeedReader automatically. No Spyware, no Adware in FeedReader.
Features:
Improved user friendly interface
Grouping headlines by source, date or tag
Powerful filtering and smartfeed engine
Can combine multiple feeds to one feed
Can handle large number of feeds
Can convert normal feed to smart feed and vice versa
Podcasting support
Full Unicode support
Secure (SSL) connection support
Tagging support
Nested folder support
OS Support: Windows 2000/2003/XP/Vista
Download FeedReader
Thursday, June 28, 2007
Are you hearing only sound but no video or only video but no sound?
CodecInstaller detects the audio and video codecs installed on your system. Suppose if you are playing a video file, you could here only sound but no video or only video but no sound. This is due to a codec missing. Here we need CodecInstaller. CodecInstaller analyzes these files and suggests you which codecs those files need. CodecInstaller lists some common codecs also. We can download those codecs from CodecInstaller itself. CodecInstaller is a Freeware.
CodecInstaller contains a MovieLauncher which displays information about the video file and a Play button. CodecInstaller supports avi, mpeg, wmv, wma, ogg, flac, mpc, mp3, mp4, wav, and wx files.

CodecInstaller supports Win98, ME, NT4(Service Pack5), 2000, Windows XP, Windows Vista. But Microsoft .Net Framework 2.0 or higher is required for CodecInstaller to work. For Windows Vista no need to install .Net Framework. It is included in Windows Vista itself.
Download CodecInstaller
Tuesday, June 26, 2007
SpaceTime, The First 3D Browser
SpaceTime is the first 3D Browser. It is available to the public in beta. SpaceTime runs on Windows 2000, XP, Vista with 512 MB Ram, 128 MB 3D card, and 2.4 GHz Pentium 4 or AMD 2400XP+. 3D card is compulsory. SpaceTime runs on 64 MB 3D card also. But it takes more time for loading.
Mainly it has three key features. They are 3D Search, 3D eBay Search, and 3D Tabbed Browsing.
Browsing the Web with this browser is also same as other browsers but with different style. In the address bar type the website address. Then that website will be opened as a small window in the middle of the browser window. Also that particular website will be stored as an icon at the lower part of the browser.

We can maximize the website's window by double clicking the smaller window in the middle of the browser. You can come back to SpaceTime browser window from that particular website by just clicking Go Back button. Now if you open another website then that site will be opened as a small window in the middle of the browser window. This site and the first site will be stored as Icons at the lower part of the browser. We can open any website by using these Icons.
Search Function is the excellent feature of SpaceTime Browser. By using this Search Function we can search Ebay, Yahoo Images, Google Images, and Flickr. We can also get Yahoo Search, Google Search from this Search function. Searching is different from other browsers.
If you want to search the web using Google then do like this. First select Google Search from the Search function. Then type the search word in the box then press enter. Then the SpaceTime browser loads 11 small windows in the middle of the SpaceTime browser window. All we know that ordinary search returns a list of links that we have to click one at a time. Out of 11 windows first window will be same as ordinary search window. So first window displays links relating to the search word. As usual there are ten results in this first window. The remaining 10 windows are nothing but websites of ten results displayed in the first window. Observe the following figure.

In a similar way we can search for Yahoo Images, Google Images, and Flickr Images. We can also search Ebay in a similar manner.
Download SpaceTime
Wednesday, June 20, 2007
Xfire, The Instant Messenger for gamers
Xfire is a free tool whick keeps track of when and where gamers are playing PC games online and lets their friends join them easily. It doesn't matter which online game your friends are playing, which server browser they are using, or which gaming service they are playing on.
You can chat with your gaming friends as you chat in regular Instant Messengers. Xfire supports latest PC games also.
After installing Xfire you have to register a Username. After you got registered with them, enter your username and password then login into your account. Now add your friends to your buddylist, then start online gaming with them. You will get more from Xfire by adding more friends to your buddylist.
See the screenshot of Xfire.

System Requirements:
10 MB hard drive space
Windows 2000, XP, or Vista Operating Systems
Internet Explorer 5 or higher with internet connection(Broadband connection recommended)
Download Xfire
Monday, June 18, 2007
The 10 things a Newbie must know in Windows Vista
1. How to place Computer, Control Panel Icons on the desktop in Windows Vista?
Click the start button. Now right click on Computer then choose Show On Desktop. Similarly click the start button. Now right click on Control Panel then choose Show On Desktop.
Also we can place Computer, Recycle Bin, User's Files, Control Panel, and Network Icons on the Desktop in a simple way as explained below.
Right click on blank area of desktop then select Personalize. On the left hand side you will observe Change Desktop Icons. Click it. Now Desktop Icon Settings window will open. Now select Computer, Recycle Bin, User's Files, Control Panel, and Network. Then click Apply then O.K.
Now all the selected Icons will be present on the Desktop.
2. How to change your Computer Name and WorkGroup or Domain?
Right click Computer then select Properties. Now click System Protection. Then click continue. Now click Compute Name tab. To rename your Computer or Workgroup just click change button. Now type your Computer name, Workgroup or Domain then click O.K. Again click O.K. Then Restart your Computer.
3. How to view Network Computers and Devices in Windows Vista?
Before viewing Network Computers first configure Local Area Connection of all computers properly. Configure them to a unique Workgroup or Domain. Then do like below.
Open Control Panel. Then click Network and Internet. Now click Network and Sharing Center. Now click View Computers and Devices. Then it will display Network Discovery and File sharing are turned off, Click to change. You will observe yellow background behind the above message. So just click click to change. Then choose Turn ON Network discovery and File Sharing. Now click continue. Now click Yes Turn ON network discovery and file sharing for all public networks. Now you will observe all computers in the network when you click View Computers and devices.
4.Where can we find Run, Command Prompt buttons and Device Manager in Windows Vista?
Click Start button. Now click All Programs. Now click Accessories. We will find Run, Command Prompt buttons in Accessories.
For Device Manager just right click Computer then select properties. Now you will observe Device Manager on the top left hand corner of the window.
5. Where can we find Folder Options in Windows Vista?
For Folder Options, open Control Panel. Now click Appearance and Personalization. Now click Folder Options. Now click View menu. Now we have choice to show hidden files and folders or do not show hidden files and folders.
6. How to uninstall a program in Windows Vista?
Open Control panel. You will find uninstall a program under Programs. Just click it. Now it will display all programs. Just click a program. Now click uninstall tab.
7. How can you turn Windows Vista features on or off?
Open Control Panel. Now open Programs. Now click turn Windows features on or off. Now click continue. Now it will display all features like games, IIS, .Net Framework 3.0 etc. To turn a feature on, select it's checkbox. To turn a feature off clear it's check box. A filled box means that only part of the feature is turned on. .Net Framework 3.0 is partly turned on. We can turn on all of it's features also by putting tick marks to all features of .Net Framework 3.0.
8. How to use an older program with Windows Vista?
Open Control Panel. Now open programs. Now click use an older program with this version of Windows under Programs and Features. Now Program Compatibility Wizard will open. Now click next and follow the instructions.
9. How can you change settings of Windows defender in Windows Vista?
Open Control Panel. Now click Programs. Now click Windows Defender. Now click Tools. Now click Options. Then Options window will open. Now you can change settings of Windows Defender as you like.
10. How to Add the Clock Gadget to Windows Sidebar in Windows Vista?
Open control panel. Click Clock, Language, and Region. Now click Add the Clock gadget to Windows sidebar. Now the Sidebar will appear as shown below. It displays Clock, Slide Show, and RSS headlines.
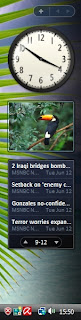
We can also add so many gadgets like Currency Converter, Calender, CPU Meter etc. By clicking plus sign in the above figure we can add so many gadgets.
Saturday, June 16, 2007
Windows Server 2008 Public Beta
Microsoft Windows Server 2008 is the next generation of the Windows Server operating system. Windows Server 2008 builds and based on Windows Server 2003 operating system.
In Windows Server 2008 powerful improvements are made to the base operating system over Windows Server 2003. Powerful improvements are made to networking, advanced security features, remote application access, centralized server role management, performance and reliability monitoring tools, failover clustering, deployment, and the file system.
Download Windows Server 2008 Beta
IZArc 3.81
IZArc is a freeware archive utility. It supports archive formats like 7-ZIP, A, ACE, ARC, ARJ, B64, BH, BIN, BZ2, BZA, C2D, CAB, CDI, CPIO, DEB, ENC, GCA, GZ, GZA, HA, IMG, ISO, JAR, LHA, LIB, LZH, MDF, MBF, MIM, NRG, PAK, PDI, PK3, RAR, RPM, TAR, TAZ, TBZ, TGZ, TZ, UUE, WAR, XXE, YZ1, Z, ZIP, ZOO.
IZArc repairs damaged zip archives. IZArc opens ISO, BIN, CDI and NRG cd image files. Also IZArc converts cd image files from one type to another.
With IZArc you can easily create self-extracting archive that can be extracted easily by double clicking the file. Just right click an archive file. Now select IZArc then choose Create Self-Extracting (.EXE) File.
IZArc converts one archive format to other format. Just right click an archive file. Now select IZArc then choose Convert Archive. Just select the Output format then click O.K.
IZArc supports 256-bit AES encryption to secure your data. IZArc supports multi languages.
IZArc is compatible with Windows 98/NT/2000/XP/2003/Vista (32 bit).
Download IZArc
Friday, June 15, 2007
Vista Codec Package 4.4.6
This is a Free Vista Codec package. This package contains all the Codecs you will need to view all movies and videos. Also you can listen all audio files. So you won't need to install any other Codec package. So uninstall all other Codecs before installing this package.
Recent package changes
Fix MP4 playback
Improve Nero product compatibility
Allow thunbnail views for rmvb, mp4, flv, mov, mkv, more
Remove several redundant files/filters
Fix DVD Playback in WinXP
FFDshow updated 1283 unicode
AC3Filter updated to 1.45b with Language files
Haali components updated to 1.7.189.11
MPEG1 files handled by microsoft decoders
Download Vista Codec Package 4.4.6
Safari 3 Public Beta now on Windows
All of us know that Safari is the browser of Apple Macintosh Computers. Now Apple recently released Safari 3 beta on Windows. Safari 3 supports Windows XP/Vista. This beta version is working fine in Windows Vista with no problems.
Safari is the fastest web browser on any platform. It is faster than Internet Explorer 7 and Firefox 2. It has also the latest features like today's famous browsers. So I won't talk about it's features.
By default you see no status bar in Safari. You can make it visible by selecting Show Status Bar in View menu. Also by default no Home button is present in the toolbar. We can drag home button into the toolbar very easily. Select Customize Toolbar from View menu. Then drag Home button into the Toolbar. Now click done.
The color of Safari's Menu bar, Toolbar, Tab bar, Status bar is almost same as Windows Vista's Taskbar. So Safari's design is best suited for Windows Vista. Once look into the following Figure. You will agree with me.

Thursday, June 14, 2007
Bsnl Broadband configuration (single and multiple computers) for Windows Vista
Bsnl Broadband configuration to single computer:
The department will do all the wiring connectons of ADSL modem,Splitter etc. I will roughly tell about the wiring connections we have to do for getting internet.
My modem is Huawei Smart Ax MT 880. Spiltter is common to all. Now I will roughly tell the wiring connections.
On the back panel of Huawei MT 880 you can observe power suppy point, power on/off button, ethernet port and adsl port.
Splitter has two ports on one side. From one of the ports connect a RJ-11 Telephone cable to adsl port of the Modem. From the second port connect a RJ-11 Telephone cable to our phone instrument.
Splitter has another port on other side. From this port connect a RJ-11 telephone cable to RJ-11 socket.
Connect LAN cable from Ethernet port of Modem to Ethernet port of your computer. Give power supply to modem through the adaptor.
Windows Vista Bsnl Broadband Configuration:
Open Control Panel. Then click Network and Internet. Now click Network and Sharing Center. Now click Manage Network Connections. Now right click Local Area Connection then click properties. Now click continue. Now Local Area Connection properties will be opened as below.
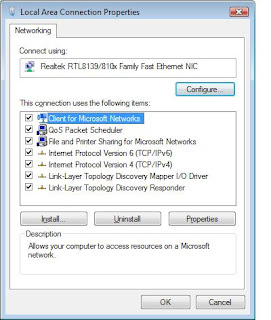
Now double click Internet protocol Version 4. Now configure TCP/IP Properties as explained below.
Select Use the following IP Address and set the IP address to 192.168.1.x(x is any number between 2 to 255). I have entered IP Address as 192.168.1.7 Now enter Subnet Mask 255.255.255.0, Default gateway 192.168.1.1, Preferred DNS server 61.1.96.69, Alternate DNS server 218.248.255.145 as shown in the figure below.

Now click O.K. Again click O.K.
Now you have to configure Huawei Smart Ax MT 880 adsl modem. I already explained about configuration of Huawei adsl modems in one of my articles. In the same article I also explained about sharing the internet connection among more than one Computer. So I won't explain it now. Just follow the link below for adsl modem configuration. Read that article from Huawei MT 880/MT 882 CPE Configuration. You can also get details of sharing the internet connection among more than one Computer in the same article. So follow the Link below for adsl modem configuration and for sharing the internet connection among multiple computers.
Huawei ADSL Modem Configuration
Tuesday, June 12, 2007
Windows Vista Installation
At first in CMOS settings select first Boot device as ATAPI CD-ROM. I already explained about this in my previous article How To Format the Harddisk? If you have any doubt once read that article.
So after setting first boot device as CD-ROM, then keep the Windows Vista DVD in the drive. Now restart the computer. The system will boot from Windows Vista DVD. Now it will display Press any key to boot from CD or DVD. So press enter. Then windows will load the necessary files.
After some time Install Windows screen will come. Now select language to install as English, select your Time and Currency Format as you like, select your keyboard or input method as you like then click next. Now click Install Now button. Enter your product key then click next. Now select the edition of Windows Vista you like and tick at I have selected the edition of Windows that I purchased then click next. Now accept the License terms then click next. Now select Custom (Advanced) installation then it will display all partitions in your harddisk. Now select the partition1 to install Windows Vista. Your partition must be NTFS to install Windows Vista. If your primary partition is FAT then click Drive Options (Read Note at the end). Now click Format. Then warning message will come. Just click O.K.
After completion of formatting partition1 as NTFS(primary) then click next. Now installation starts. The computer will restart after some installation is completed. After restarting again installation will be continued. After some installation again computer will restart. Now type your username then click next. Now type a computer name and choose a desktop background then click next. Now Help Protect Window automatically screen will come. Select your option as you like. Now Timezone window will come. Choose your Timezone then click next. Now click Start. Now Windows Vista will check your computer's performance. After sometime welcome screen will come and Windows Vista will prepare desktop for you. Now you completed Windows Vista installation.
Note: When you click Drive Options then options like DELETE, FORMAT, NEW, EXTEND will appear. By using these options we can delete any partition, format any partition or create new partitions.
Friday, June 08, 2007
Netscape Navigator 9.0 Features
Recently Netscape Navigator 9 released. So many new features are included in Netscape Navigator. Except the new features, other features are same as FireFox. This browser also works same as FireFox but with some new features as explained below. Netscape Navigator 9 is based on the latest Mozilla technologies.
Social Integration
Now Netscape navigator browser is integrated with the famous social news portal netscape.com. So now you can share and vote for webpages you like from Netscape Navigator browser. Just open the website page you want to share. Then you will observe Share button at the top right-hand corner of the address bar of your browser ( Share button will appear for webpages that are not already submitted to Netscape.com). For example open a page you like from my blog in Netscape Navigator 9. Then Share button will be appeared as shown below.

Now click the share button. Then netscape.com page will open asking your username and password. If you are already a member then enter those details( not a member, just signup). Now you will goto your member account. Click the Submit a Story link. Now enter Story URL , Story Title, Story Summary, Choose a Channel, Type 5 Tags or Keywords and then submit the content to Netscape.com. So now it is very simple to share the content you like from websites or Blogs.
URL Correction
Now Netscape Navigator will fix common typing mistakes in URLs. For example if you type www.wikipedia.com then Netscape Navigator will automatically correct the mistake and it will open www.wikipedia.org website. Netscape Navigator will watch for nearly 30 different types of common mistakes and correct them for you.
News
Netscape Navigator now contains News menu. You can get latest news on different topics from News menu directly.
The Sidebars
We know that in FireFox we have Sidebar feature in View menu. But in Firefox Sidebar we will find only Bookmarks and History information only. But in Netscape Navigator's Sidebar (Sidebar option in View menu) we will find the following features as shown in the fig.

We know about Bookmarks, History, Netscape News(From News menu also we will get the same news). With Mini Browser feature we can open websites in the Sidebar as shown in the figure below. Also we can open any link in Sidebar. Just you have to right click on a link and select Open Link in Sidebar.

With Netscape Friends Activity Sidebar, you will know what your friend's are doing on Netscape.com. With Linkpad feature you can save links/URLs that you want to visit later without cluttering your bookmarks. Just drag a link over the Link Pad status bar icon then drop it to save it in the Link Pad. By clicking on an item in the Link Pad will open it in the browser and remove it from the list. Observe the following figure for understanding linkpad.

The Netscape Tracker Sidebar tracks the very latest news from netscape.com.
Extension Compatibility
Netscape Navigator 9 is based on the latest Mozilla technologies. So you can install extensions that are compatible with Firefox 2 in Netscape Navigator also.
Sitemail Notification
This icon will display an exclamation point when you have new Netscape.com sitemail messages waiting for you.
OPML Support
Netscape Navigator support OPML format for sharing lists of newsfeeds.
Stop/Reload Buttions Combined
Since you never need Stop/Reload buttons at the sametime, both buttons are combined as single button in Netscape Navigator.
Restart Netscape
You can restart Netscape Navigator by keeping your current Tabs intact. Just select Restart Navigator from the File menu
Download Netscape Navigator
FireFox 3 (Gran Paradiso Alpha 5) Released
Gran Paradiso Alpha 5 is the next version of current FireFox version. FireFox 3 is built on Mozilla's next generation layout engine, Gecko 1.9.
Gecko 1.9 Alpha 5 introduces several new features like inclusion of the FUEL Javascript library for extension developers, new Page Info window, improvements to offline application support, many Cocoa user interface improvements and bug fixes.
Gran Paradiso Alpha 5 or FireFox 3 is now available for Windows, Linux, and Mac OS X.
Windows Users can download FireFox 3 at the location below
http://download.mozilla.org/?product=
granparadiso-alpha5&os=win&lang=en-US
MAC OS X Users can download FireFox 3 at the location below
http://download.mozilla.org/?product=
granparadiso-alpha5&os=osx&lang=en-US
Linux Users can download FireFox 3 at the location below
http://download.mozilla.org/?product=
granparadiso-alpha5&os=linux&lang=en-US
Windows Users can also download FireFox 3 at the following location
ftp://ftp-mozilla.netscape.com/pub/mozilla.org/firefox/releases/
granparadiso/alpha5/win32/en-US/
In FireFox, I.E 7.0 just type the above address then press enter. Then it will open the site then click Gran Paradiso Setup Alpha 5.exe link.
Wednesday, June 06, 2007
Try PCLinux OS 2007 as an alternative to Vista
PCLinux OS was founded by Texstar. PCLinux OS is a free Linux based operating system for desktop pc's. PCLinux OS was based on Mandriva Linux version and shares many features of Mandriva such as the Control Center and the Draklive Installer.
Features such as kernel 2.6.18.8, KDE 3.5.6, Open Office 2.2.0, Firefox 2.0.0.3, Thunderbird 2.0, Frostwire, Ktorrent, Amarok, Flash, Java JRE, Beryl 3D are included in PCLinux OS 2007.
PCLinuxOS is distributed as a LiveCD. LiveCD mode enables users to test Linux without actually having to install it. Later you can install it to your harddisk, if you like the PCLinux OS 2007 version. PCLinux OS 2007 includes mklivecd script. This script allows you to take a snapshot of current installation settings, applications etc. Also you can save it into an ISO CD/DVD image. This feature works like Norton Ghost.
PCLinux OS is user friendly and very easy to use. So You can try PCLinux OS 2007 as an alternative to Vista.
Download PCLinux OS 2007
Saturday, June 02, 2007
FireFox 3 (codename: Gran Paradiso Alpha 4) now available for Developers and the Testing Community
Gran Paradiso Alpha 4 is the next version of current FireFox version. FireFox 3 is now available for Testing Purposes. FireFox 3 is built on Mozilla's next generation layout engine, Gecko 1.9.
Gecko 1.9 Alpha 4 introduces several new features like inclusion of the FUEL Javascript library for extension developers, new Page Info window, improvements to offline application support, many Cocoa user interface improvements and bug fixes.
Gran Paradiso Alpha 4 or FireFox 3 is now available for Windows, Linux, and Mac OS X in a variety of languages.
Windows Users can download FireFox 3 at the location below
http://download.mozilla.org/?product=
granparadiso-alpha4&os=win&lang=en-US
MAC OS X Users can download FireFox 3 at the location below
http://download.mozilla.org/?product=
granparadiso-alpha4&os=osx&lang=en-US
Linux Users can download FireFox 3 at the location below
http://download.mozilla.org/?product=
granparadiso-alpha4&os=linux&lang=en-US
Windows Users can also download FireFox 3 at the following location
ftp://ftp-mozilla.netscape.com/pub/mozilla.org/firefox/
releases/granparadiso/alpha4/win32/en-US/
Hints for downloading from the above ftp site:
In internet explorer just type the above address then press enter. Now you will observe Gran Paradiso Setup Alpha 4.exe then just copy Gran Paradiso Setup Alpha 4.exe to your hdd
In FireFox just type the above address then press enter. Then it will open the site then click Gran Paradiso Setup Alpha 4.exe link.