Waltham based company Zink Imaging,LLC has developed this Zero Ink Technology. With Zink Technology we will get high quality digital images without Ink catridges or Ribbons or Toners.
The Printer size will become so small with this Technology since no Catrigde or Toner is needed. They are introducing this technology first in Camera Phones and Digital Cameras. This technology can transform any device into a printer. The printer can fit in your pocket.
The key to this printing is the special paper designed by Zink Team. The paper is made up of with dye crystals embedded inside and a polymer overcoat layer outside. The Zink Paper looks like normal white photo paper. At the time of printing the Zink Printer uses heat to activate and colorize these crystals.
For further details meet the Zink Team.
Wednesday, January 31, 2007
Inkless Printing Technology from the Zink(Zero Ink) Team
Internet Protocol Version 6 (IPv6)
Currently we are using Internet protocol Version 4 (IPv4). Most of Today's Internet uses IPv4 which is nearly twenty years old. IPv4 has proven to be robust, easily implemented and interoperable. All we know that each device in a network has it's own unique IP address. IPv4 supports 232 (4,294,967,296) addresses. So it is impossible to give even one address to every living person. In future so many devices will be connected in networks. So there is shortage of IPv4 Addresses in near future. So we must need next generation protocol.
Internet Protocol Version 6 (IPv6) is the next generation protocol. IPv6 supports 2128 (340,282,366,920,938,463,463,374,607,431,768,211,456)addresses. Approximately 5 x 1028 addresses for every living person. 128 bit address space provides 655,570,793,348,866,943,898,599 addresses for every square meter of the Earth's surface. IPv6 is expected to gradually replace IPv4. IPv6 fixes a number of problems in IPv4.
It is expected that IPv4 will be supported alongside IPv6 for the foreseeable future. IPv4 only clients/servers will not be able to communicate directly with IPv6 clients/servers, and will require service specific intermediate servers or NAT PT protocol translation servers.
Features of IPv6:
Larger Address space
The addresses of IPv 6 are 128 bits long. 128 bits can express over 3.4 x 1038 possible combinations. The bottom 64 bits would be used for Mac Address of the network card and top 64 bits would be used for routing purposes.
New header format
The new IPv6 header is twice as large as the IPv4 header. The IPv6 header has a new format which keeps header overhead to a minimum. This is achieved by moving both non essential fields and optional fields to extension headers that are placed after the IPv6 header. The streamlined IPv6 header is more efficiently processed at intermediate routers.
Efficient and hierarchical addressing and routing infrastructure
IPv6 global addresses are designed to create an efficient, hierarchical, and summarizable routing infrastructure that is based on the common occurrence of multiple levels of Internet service providers.
Stateless and Stateful Address Configuration
IPv6 supports both stateful address configuration(address configuration in the presence of a DHCP server) and stateless address configuration(address configuration in the absence of a DHCP server). This simplifies host configuration.
IPv6 hosts can be configured automatically. When first connected to a network, a host sends a link local multicast request for its configuration parameters, if configured suitably, routers respond to such a request with a router advertisement packet that contains network layer configuration parameters.
If IPv6 autoconfiguration is not suitable, a host can use stateful autoconfiguration (DHCPv6) or be configured manually. Stateless autoconfiguration is only suitable for hosts, routers must be configured manually or by other means.
Extensibility
We can extend IPv6 easily for new features by adding extension headers after the IPv6 header. IPv4 header supports 40 bytes of options where as the size of IPv6 extension headers is constrained by the size of the IPv6 packet only.
Network Layer Security
IPsec is an integral part of IPv6. IPsec is the protocol for IP network layer encryption and authentication. This protocol provides a standards based solution for network security needs and promotes interoperability between different IPv6 implementations. IPsec support is optional in IPv4.
Faster Routing Performance
The routing performance is faster in IPv6 by using a simpler and more systematic header structure.
Packet Limit
packets are limited to 64 KiB of payload in IPv4. IPv6 has support for for packets over this limit.
Multicast Addresses
In IPv4 Broadcast addresses are used to send traffic to all nodes on a subnet. In IPv6 there are no IPv6 broadcast addresses. A link local scope all nodes multicast address is used in IPv6 instead of broadcast addresses. A multicast address identifies multiple interfaces. Packets addressed to a multicast address are delivered to all interfaces that are identified by the address.
IPv6 Address Notation
IPv6 addresses are represented in eight groups of four hexadecimal digits separated by colons. In IPv6, the 128 bit address is devided into eight 16 bit blocks and each 16 bit block is converted to a 4 digit Hexaecimal number and separated by colons.
The following is an valid IPv6 Address in colon hexadecimal format.
2001:0db8:0000: 08d3:1319:8a2e: 00ff: 02aa
In binary form the above one is divided along 16-bit boundaries like this
0010000000000001 0000110110111000 0000000000000000 0000100011010011 0001001100011001 1000101000101110 0000000011111111 0000001010101010
The above IPv6 address in colon hexadecimal format can be futher simplied by removing leading zeros in each 4 digit hexadecimal block. But each block must have atleast a single digit. So the above address can be simplied like below.
2001:db8:0:8d3:1319:8a2e:ff:2aa
For example take this address 2001:db8:0:0:0:0:ff:2aa We can further simplify this type of addresses. A contiguous sequence of 16 bit blocks set to 0 in the colon hexadecimal format can be replaced by “::” ,that is double colon. So we can simplify above address like below.
2001:db8::ff:2aa
In URL's IPv6 address is enclosed in brackets as shown below.
http://[ 2001:db8:0:8d3:1319:8a2e:ff:2aa]/
With this type of notation we can not confuse between IPv6 address and port number as shown below.
http://[ 2001:db8:0:8d3:1319:8a2e:ff:2aa]:220/
IPv6 address types
IPv6 addresses are of three types Unicast,Multicast and Anycast.
A unicast address identifies a single interface within the scope of the type of unicast address. Packets addressed to a unicast address are delivered to a single interface.
A multicast address identifies multiple interfaces. Packets addressed to a multicast address are delivered to all interfaces that are identified by the address.
An anycast address identifies multiple interfaces. Packets addressed to anycast address are delivered to a single interface, that is the nearest interface that is identified by the address.
Microsoft has implemented IPv6 protocol for Windows XP SP1, XP SP2, Windows server 2003 family, Windows CE.NET version 4.1 and later. This can be can be installed and uninstalled as a network protocol through the Network Connections folder.
Microsoft has implemented Next Generation TCP/IP stack in Windows Vista and Windows server Longhorn. The Next Generation TCP/IP stack supports the dual IP layer architecture in which the IPv4 and IPv6 implementations share common Transport and framing layers. The Next Generation TCP/IP stack has both IPv4 and IPv6 installed and enabled by default. There is no need to install a separate component to obtain IPv6 support.
Monday, January 29, 2007
Free Online Storage
There are a number of sites on the net , Which gives you a Free Online Storage Place to upload, store, access, and share your personal videos, photos, movies, music, and files. Depending on the site we will get free storage space of 1 MB to 25 GB. I will introduce a few sites that are offering huge amount of free space to their registered users(Registration is free).
www.streamload.com
This site offers 25 GBs of FREE online storage. you can upload, store, access, and share videos, photos, music, files, and work related documents. You can access those files, videos, photos, music, MP3s, and more anytime and from anywhere.
After you register as a member in this site, you will get 25 GB of secure online storage. You can download or Share 1 GB per month. You can send files upto 25 MB in size. For Rules and regulations read their Privacy Policy at their site.
www.eggdisk.com
This site offers 6 GBs of FREE online storage. you can upload, store, access, and share videos, photos, music, files, and work related documents. You can access those files, videos, photos, music from anywhere.
Without Registration also we can upload,share files. But this service allows up to 20MB files. With the registered service you can have up to 100MB filesizes. For Rules and regulations read their Privacy Policy,TOS at their site.
www.freedrive.com
This site offers 6 GBs of FREE online storage. By registering with FreeDrive.com you can upload, share and access your files, including music,Photos and vedios.
www.xdrive.com
This site offers 5 GBs of FREE online storage. By registering with FreeDrive.com you can upload, share and access your files, including photos.
Sunday, January 28, 2007
Live WebCast of Windows Vista and Microsoft Office 2007 Celebration
All we know that Windows Vista and Microsoft Office 2007 will be available worldwide on 2007 January 30.
Bill Gates Celebrates Worldwide Launch of Windows Vista and the 2007 Microsoft Office System on Monday, January 29, 2007. Join Microsoft Chairman Bill Gates for a live webcast celebrating the worldwide launch of Windows Vista and the 2007 Microsoft Office System. The celebration pays tribute to the millions of Microsoft customers, partners and product testers around the world who provided input and feedback on these products.
Schedule of Events on Jan 29, Jan 30
Live WebCast begins at 1.45 pm Pacific Monday,January 29, 2007.
View the Live WebCast
YouTube share ad money to people who upload their own full copyrighted videos
YouTube share it's revenue with people in a couple of months. This offer applies to people who upload their own full copyrighted videos to the YouTube website.
YouTube founded in Feb 2005. It is a consumer media company for people to watch and share original videos worldwide through a Web experience. YouTube started as a personal video sharing service, and has grown into an entertainment destination with people watching more than 70 million videos on the site daily.
With YouTube people can upload,share videos worldwide. People can view millions of videos uploaded by community members. Google bought YouTube in November 2005.
For full details read BBC NEWS
Saturday, January 27, 2007
Download free Gmail Drive
Gmail Drive creates a new drive to your computer under the My Computer folder, allowing you to use your Google Gmail account as a storage medium. You can copy your files to this Gmail Drive. When you copy a file to Gmail Drive then that file is stored as email on your Google Gmail account. All these files are stored in mail attachments. Also you can delete any stored file from Gmail Drive. If you delete a stored file in Gmail Drive then the corresponding mail attachment will be deleted automatically from your Google Gmail account.
All we know that Google is offering email account with a storage space of 2810 MB. So we have plenty of storage space. With Gmail Drive we can easily copy files to our Gmail account and retrieve them again when we need. When we copy a file to Gmail Drive then it generates an email and posts it to our Gmail account.
Download Free Gmail Drive
Friday, January 26, 2007
Google's Build Your Campus in 3D Competition
Simply model your school's campus buildings in Google SketchUp using photo texturing and with a low polygon count, geo reference them in Google Earth and submit them through Google's competition web site http://contest.sketchup.com/entry.php. The top 5 or 7 teams (max 50 people) will win a 3 day trip to Google's Mountain View headquarters to participate in a workshop with 3D modeling experts from Google, get free airfare, hotel and food.
Each team comprised of up to 15 students. The Contest is open to individuals who are at least 18 years old, and who are a student at a college or university in the United States or Canada only. Students who are under 18 years old are eligible to participate in the Contest but will be required to submit a signed parental consent form in order to collect any prize won.
Entries will be judged by a panel of Industry experts from Walt Disney Imagineering, Electronic Arts, Communication Arts Inc., Skidmore, Owings & Merrill, Green Mountain Geographics LTD, HKS Architects, Inc.
The Contest begins at 12:01 a.m. Pacific Daylight Time (PDT) on January 1, 2007 (5:01 a.m. Greenwich Mean Time (GMT) on January 1, 2007) and ends at 11:59 p.m. PDT on June 1, 2007 (4:59 a.m. GMT on June 1, 2007). The names of the prize winners will be available at http://contest.sketchup.com on or about July 10, 2007 for a period up to 30 days.
To enter the Contest, visit the Contest website and complete the online registration form, including, as applicable, registering as part of a team, and follow the instructions to create and submit your campus model in both .skp and .kmz formats. All entries must be in English. The entire campus must be modeled using SketchUp for the entry to be considered for a prize.
Fill up Competition Entry Form
Download Google Sketchup Pro 6
Thursday, January 25, 2007
Industry's First Terabyte Hard Disk from Hitachi by March 2007
Hitachi company is planning to release 1 Terabyte Deskstar 7K 1000 by March 2007.
Specifications:
Capacity: up to 1 TB(1000 GB)
Rotational Speed: 7200 RPM
Interface standard: SATA 3.0Gb/s (Serial) and ATA Ultra 133 (Parallel)
Average seek time: 8.5 ms
Up to 32MB buffer on SATA models
Perpendicular magnetic recording technology
Ramp load design increases shock protection and power savings
Thermal monitoring and fly height control enhance reliability
Three low power idle modes boost power efficiency
Silent seek acoustics achieve ultra quiet operation
Host/drive authentication for hardware security
Hitachi's Perpendicular magnetic recording technology(PMR) and media technology improves noise characteristics and thermal stability. Deskstar 7K1000 features three advanced low power idle modes active, unload and low power. They reduce power consumption at the drive level up to 20%, optimize non operational latency and lower drive temperature for cooler system operation.
Deskstar 7K1000's thermal fly height control (TFC) uses an integrated heating element to precisely maintain a constant fly height throughout read and write operations. This reduces raw soft error rate and in turn improves overall data integrity, drive performance and reliability. Deskstar 7K1000's iridium manganese chromium (IrMnCr) read head sensor technology offers better performance and reliability in harsh conditions.
Wednesday, January 24, 2007
Google drops the Beta Tag from Google Groups
From Today Google drops the beta tag from Google Groups.
With the help of Google Groups users can connect with people, access information, and communicate effectively over email and on the web. You can have discussions and create pages in many languages at free of cost. The new version of Google Groups provides an unparalleled interactive forum for discussion and collaboration.
The new features allow you to easily create, manage, search, and browse groups. Google Groups helps you keep in touch with friends, family, or colleagues, publish information relevant to your group, organize events, or work on projects. Google Groups never displays popups and banner ads. You see only relevant text ads.
You can select pictures, colors and styles to give your group its own distinct look. You can Upload and share your work with others in your group. You can Learn more about the other members in your group.
Windows Live OneCare V1.5 will be available to U.S and 16 other countries on January 30
Windows Live OneCare v1.5 will be available to customers in Australia, Austria, Belgium, Canada, France, Germany, Ireland, Italy, Japan, Mexico, Netherlands, New Zealand, Singapore, Spain, Switzerland, the United Kingdom and the United States on January 30th.
Existing users will be automatically upgraded to the latest release. The new OneCare Version will also run on Vista. OneCare is priced at 49.95 Dollars, covers up to 3 PCs running Windows XP or Vista for a year and includes free phone based support.
All we know that OneCare is Microsoft's first PC care service product, released in May 2006. OneCare service comes with Antivirus,Antispyware,Anti phishing and Firewall software with Backup,Restore Features and several Tune up tools for Windows Computers. So with Windows Live OneCare, you don't have to worry about nasty interruptions from viruses, spyware, hackers, and other unwanted intruders. It is easy to use and works in the background on your computer.
Monday, January 22, 2007
Don't Open Spam Email with message “Castro is Dead”
All we know that some Spam Email messages contains viruses. Now recently Spammers spreading Virus with the following messages. So don't open Spam Email with messages like “Castro is Dead”, “Saddam Hussein safe and sound”,“President of Russia Putin dead”, “Venezuelan President Hugo Chavez dead”, “US Secretary of State
Condoleezza Rice has kicked German Chancellor Angela Merkel”, “The (US) Supreme Court has been attacked by terrorists”.
All the above Email messages contains viruses. So don't open those messages. For Full Details
Saturday, January 20, 2007
How can you make partitions with FDISK?
At First in CMOS Settings select First boot device as Floppy. I already explained about this in my previous article How To Format the harddisk?. Keep the 98 start up disk in the Floppy Drive then boot the system with floppy. After booting from floppy system will come to A Prompt. At A:\> type FDISK like below then press enter.
A:\>FDISK
It will display message like this. Do you wish to enable large disk support(Y/N)? [Y]
By default Y is selected. So you just press enter. Then it will display Fdisk Options like this.
1.Create Dos partition or Logical Dos drive
2.Set active partition
3.Delete partition or Logical Dos Drive
4.Display partition information.
Enter choice[1]
If it is a new hard disk select option 1. If it is a hard disk already with partitions then select 3 in order to delete the existing partitions first. You will create new partitions after you delete old partitions only.
If you have old partitions then select option 3 and press enter. Then again it will display delete options like this.
1.Delete primary Dos partition
2.Delete Extended Dos partition
3.Delete Logical Dos Drives in Extended Dos partition
4.Delete Non-Dos partition
Generally we do not have Non Dos partition. So select all the three options one by one. First select option 1 then press enter. Then it will give a warning. Again press enter. Then it asks Volume Label of Primary partition. You can observe the Volume label over the top on the same screen. Just type that name and press enter. Some times there is no name for Volume label. In that case just press enter without typing any name. Now it will ask are you sure? Type Y then press enter. Now Primary Dos partition deleted.
Press Esc to continue. Again it will come to Fdisk Options menu. Select 3 to delete partition and press enter. Now first delete Logical Dos Drives in the extended Dos partition like the same as Primary partition deletion. After deleting all Logical Dos Drives in the extended Dos partition press Esc to continue. Again press Esc to continue. Again it will come to Fdisk Options menu. Select 3 to delete partition and press enter. Now delete Extended Dos partition in the same manner as Primary Dos partition. After deleting Extended Dos partition press Esc to continue. Now again it displays Fdisk Options.
Now you can create New partitions. First select Create Dos partition or Logical Dos Drive then press enter. Now select Create primary Dos partition and press enter. It will verifies drive integrity. Then it will display Do you wish to use the maximum size? Press N then press enter. It will again verifies drive integrity. Then it will ask primary Dos partition size. Type the size as you like then press enter. Now it creates Primary Dos partition. Press Esc to continue. Now Fdisk Options menu comes. Now set the Primary Dos partition as Active partition by selecting option 2 then press enter. Then it displays Enter the number of the partition you want to make active. Type 1 then press enter. Now partition 1 made active. Press Esc. Now fdisk Options menu comes. Select Create Dos partition then press enter. Select Create Extended Dos partition then press enter. It verifies drive integrity. It will ask the partition size for Extended Dos partition. Type the remaining space then press enter. Now Extended Dos partition was created. Press Esc. Again it verifies drive integrity. Now you have to create required Logical drives in the Extended Dos partition. Suppose if you want to create 3 logical drives in the extended Dos partition. So now type the first logical drive size then press enter. It verifies drive integrity. Now after verification type the second logical drive size then press enter. Again it verifies drive integrity. Now after verification leave the remaining space for third logical drive then press enter. Now press Esc. Then it comes to Fdisk Options. Now again press Esc to exit Fdisk. It will display a message. Again press Esc to exit Fdisk. It will come to A Prompt.
Now reboot the system without removing the 98 start up disk from the drive. Now system will boot from the 98 start up disk and come to A Prompt. Then for formatting C drive type like this at the A Prompt.
A:\>format C:/S then press enter.
It will give a warning message. Just press Y then press enter. After Format completed then it asks enter a Volume Label. Just press enter. Then it will come to C Prompt. Now you can format D drive by format D: command. You can format E drive by format E: command.
Now you can install Any Windows O.S in your system.
Note:By using Fdisk in Win 98,Win ME bootable disks we can make fdisk partitions of Hard Disks of size upto 64 GB. We can also make partitions of disks greater than 64 GB but Fdisk won't show correct size of partitions. Latest Fdisk can make partitions of high capacity Hard Disks of size greater than 64 GB. Read Latest FDISK article.
How can you format high capacity Hard Disks by Disk Manager?
We know that by Seagate's disk manager 9.46 version(you can use lower versions also) we can format any Hard disk of size up to 40 GB. With same disk manager 9.46 version we can format Seagate,Samsung or any other company Hard disks. But we can not format harddisks of size greater than 40 GB with disk manager 9.46. But by using Windows XP C.D we can format any company's High Capacity Disks easily. But disadvantage is we have to install Win XP compulsory after formatting is completed.
By using latest Disk Manager versions we can format high capacity Hard disks. We can install any Windows O.S we like. But for format Samsung hard disks we have to use Samsung version disk manager only. In the same way for formatting Seagate hard disks we have to use Seagate version disk manager only. With Seagate disk manager 10.45.06 version we can format High capacity Seagate Hard disks. With Samsung disk manager 10.42 version we can format High capacity Samsung Hard disks. Now I will explain procedure for formatting High capacity Samsung Hard disks with Samsung disk manager 10.42 version. After that You can easily format Seagate Hard Disks with Seagate disk manager 10.45.06 at your own. So I wont explain about Seagate disk manager 10.45.06. So now I am explaining Samsung disk manager 10.42 version format procedure.
At First in CMOS Settings select First boot device as Floppy. I already explained about this in my previous article How To Format the harddisk?.
So after selecting first boot device as Floppy then keep the Disk Manager 10.42 floppy in floppy drive. Now Start the computer. The system will boot from the floppy. Then automatically Caldera DRDOS will be started and XMS Manager will be installed. Then computer will load files into memory. After some time Disc manager Wizard will come on the screen. With the help of Tab select Install existing Hard disk then press enter. With the help of Tab select Next then press enter. With the help of Tab select Primary Master then press enter. With the help of Tab select Next then press enter. It will give a warning message. With the help of Tab select Continue with selected option and erase existing data then press enter. With the help of Tab select Next then press enter. With the help of Tab select your O.S then press enter(by default Win ME O.S is selected. But I selected Win 98. Read note at the end also). With the help of Tab select Next then press enter. Select Advanced installation with the help of Tab then press enter. With the help of Tab select Next then press enter. Now it will show existing partitions on the drive. With the help of Tab select clear then press enter. Then all existing partitions will be cleared. Now Add button is highlighted,press enter. Type first partition size then press enter. Again press enter. Type second partition size then press enter. Again press enter. Type third partition size then press enter. Again press enter. Now leave the remaining space for fourth partition then press enter. Now with the help of Tab select Next and press enter. It will give a warning message. With the help of Tab select first partition then select erase by again pressing tab then press enter. With the help of Tab select Next then press enter. Now Disk Manager installation process takes place and it asks 98 boot floppy. Put the 98 start up disk in drive then press enter. It will copy files from the floppy and created four harddisk partitions. Remove the disk from the drive and press Control+Alt+Delete. Just you finished formatting your Hard disk.
After rebooting system will come to Command prompt. Now you can install any Windows O.S you like.
Note: At the time of O.S selection by default Win ME is selected. We can select any O.S here. But some times we are unable to select other O.S than Win ME due to bug in software. In that case leave the default Win ME and continue formatting the hard disk. During formatting you can use any O.S. After completion of Formatting you can install any Windows O.S you like.
IrfanView 4.00 with improved Vista compatibility
Inorder to reduce saved file size do like this.
1. Open an image.
2. Go to menu Image then select Resize/Resample and reduce the image dimensions in pixels or cm or inches.
3. Go to menu File then Save As, choose JPG and save as new file (see also JPG save options like: lower JPG quality, uncheck EXIF, etc.).
4. Look at the file size of the new file. If still too big, repeat the steps, using smaller pixel size and/or lower quality, etc.
5. For many images, use menu File then select Batch Conversion, Advanced options.
In order to convert a bmp image to jpg image do like this.
Open a BMP file using Open in File menu. Now go to File Menu then select Save as, choose JPG as output format, set the new file name/folder and save. If you want to convert many files, use the Batch Conversion.
There are so many Plugins available for irfanview 4.00 in their site. All these Plugins allow IrfanView 4.00 to load photoshop 8BF filters, allows IrfanView 4.00 to play video/sound/audio cd files of all types, allows IrfanView 4.00 to process lossless JPG transformations, allows IrfanView 4.00 to read PS, EPS, PDF files, allows IrfanView 4.00 to play Macromedia's Flash/Shockwave format, allows IrfanView 4.00 to save PDF files and so many things.
Download IrfanView 4.00 and IrfanView 4.00 Plugins
Thursday, January 11, 2007
Download CombiMovie(Free Mpeg Joiner)
To combine your mpg files, first select the mpg Files folder in your system using the structure on the left side. The FileList on the right side will show when there are mpg/mpeg file(s) in that folder.
To start joining the files, two or more files should be selected. The Join button will not be enabled until there are two or more files selected. Use Shift key to select a range of items. Use Ctrl key to select multiple noncontiguous items.
CombiMovie can not join AVI or ASF movie formats. Each mpg file size should not be more than 8 mb. You can combine any number of files. CombiMovie should be used to combine only files with the same characteristics.
Download CombiMovie
Tuesday, January 09, 2007
Download HWINFO32, a powerful System Information Tool
This is a professional hardware information and diagnostic tool supporting latest components, industry technologies and standards. This tool recognize and extract the most possible amount of information about computer's hardware. This information is very useful for users searching for driver updates, computer manufactures, system integrators and technical experts.
This is a shareware (14 day free trial). This supports Windows NT/2000/XP/Server 2003 (32/64-bit), Windows 9X/Me.
With the help of this tool we can know about complete details of our Processor,Harddisk,RAM,Motherboard,BIOS,AGP card,LAN card,Monitor,Floppy drives,CD drives,Keyboard,Mouse,Sound card and any Hardware component. This tool even tells about the serial No of our hard disk also.
If you own a Licensed copy then you can save your complete hard ware information in Text, CSV and XML report formats.
Download HWINFO32
Format Floppy with Format144b2 utility
Format144b2 utility is used to unconditionally format standard 1.44 MB floppies under Windows. This is just 12 kb file.
This utility formats all types of floppies successfully. Some times we will get the following messages when we are accessing the Floppy.

This utility will format above type of Floppies also(About 50 percent of this type of Floppies will work after reformatting them with this utility).
Download Format144b2
Monday, January 08, 2007
Download Real Alternative which plays all Media files including Real Media Files
Real alternative is a free software. It plays RealMedia files without having to install RealOne Player or RealPlayer from Real Networks. It also plays all the other Media files like mpg etc.
Key features of Real Alternative:
Media Player Classic
RealMedia Codecs
RealMedia DirectShow splitter
RealMedia plugin for Internet Explorer
RealMedia plugin for Opera/Mozilla/Netscape
It is highly recommended that you have to uninstall all existing Real related software, like RealPlayer or RealOne Player, before installing Real Alternative.
Download Real Alternative
Sunday, January 07, 2007
Online Free PDF Converter and Document Creator
This Free Online PDF Converter is Adobe compatible tool. This converts Word, Excel,
PostScript, PowerPoint, RichText, Images, Webpages, Vector Graphic Formats Files to PDF files. Also this Online pdf converter converts PDF files to Word or Excel files. All the conversion process done in Online. So first You open http://www.freepdfconvert.com site.
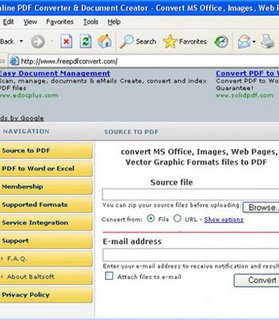
Then browse the path of the file you want to convert to PDF File. Then click Convert button. Then the site converts your file to PDF. Then you have to download that PDF file from the link given by that site. All this conversion process takes place within seconds.
If you want to convert PDF to Word Or Excel then you will observe a link PDF to Word or Excel on the right side. Just click that link then browse the path of the PDF file you want to convert to Word or Excel. Then click the Convert button. Then the site converts your PDF file to Word or Excel. Then you have to download that Word or Excel file from the link given by that site. All this conversion process takes place within seconds.
Click this link to convert your files.
Saturday, January 06, 2007
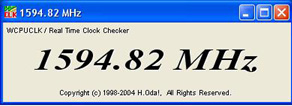
Download WCPUID Freeware Program(Displays the complete CPU information of your personal computer)
This WCPUID version Supports Many New CPU, Many New ChipSet/VGA, New Linux Kernel 2.6, Online Update Function Addition of the Definition Files.
WCPUID V3 runs on
Microsoft Windows 95/98/Me, Microsoft Windows NT 4.0, Microsoft Windows 2000, Microsoft Windows XP, Microsoft Windows Server 2003, Linux Distributions (Kernel 2.2/2.4/2.6), FreeBSD 4.x/5.x
This program Shows Frequency, Multiplier, Cache Info,Chipset Info etc like this

We can check the Real time clock like this with this Program.
Friday, January 05, 2007
How can you know accurate account of the data flowing through your computer's Internet connection?
With the help of Bandwidth Meters You can know Your network activity. You will know the amount of downloaded data,Uploaded data, or total amount of both with the help of Bandwidth meters. Also You will know about the average download speed,average upload speed with the help of bandwidth meters.
Using the Alerts feature, Bandwidth Meters can notify you when you have uploaded/downloaded a certain amount of data, or if your speed goes above or below any limit that you specify.
Suppose your ISP put a total Download/Upload limit to 20 GB per month. Then you can enter these details in Bandwidth meters. Then they will warn you when you approach your limit. Bandwidth Meters work with all types of network connections: phone modems, ADSL, ISDN, DSL, cable modem, LAN, satellite, and more.
Some Bandwidth meters helps you to be protected against network threats.
Now I will introduce you about two Bandwidth Meter Softwares.
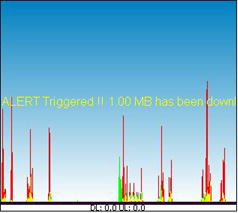
Bitmeter 2 is a free Bandwidth Meter software. Bitmeter 2 is given away completely free of charge, there is no trial period, no time-limited features, no spyware, and no adware. Bitmeter 2 requires version 1.1 or later of the Microsoft .NET framework to be installed.
After installing the Software, Rightclick the Bitmeter Icon on the System Tray then choose Statistics Grid option then you will get network activity details like this.

We can set Alerts also. You will get the Alerts option by rightclicking the Bitmeter Icon on the system tray. You can set download,upload alerts as you like. Suppose if you set a download alert for 1 MB. Then it will alert you by displaying a message and by playing a sound when you exceeds your download size of 1 MB like this.
Now I will tell about second one DU Meter. DU Meter is an award winning utility from Hagel Technologies. DU Meter helps you to be protected against network threats also. Remaining Features will be almost same as above.
But this is not a freeware. This is a Shareware program. For one month you can use it freely. After one month for the program to work you have to purchase it.
Download DU Meter
Thursday, January 04, 2007
Download Microsoft .NET Framework 1.1 Service Pack 1 (SP1)
The main use of Microsoft .NET Framework 1.1 Service Pack 1 (SP1) is improved security. SP1 provides better support for consuming WSDL documents, Data Execution prevention and protection from security issues such as buffer overruns. SP1 is available in 22 languages. This supports all Windows Operating systems from win98 to windows vista. Microsoft Internet Explorer 5.01 or later must be installed in your system.
Download Microsoft.Net Framework 1.1 SP1
Wednesday, January 03, 2007
Free and Open Source PDF Splitter and Merger utility
By using this pdf splitter, pdf merger software we can split any PDF file irrespective of it's size. Suppose a PDF file has 200 pages. If you want 100 page only from that PDF file then by using this software we can get the 100 page as separate PDF file. In this software we can specify the page numbers we want to split from a PDF file like 5(only page 5),1-17(pages from 1 to 17) etc.
In this software first Add the file to be split . For adding file click file menu then you will find Add Files option. You can easily add the PDF file in your system to the list by Add Files option. Then that PDF file Path and Page Count will appear in PDF file list. Just double click so many times on the first row which contains Page Count and PDF file path. Then a typing box will appear to the left side of the Page Count file. In that box you can specify the page numbers you want to split from the file. Then you can split the PDF file by clicking Split into Single Page Files button on the Top.

Suppose you have splitted first five pages of a PDF file. Then with this pdf merger software you can merge those 5 individual pages to a single PDF file. This is a very useful software.
In the website you will find three download links. First link is a open source file. If you have sound software knowledge you can also add extra features to this software. For downloading the software you have to click the third link Download PDF Splitter And Merger v1.11 MSI Installer.
Microsoft .NET Framework version 1.1 is required for this software to work.
Also install Microsoft .NET Framework 1.1 Service Pack 1.
Download PDF Splitter And Merger v1.11 MSI Installer
Download PDF To TEXT Converter
This program converts PDF document to plain text. It doesn't requires Adobe Acrobat . This is compatible with PDF standard 1.6.
In general For modifying any PDF document we must need Adobe Acrobat. But this software converts PDf file to a text file. Then we can make any changes to a text file very easily. We can also make it as MS WORD file by just copying the text file matter to MS WORD file easily. So there is no need of Adobe Acrobat.
But this software is a trial version only. It converts only first five pages of a PDF file to text. You can use the trial version life long.
Download PDF To TEXT Converter
Tuesday, January 02, 2007
Latest FDISK program for High Capacity Hard Disks
You can get the update file from Microsoft site. Just this is 175 kb file. Run this file in Windows 98 O.S. Then it will save latest Fdisk.exe in Windows\command and Windows\options\cabs folders. Just copy this latest Fdisk.exe from any one of the above folders to Win 98 start up disk.
Download Latest Fdisk.
WIN XP Commands
Command-line tools must be run at the Command prompt .To open Command Prompt, click Start, click Run, type cmd, and then click OK. We can use any Command with or without parameters. You can get help for any command at the command Prompt by typing CommandName /?
1.ASSOC
This Command displays or modifies file name extension associations. Without parameters, assoc displays a list of all the current file name extension associations.
Parameters
.ext : Specifies the file name extension.
filetype : Specifies the file type with which you want to associate the specified file name extension.
Syntax
assoc [.ext[=[filetype]]]
Examples
Assoc .log
View the current file type association for the file name extension .log.
assoc .log=
Delete the file type association for the file name extension .log.
assoc more
View current file type associations one screen at a time.
assoc>assoc.cfg
Send the output of assoc to the file Assoc.cfg.
2.Attrib
This windows xp command Displays, sets, or removes the read-only, archive, system, and hidden attributes assigned to files or directories. Without parameters, attrib displays attributes of all files in the current directory.
Parameters
+r : Sets the read-only file attribute.
-r : Clears the read-only file attribute.
+a : Sets the archive file attribute.
-a : Clears the archive file attribute.
+s : Sets the system file attribute.
-s : Clears the system file attribute.
+h : Sets the hidden file attribute.
-h : Clears the hidden file attribute.
[Drive:][Path] FileName : Specifies the location and name of the directory, file, or set of files for which you want to display or change attributes. You can use wildcard characters (that is, ? and *) in the FileName parameter to display or change the attributes for a group of files.
/s : Applies attrib and any command-line options to matching files in the current directory and all of its subdirectories.
/d : Applies attrib and any command-line options to directories.
Syntax
attrib [{+r-r}] [{+a-a}] [{+s-s}] [{+h-h}] [[Drive:][Path] FileName] [/s[/d]]
Examples
attrib gta.doc
Display the attributes of a file named gta.doc located on the current drive.
attrib +r gta.doc
Assign the read-only attribute to the file gta.doc.
attrib -r gta.doc
Remove the read-only attribute from the file gta.doc.
3. Chkdsk
This windows xp command creates and displays a status report for a disk based on the file system. Chkdsk lists and corrects errors on the disk. Without parameters, chkdsk displays the status of the disk in the current drive.
Parameters
volume: : Specifies the drive letter (followed by a colon), mount point, or volume name.
[Path] FileName : Specifies the location and name of a file or set of files that you want chkdsk to check for fragmentation. You can use wildcard characters (that is, * and ?) to specify multiple files.
/f : Fixes errors on the disk. The disk must be locked. If chkdsk cannot lock the drive, a message appears that asks you if you want to check the drive the next time you restart the computer.
/v : Displays the name of each file in every directory as the disk is checked.
/r : Locates bad sectors and recovers readable information. The disk must be locked.
/x : Use with NTFS only. Forces the volume to dismount first, if necessary. All open handles to the drive are invalidated. /x also includes the functionality of /f.
/i : Use with NTFS only. Performs a less vigorous check of index entries, reducing the amount of time needed to run chkdsk.
/c : Use with NTFS only. Skips the checking of cycles within the folder structure, reducing the amount of time needed to run chkdsk.
/l[:size] : Use with NTFS only. Changes the log file size to the size you type. If you omit the size parameter, /l displays the current size.
Syntax
chkdsk [volume:][[Path] FileName] [/f] [/v] [/r] [/x] [/i] [/c] [/l[:size]]
Examples
chkdsk e: /f
Check the disk in drive E and have Windows fix errors.
If it encounters errors, chkdsk pauses and displays messages. Chkdsk finishes by displaying a report that lists the status of the disk. You cannot open any files on the specified drive until chkdsk finishes.
chkdsk *.*
Check all of files on a FAT disk in the current directory for noncontiguous blocks.
Chkdsk displays a status report, and then lists the files matching the file specification that have noncontiguous blocks.
4.Cls
This windows xp command Clears the Command Prompt window.
5.Cmd
This windows xp command Starts a new instance of the command interpreter, Cmd.exe. Without parameters, cmd displays Windows XP version and copyright information.
Parameters
/c : Carries out the command specified by string and then stops.
/k : Carries out the command specified by string and continues.
/s : Modifies the treatment of string after /c or /k.
/q : Turns the echo off.
/d : Disables execution of AutoRun commands.
/a : Creates American National Standards Institute (ANSI) output.
/u : Creates Unicode output.
/t:fg : Sets the foreground f and background g colors. We can use hexadecimal digits as the values for f and g. We can give from 0 to 9, A to F as the values for f and g.
/e:on : Enables command extensions.
/e:off : Disables commands extensions.
/f:on : Enables file and directory name completion.
/f:off : Disables file and directory name completion.
/v:on : Enables delayed environment variable expansion.
/v:off : Disables delayed environment variable expansion.
string : Specifies the command you want to carry out.
Example
Cmd /t:c7
This windows xp command sets the background color to red(c for red) and fore ground color to white(7 for white). By this command we will get command prompt window with red background and with white lettering on it.
6.Convert
This windows xp command Converts FAT and FAT32 volumes to NTFS.
Syntax
convert [volume] /fs:ntfs [/v] [/cvtarea:FileName] [/nosecurity] [/x]
Parameters
volume Specifies the drive letter (followed by a colon), mount point, or volume name to convert to NTFS. /fs:ntfs Required. Converts the volume to NTFS. /v Specifies verbose mode, that is, all messages will be displayed during conversion. /cvtarea:FileName For advanced users only.
/nosecurity Specifies that the converted files and directory security settings are accessible by everyone. /x Dismounts the volume, if necessary, before it is converted. Any open handles to the volume will no longer be valid.
Example
convert f: /fs:ntfs /v
Convert the volume on drive F to NTFS and display all messages.
7. Defrag
This windows xp command Locates and consolidates fragmented boot files, data files, and folders on local volumes.
Syntax
defrag volume
defrag volume [/a]
defrag volume [/a] [/v]
defrag volume [/v]
defrag volume [/f]
Parameters
volume : The drive letter or a mount point of the volume to be defragmented.
/a : Analyzes the volume and displays a summary of the analysis report.
/v : Displays the complete analysis and defragmentation reports.
When used in combination with /a, displays only the analysis report. When used alone, displays both the analysis and defragmentation reports.
/f : Forces defragmentation of the volume regardless of whether it needs to be defragmented.
8. Driverquery
This windows xp command Displays a list of all installed device drivers and their properties.
Syntax
driverquery [/s Computer] [/u Domain\User /p Password] [/fo {TABLELISTCSV}] [/nh] [/v] [/si]
Parameters
/s Computer : Specifies the name or IP address of a remote computer (do not use backslashes). The default is the local computer.
/u Domain\User : Runs the command with the account permissions of the user specified by User or Domain\User. The default is the permissions of the current logged on user on the computer issuing the command.
/p Password : Specifies the password of the user account that is specified in the /u parameter.
/fo {TABLELISTCSV} : Specifies the format to display the driver information. Valid values are TABLE, LIST, and CSV. The default format for output is TABLE.
/nh : Omits the header row from the displayed driver information. Valid when the /fo parameter is set to TABLE or CSV.
/v : Specifies that detailed driver information be displayed.
/si : Displays digital signature information for both signed and unsigned device drivers.
Examples
driverquery
driverquery /fo csv
driverquery /nh
driverquery /s ipaddress
9 Format
This windows xp command Formats the disk in the specified volume to accept Windows files.
Examples
format a:
Format a new floppy disk in drive A using the default size.
format a: /q
Perform a quick format operation on a previously formatted disk in drive A.
format a: /v:KARRI
Format a floppy disk in drive A and assign it the volume label KARRI.
10. Getmac
This windows xp command Returns the media access control (MAC) address and list of network protocols associated with each address for all network cards in each computer, either locally or across a network.
11. Hostname
This windows xp command Displays the host name portion of the full computer name of the computer.
12. Ipconfig
This windows xp command Displays all current TCP/IP network configuration values and refreshes Dynamic Host Configuration Protocol (DHCP) and Domain Name System (DNS) settings. Without parameters, ipconfig displays the IP address, subnet mask, and default gateway for all adapters.
Examples
Ipconfig
Displays the basic TCP/IP configuration for all adapters.
ipconfig /all
Displays the full TCP/IP configuration for all adapters.
ipconfig /release
Sends a DHCPRELEASE message to the DHCP server to release the current DHCP configuration and discard the IP address configuration for either all adapters.
ipconfig /renew "Local Area Connection"
Renew a DHCP-assigned IP address configuration for only the Local Area Connection adapter.
ipconfig /flushdns
Flush the DNS resolver cache when troubleshooting DNS name resolution problems.
ipconfig /showclassid Local
Displays the DHCP class ID for all adapters with names that start with Local.
ipconfig /setclassid "Local Area Connection" TEST
Set the DHCP class ID for the Local Area Connection adapter to TEST.
13. Label
This windows xp command Creates, changes, or deletes the volume label (that is, the name) of a disk. Without parameters, label changes the current volume label or deletes the existing label.
14. Msinfo32
This windows xp command Displays a comprehensive view of your hardware, system components, and software environment.
Examples
msinfo32 /showcategories
Lists the available category IDs.
msinfo32 /categories +all -loadedmodules
Start System Information with all available information displayed, except Loaded Modules.
msinfo32 /nfo syssum.nfo /categories +systemsummary
Display only System Summary information and create an .nfo file called syssum.nfo that contains information in the System Summary category.
msinfo32 /nfo conflicts.nfo /categories +componentsproblemdevices
+resourcesconflicts+resourcesforcedhardware
Display resource conflict information and create an .nfo file called conflicts.nfo that contains information about resource conflicts.
15. Nbtstat
This windows xp command Displays NetBIOS over TCP/IP (NetBT) protocol statistics, NetBIOS name tables for both the local computer and remote computers, and the NetBIOS name cache. Nbtstat allows a refresh of the NetBIOS name cache and the names registered with Windows Internet Name Service (WINS). Without parameters, nbtstat displays help.
Examples
nbtstat -n
Display the NetBIOS name table of the local computer.
nbtstat -c
Display the contents of the local computer NetBIOS name cache.
nbtstat -R
Purge the NetBIOS name cache and reload the PRE-tagged entries in the local Lmhosts file.
nbtstat -RR
Release the NetBIOS names registered with the WINS server and re-register them.
nbtstat -S 5
Display NetBIOS session statistics by IP address every five seconds.
nbtstat -a CORPO10
Display the NetBIOS name table of the remote computer with the NetBIOS computer name of CORPO10.
nbtstat -A 10.0.0.77
Display the NetBIOS name table of the remote computer assigned the IP address of 10.0.0.77.
16. Regsvr32
This command-line tool registers .dll files as command components in the registry.
Examples
regsvr32 schmmgmt.dll
Register the .dll for the Active Directory Schema.
17. Systeminfo
This windows xp command Displays detailed configuration information about a computer and its operating system, including operating system configuration, security information, product ID, and hardware properties, such as RAM, disk space, and network cards.
18. System File Checker (sfc)
This windows xp command Scans and verifies the versions of all protected system files and replaces incorrect versions with correct Microsoft versions.
Examples
sfc /scannow : Scans all protected system files immediately.
sfc /scanonce : Scans all protected system files once.
sfc /scanboot : Scans all protected system files every time the computer is restarted.
sfc /revert : Returns the scan to its default operation.
sfc /purgecache : Purges the Windows File Protection file cache and scans all protected system files immediately.
sfc /cachesize=x : Sets the size, in MB, of the Windows File Protection file cache.
19. Ver
This windows xp command Displays the Windows XP version number.
20. Vol
This windows xp command Displays the disk volume label and serial number, if they exist. A serial number is displayed for a disk formatted with MS-DOS version 4.0 or later.
Syntax
vol [Drive:]
21. Winnt32
This windows xp command Performs an installation of or upgrade to Windows XP. You can run winnt32 at the command prompt on a computer running Windows 95, Windows 98, Windows Millennium Edition, Windows NT, Windows 2000, or Windows XP.
Monday, January 01, 2007
Recover your Deleted Pictures,Videos,Sound Files with PC INSPECTOR Smart Recovery
IMP NOTE:
If you want to recover a file in C drive then install this software in D or E or F drives depending on your partitions. Suppose you have C,D,E,F partitions. Then install this software in F drive then It will recover any deleted files in C,D,E successfully. If you want to recover Files in F drive then install this software in D or E drives. Try to avoid installation of this software in C drive.
PC INSPECTOR smart recovery is the software with which you can recover your pictures,Videos,Sound Files in seconds after unintentional deletion. This is the Free data recovery program from CONVAR for Flash Card, Smart Media, SONY Memory Stick, IBM Micro Drive, Multimedia Card, Secure Digital Card or any other data carrier for digital cameras.
PC INSPECTOR smart recovery supports the following picture formats: .jpg, .amr, .tif, .bmp, .gif, Canon .crw , Fuji .raf , RICOH .raw, Olympus .orf (E-XX), Olympus .orf (C5050), Nokia 3gp, Kodak .dcr, Minolta .mrw, Nikon .nef (D1H/D1X), Nikon .nef (D2H/D2X), Nikon .nef (E5000/E5700), Sigma - Foveon .x3f, mp4, QuickTime .mov (Konica Minolta). Video files in .avi, QuickTime .mov format and audio files in .wav, .dss format can also be recovered.
PC INSPECTOR smart recovery supports all Win 9x, ME, NT 4.0, XP and Windows 2000 systems.
Download PC INSPECTOR Smart Recovery
Author: Convar
Recover your files with PC INSPECTOR File Recovery
IMP NOTE:
If you want to recover a file in C drive then install this software in D or E or F drives depending on your partitions. Suppose you have C,D,E,F partitions. Then install this software in F drive then It will recover any deleted files in C,D,E successfully. If you want to recover Files in F drive then install this software in D or E drives. Try to avoid installation of this software in C drive.
PC INSPECTOR File Recovery is a data recovery program. This is a Freeware program. This program supports the FAT 12/16/32 and NTFS filesystems.
It supports and recovers the following type of File Formats. DOC,ART,AVI,PDF,BMP,CDR,DXF,DBF,XLS,EXE,GIF,HLP,HTM,
HTML,JPG,LZH,MID,MOV,MP3,PNG,RTF,TAR,TIF,WAV and ZIP File formats. If you accidently delete any type of above files then we can easily recover those files with this Freeware Program.
PC INSPECTOR Finds partitions automatically, even if the boot sector or FAT has been erased or damaged.
PC INSPECTOR File Recovery is a data recovery tool for Windows 95, 98, ME, NT, 2000 and XP users.
After installing the software run it. You will observe screen like this.
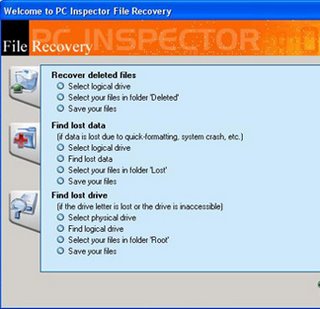
Just click the box by the side of Recover Deleted Files. Then you will observe the drives in your system like this.
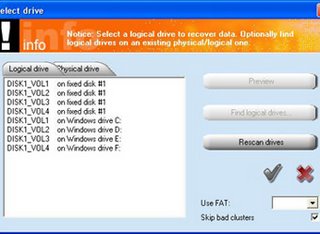
Now just double click the drive letter (C,D,E,F) in which deleted file is located. Then you will observe all deleted files like this.
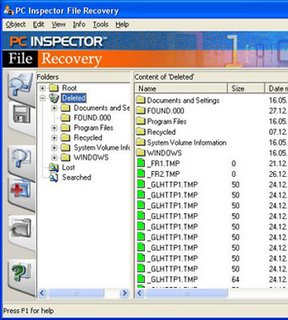
Just right click the deleted file and select Save To. Then save the file on the desktop. Just you simply recover your deleted file to desktop very easily.
Download PC INSPECTOR File Recovery
Author: Convar
Download Samsung DM 10.42 version
With Samsung disk manager 10.42 version we can format High Capacity Samsung Hard Disks.
Download DM creator.zip file from Samsung site to your drive. Extract it. You can see the DM_Creator.exe. Put A new Floppy in Floppy Drive. Now execute the DM_creator.exe file. Then disk manager 10.42 will be copied to the Floppy.
Note: When you downloading DM creator.zip, it will ask your Hard Disk Model No,Hard Disk S.NO. Run Hardware Info Tool on your system then that Tool will tell you about your Hard Disk Model No,Hard Disk S.NO etc. You can get the Hardware Info Tool from the same Softwares section of my Blog.
Download Samsung DM 10.42