The following Security Issues have been fixed in FireFox 2.0.0.6.
Previous FireFox versions did not percent-encode spaces and double-quotes in URIs handed off to external programs for handling, which can cause the receiving program to mistakenly interpret a single URI as multiple arguments. This bug is fixed in FireFox 2.0.0.6.
Privilege escalation through chrome-loaded about:blank windows issue also has been fixed in FireFox 2.0.0.6.
Due to Security Fixes, Mozilla recommends all of it's users to upgrade to latest FireFox 2.0.0.6
Download FireFox 2.0.0.6
Tuesday, July 31, 2007
FireFox 2.0.0.6 released for Windows, Mac and Linux
Monday, July 30, 2007
XAMPP 1.6.3 for Windows and Linux
XAMPP is an easy to install Apache distribution containing MySQL, PHP and Perl. XAMPP is very easy to use.
XAMPP includes:
Apache 2.2.4
MySQL 5.0.45
PHP 5.2.3 plus PHP 4.4.7 plus PEAR
PHP-Switch win32 1.0
XAMPP Control Version 2.5
XAMPP Security 1.0
SQLite 2.8.15
OpenSSL 0.9.8e
phpMyAdmin 2.10.3
ADOdb 4.95
Mercury Mail Transport System v4.01b
FileZilla FTP Server 0.9.23
Webalizer 2.01-10
Zend Optimizer 3.3.0
eAccelerator 0.9.5.1 for PHP 5.2.3
At present there are four XAMPP versions are available. They are:
version for Linux systems (Ubuntu, SuSE, RedHat, Mandrake and Debian)
version for Windows 98, NT, 2000, 2003, XP and Vista
beta version for Solaris SPARC (developed and tested under Solaris 8)
and a beta version for Mac OS X.
Use the beta versions at your own risk.
Important Note: In Vista, do not install XAMPP in c:\program files folder. Install XAMPP in folders like c:\xampp or c:\myfolder\xampp.
Download XAMPP
Sunday, July 29, 2007
Download DirectX(June 2007) Redist full package and DirectX End-User Runtime Web Installer
Microsoft DirectX is a group of technologies designed to make an ideal platform for Windows based computers for running and displaying rich multimedia applications.
June 2007 Redistributable Package is DirectX 9.19.1007 version. This DirectX redist package includes all the latest and previous released DirectX runtime. This includes the bi-monthly D3DX, XInput, and Managed DirectX components with file size of 53.6 MB. This DirectX runtime cannot be uninstalled.
Download DirectX June 2007 Redist Full Package
Recent DirectX End-User Runtime Web Installer needs internet connectivity during installation. This package provides updates to DirectX 9.0c and previous versions of DirectX. This package is available to customers running genuine Microsoft Windows. This DirectX runtime cannot be uninstalled.
Download DirectX End-User Runtime Web Installer
Saturday, July 28, 2007
Debugging Tools for Windows
Debugging Tools are used for debugging windows operating systems. They also debug drivers, applications, and services run on the windows operating systems. Both 32 bit and 64 bit Debugging Tools are available. You can use 64 bit Debugging Tools package, if you have a 64 bit Processor system. These are Free Tools from Microsoft.
32 bit Debugging Tools supports 32 bit or 64 bit Microsoft Windows Server 2003, 32 bit or 64 bit Windows XP, Windows 2000, Windows NT 4.0, Windows Vista, or Windows Server with codename Longhorn.
64 bit Debugging Tools supports 64 bit Microsoft Windows Server 2003, 64 bit Windows XP, 64 bit Windows Vista, or 64 bit Windows Server with codename Longhorn.
Download 32 bit Debugging Tools for Windows
Download 64 bit Debugging Tools for Windows
Friday, July 27, 2007
Slax 6.0 RC6 - The Linux O.S which runs from the CD
Slax is the the Linux operating system which runs directly from the CD or USB without installing. Slax fits on a small disc. Slax 6 RC6 includes Linux Kernel 2.6.21.5 and KDE 3.5.7. Slax 6 RC6 is based on Slackware 12.0 Linux distribution and uses Unification File System. Below is the screenshot of Slax.

After downloading Slax6RC6.iso from ftp site, then you have to burn it to a CD. Start your CD writing software and search for Burn image or Burn CD iso image option. Then burn the iso image to a CD using the Burn image option. The CD works only if you select Burn image or Burn CD iso image option.
The computer boots from Slax CD in three different ways. First one depends on type of motherboard. While booting your system from Slax CD, press a special key F11 or F2 or F10. Many motherboards support this method. Second method is, you have to set CDROM as first boot device in BIOS SETUP. Third way is by starting DOS and using linux.bat program from SLAX CD.
Download Slax 6.0 RC6
You can download Slax old and new versions from here.
Download Visual Studio 2008 Beta 2
Microsoft announced Visual Studio 2008 Beta 2 version. Visual Studio 2008 is the next generation development tool for Windows Vista, office 2007, and the Web. Visual Studio 2008 provides tools that speed creation of software and services on the latest platforms, including the Web, Windows Vista, Office 2007, SQL Server 2008, and Windows Server 2008. Visual Studio 2008 enables the developers to solve complex business problems at low cost. The developers can develop quality software with the new Tools of Visual Studio 2008. Developers can improve their skills and work with Visual Studio 2008.
All versions of Visual Studio 2008 beta 2 will be available at the following Microsoft site. Also you can download latest Microsoft.NET Framework 3.5 Beta 2 from the same location.
Download Visual Studio 2008 Beta 2
Thursday, July 26, 2007
Shup v0.14 - Free Screen capture Utility
Shup is a free Program which captures your desktop and uploads files to many different hosts. Shup also includes a built in Image Editor. You can share your screenshots, images, and other files by turning them into web links with this small utility program Shup. Shup supports Windows 2000, Windows XP, and Windows Vista.
How to Use Shup?
When you run Shup program then Shup Icon will sit in system tray. If you want to take a screenshot of your desktop or the currently active window, then right click on the Shup icon at the system tray, then select Capture Desktop. Wait for sometime. Shup will take the screenshot of the desktop or active window and store it in default directory C:\Program Files\Shup\Archive. The image is saved in PNG format only. Also the image is automatically uploaded to any one of the supported hosts like ImageShack, Stasbox etc. Also the URL is placed into your clipboard so that you can easily copy and share that image url with your friends.
See the screenshot below, taken by Shup
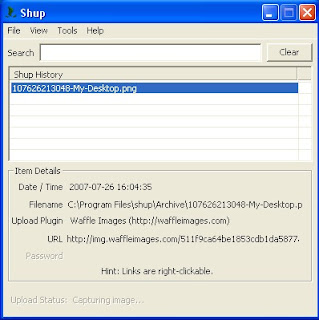
You can also get the URL details in another way. Just doubleclick on Shup icon at the system tray. Then Shup history window will open. Just click an item in history window. Then Shup will display the item details as shown in the figure below.
You can upload files to different hosts like Flickr, ImageShack, PhotoBucket, Stashbox, and Waffle Images with Shup. Just right click the file you want to upload then select Shup, then select the host. It is very simple process.
You can do Image editing also with Shup. Just right click the image you want to edit then select Shup, then select Open In Shup. Now Shup will open the image. Remember Shup supports only PNG format. Shup provides Paint Brush Tool, Highlighter Tool, Rectangular selection Tool and Crop Tool. You can do Image editing with these Tools.
Download Shup
Wednesday, July 25, 2007
Process Monitor v 1.2
Process Monitor is an advanced monitoring tool for Windows. It shows real-time file system, Registry and process/thread activity. Process Monitor's user interface and options are similar to those of Filemon and Regmon. But Process Monitor includes numerous significant enhancements over Filemon and Regmon.
Process Monitor displays file system activity for all Windows file systems, including local storage and remote file systems. Process Monitor automatically detects the arrival of new file system devices and monitors them. To remove file system operations from the display de-select the file system push-button in the Process Monitor toolbar and to add back file system operations depress the button.
Process Monitor logs all Registry operations and displays Registry paths. To remove Registry operations from the display de-select the Registry push-button in the Process Monitor toolbar and to add back Registry operations depress the button.
In its process/thread monitoring subsystem Process Monitor tracks all process and thread creation and exit operations as well as DLL and device driver load operations. To remove Process operations from the display de-select the process push-button in the Process Monitor toolbar and to add back process operations depress the button.
Process Monitor supports Windows 2000 SP4 with Update Rollup 1, Windows XP SP2, Windows Server 2003 SP1, and Windows Vista. Also supports 64 bit versions of Windows XP, Windows Server 2003 and Windows Vista.
Download Process Monitor
How to rectify DLL Errors like MSVCR71.dll was not found or MSVCP71.dll was not found or any dll was not found?
Have you received the following DLL error messages when try to install a program?
The application has failed to start because MSVCR71.dll was not found.
The application has failed to start because MSVCP71.dll was not found.
The application has failed to start because xxx.dll was not found.
I think everyone has received this type of messages. We can rectify this type of messages very easily.
First I will explain what is a DLL file and it's uses. Then I will give the solution to the above type of dll error messages.
A dynamic-link library (DLL) is a module that contain functions and data that can be used by another module. Module can be another DLL or a Windows application. A DLL can be used by several programs at the same time. Windows operating system provides some DLLs. Some DLLs are particularly written for a application and these DLLs are loaded with that particular application.
DLLs save memory, reduce swapping, save disk space, upgrade easier, provide after-market support, provide a mechanism to extend the MFC library classes, support multilanguage programs, and ease the creation of international versions. DLL file will be loaded in to RAM when a program needs it only. Thus DLLs save memory. It saves Disk space since same DLL is used by several applications. If each application has it's own DLL then a lot of space is required.
Rectification of DLL Errors:
If you get the application has failed to start because MSVCR71.dll was not found error message, then you have to download MSVCR71.dll zip file. Then extract it. Then copy MSVCR71.dll file and paste it in Windows/System directory.
Download MSVCR71.dll
If you get the application has failed to start because MSVCP71.dll was not found error message, then you have to download MSVCP71.dll zip file. Then extract it. Then copy MSVCP71.dll file and paste it in Windows/System directory.
Download MSVCP71.dll
Other DLL Errors:
If you get any other dll errors then just goto the above site http://www.dll-files.com. In that site you will find Search for DLL Files. Just type the DLL you want in the box, then click O.K. Now it will display that DLL informaton. On the same page you will find the download link for that DLL file. After downloading the DLL file paste it in Windows/System directory.
Tuesday, July 24, 2007
Intel announced the world's first 40G silicon laser modulator

Today Intel announced the the world's first 40G silicon laser modulator. This laser modulator encodes optical data at 40 billion bits per second. This is the Fastest Laser Modulator made from silicon. This laser Modulator is Capable of putting one's and zeros on a beam of laser light - 40 Billion time per second.
In 2004 Intel announced a One Giga-bit per second silicon laser modulator. Now they have achieved 40 Giga-bits/second. By Using 25 Silicon Laser Modulators at 40Gb/s Intel can build a Tera-bit per second Optical link.
One Tera-bit = 1000 Billion bits
Today's commercially available optical modulators at 10 Gbps are based on lithium niobate and III-V compound semiconductors. These devices have deployed at speeds up to 40 Gbps. But these are more costlier than silicon laser modulators.
Windows Vista Drivers for HP LaserJet 1018(for all other models also) are now available
Not only HP LaserJet 1018 Windows Vista drivers, but also other HP printers Windows Vista drivers are now available.
Two types of Driver Packages are available for HP LaserJet 1018 printer. One is HP LaserJet 1018 Basic Plug and Play Driver. This package provides drivers and software to assist with device installation for devices connected via hi speed USB 2.0 port. Second one is HP LaserJet 1018 Basic Print Driver. You can use this software for first time USB installations only. Do NOT attach a USB cable until prompted by the installation program.
HP LaserJet 1018 Plug and Play Driver installation:
First download the driver software. Then just double click on the file and follow the on screen instructions. The installer will extract all the driver files to a default directory C:\Program Files\Hewlett-Packard\LaserJet 1018 Drivers. This driver supports Microsoft Windows 2000, Microsoft Windows XP, Microsoft Windows Vista, Microsoft Windows Server 2003.
Download HP LaserJet 1018 Basic Plug and Play Driver
HP LaserJet 1018 Basic Print Driver installation:
Now I will explain how to install HP LaserJet 1018 Basic Print Driver. This HP LaseJet 1018 driver also supports Microsoft Windows 2000, XP (32-bit), Server 2003 (32-bit).
Be ready with your printer. But do not attach the USB cable to the printer.
First download HP LaserJet 1018 Print Driver Package and save that package in a directory.
After download has completed then double click on that file. This will extract the driver files into a default directory C:\Program Files\Hewlett-Packard\LaserJet 1018 Drivers.
Now go to that default directory then click EZInstall. Then follow the instructions on the screen. Attach the USB cable to the printer when the install program prompts you to do. Also switch on the power supply to the printer.
Now if Found new Hardware screen appears, then click Locate and install driver software (recommended). (Windows Vista only).
Download HP LaserJet 1018 Basic Print Driver
For Other Printers drivers visit this link
HP recently (July 30) released HP Universal print Driver 4.0 for Windows Vista, XP, 2000, 2003 Server. HP Universal Print Driver 4.0 is a single driver that supports PCl5, PCl6, and HP postscript level 2 and level 3 emulation. Details of HP Universal print Driver 4.0 are available here.
KompoZer
KompoZer is an open source wysiwyg HTML editor. KompoZer is aimed for Advanced users. At present KompoZer 0.7.9 version is available.
KompoZer supports Windows 2000/2003/2008/9x/Vista/XP. KompoZer for Mac OS X, KompoZer for Linux editions are also available. Source code to work with many OS platforms is also available for KompoZer.
You can get KompoZer for windows and also platform independent KompoZer version at the following location.
KompoZer
Monday, July 23, 2007
Windows 7 is expected in 2010
Windows 7 is the new operating system from Micosoft. It is the successor of Windows Vista. At present Microsoft is developing this new operating system Windows 7. Previously Windows 7 was codenamed as Vienna. Now 7 is the internal code name of Windows 7. Windows 7 will be released in about 3 years.
Windows 7 will be available in both consumer and business versions. Also it will be available in both 32 bit and 64 bit versions. Also Microsoft may change the new operating systems name after it's development is completed. Windows Vista is based on NT kernel 6. So at present they named the new operating system as Windows 7.
Comodo Antivirus free for lifetime
Comodo Antivirus software developers are offering free lifetime license. Comodo supports Windows XP (SP2) and Windows 2000 (SP4 or Later). It does not support Windows 9x systems.
At present Comodo AntiVirus 2.0 beta version is available. Final version will also be free to both home and business users. Comodo Antivirus definition updates are also free for life to all users. Comodo Antivirus protects your computer against all known Viruses, Trojans and Worms.
Features of Comodo Antivirus:
Automatic Email scanning
Automatic Daily Updates
It scans compressed files such as .RAR, .ZIP, CAB files
It scans Network Drives also for Viruses, Trojans etc
Faster Virus scanning
Instant scanning of any file, folder, drive
Advanced Virus detection Engine
Continuous scanning of PC memory
Block worms
Download Comodo Antivirus
Saturday, July 21, 2007
Update your Hotmail account to Windows Live Hotmail account
Windows Live Hotmail is the next generation of MSN Hotmail. Windows Live Hotmail brings you 2GB space, improved spam protection. It identfies suspicious email by color coded safety bar. It scans every incoming email and attachment automatically for viruses. You can send attachments of size upto 10 MB now. Lot of Themes are available in new hotmail. You get the themes from Options tab. You can change the color of the window as you like with themes. You can change your Inbox view to an advanced view. In Advanced View, you can preview email message without opening it. See the screenshot below.

In Advanced View on the left you have check mail, Contacts etc. In the middle of the window you have your messages. If you select any message then preview of the message will appear to the right side of the window as shown above in the figure.
If you donot like the Advanced View then you can switch back to traditional Inbox view by clicking Switch To Classic button on the left side of the window. Also you can switch back to MSN Hotmail easily. Simply click the Options tab. In that window you will observe Switch To Hotmail link.
Update your Hotmail account to New Hotmail
http://mail.live.com is the web address of new Hotmail site.
Friday, July 20, 2007
SeaMonkey 1.1.3 Released

Mozilla Foundation's SeaMonkey Project released it's latest version. It has fixed several bugs and several security vulnerabilities found in previous SeaMonkey versions. It is a Freeware.
SeaMonkey is an all-in-one Internet application suite. In one application we have Web-browser, advanced e-mail and newsgroup client, IRC chat client, and HTML editor.
The SeaMonkey browser includes all the features of a modern browser. It includes modern features like Tabbed browsing, Popup blocker, Image Manager etc. You can control your email from spammers by SeaMonkey's Junk Mail controls. You can manage your email with customizable Labels and Mail Views and color code your email.
SeaMonkey supports windows 95, 98, 98SE, Windows Me, Windows NT 3.51, Windows NT 4.0, Windows 2000, Windows XP, Windows 2003, Mac and Linux.
So many Browser Extension Add-ons, Plugins, Sevaral Themes are available for SeaMonkey at the Mozilla site given below.
Download SeaMonkey
How to select and print the content you want on the Web page with HP Smart Web Printing 2.0?
HP Smart Web Printing supports I.E 6.0 and I.E 7.0. After installaing HP Smart Web Printing, it adds two new buttons to the toolbar in your IE browser. They are Clip Book and HP Smart Select. Also it adds Clip Book Pane to your browser window's right side. You can turn it off by simply clicking the close button. It also adds Standard Selection and HP Smart Selection options to the Edit menu. Standard Selection is nothing but the Original Selection method of IE. So from Edit menu you can switch to HP Smart Selection or IE's Standard Selection.
What is the use of HP Smart Selection?
Selecting content you want on a web page using Internet Explorer's standard selection is difficult. Sometimes you want to select an image and text around it. Then it will be a difficult thing to do it with Standard Selection. But with HP Smart Selection feature you can select the content you want on a web page very easily. Also you can print that selected content.
How to select and print the content you want with HP Smart Web Printing 2.0?
First turn on HP Smart Selection from Edit menu of your IE browser. Now open the web page whose content you want to select, with Internet Explorer. Now drag out a rectangular area containing the content you want to select. Only content within the area is selected. A pop-up menu with the following options also appears when you make a selection as shown in the fig below.
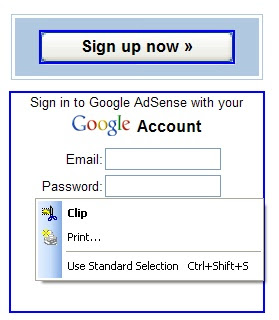
If you choose the Clip option, then the selected content will be added as a Clip to the Clip Book Pane on the the right side of the browser window. The Clip Book can store upto 100 clips. Once the clip is added to the Clip Book Pane then you can print the content in the clip or you can save the content in the clip as a PDF file.
If you choose Print option, then You can print the selected content with the printer you have.
If you choose Use Standard Selection then the present HP Smart Selection mode will be switched back to Standard Selection.
How to save the entire Web page as PDF file with HP Smart Web Printing 2.0?
First turn on HP Smart Selection from Edit menu of your IE browser. Now open the web page you want to save as PDF file, with Internet Explorer. Now drag out a rectangular area over the entire page. Now a small pop-up menu appears as explained above with Clip, Print, Use Standard Selection options. Choose Clip option. Now the entire web page will be added as a Clip to the Clip Book Pane on the right side of the browser window as shown in the fig below.
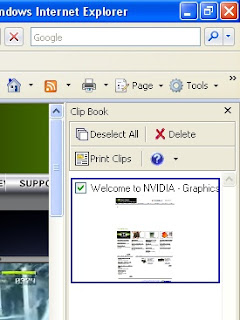
Now select Print Clips from the Clip Book Pane. Now Print Clips window will present on the screen. Now click Save As PDF button. Now choose a save directory and type a name for the PDF file then click Save. Now your entire Web page will be saved as a PDF file. But the Text and Images quality will be low as compared to the original web page.
Download HP Smart Web Printing 2.0
Thursday, July 19, 2007
Security Issues fixed in new Firefox 2.0.0.5
Mozilla developers fixed many bugs and security issues in Firefox 2.0.0.5 update. The following security issues have been fixed by Mozilla in Firefox 2.0.0.5 update.
XPCNativeWrapper pollution
Unauthorized access to wyciwyg:// documents
Remote code execution by launching Firefox from Internet Explorer
File type confusion due to %00 in name
Privilege escalation using an event handler attached to an element not in the document
Frame spoofing while window is loading
XSS using addEventListener and setTimeout
Crashes with evidence of memory corruption
You can download Firefox 2.0.0.5 update from here
SMPlayer
SMPlayer is a free multimedia player which plays Videos, Vcds, Dvds. SMPlayer plays all known video and audio formats without the need of external codecs.
SMPlayer uses the award winning MPlayer as engine. SMPlayer plays known formats like avi, mkv, ogm, mpeg, vob, 3gp, asf, mov, wmv, mp3, ogg without the need of external codecs. We can play internet streams also with SMPlayer.
SMPlayer remembers the settings of all files you play. Suppose you watch a movie for sometime then close the SMPlayer. If you play the movie again then SMPlayer will resume the movie at the same point you left it.
So many features available in SMPlayer. But SMPlayer is still alpha software. So additional features may contain bugs. In future so many new feautures are also available in SMPlayer. SMPlayer is now available for both Windows and Linux now.
Download SMPlayer
In the same site an update to SMPlayer is also available. Download it also. After installing SMPlayer, uncompress the update file on the same directory where you installed SMPlayer, overwriting the old files.
Wednesday, July 18, 2007
Rainlendar
Rainlendar is a Desktop Calendar application with a wide variety of Skins. Rainlendar is platform independent, so Rainlendar can be run on Windows 2000/2003/Vista/XP and linux also. We can store our Events and Tasks. We can also set an alarm for those Events and Tasks. Rainlendar will alert you in advance by alarm before the Event or Task takesplace. We can set alarm in minutes, hours, days before the event starts.
We can change the appearance of the calendar with the the help of Skins. For getting skins rightclick on the calendar. Then select Options. Then click Skins. Now click Get More Skins. That link will take you to the Skins page of Rainlendar site. Now you can download the Skin you like.
Old skins and New skins are available for Rainlendar. Old skins are generally in Zip or Rar format. To install old skins, just uncompress the skin into the skins folder of Rainlendar. To install new skins just double click them.
Observe the skin below.

Tuesday, July 17, 2007
JaBack - Free Automated Data Backup Software
Jaback backups your files and folders. Jaback creates the backup file or folder in standard zip format. Any zip software can unzip the backup file easily. You can also unzip the backup file using Jaback's Zip Viewer utility. Also You can Transfer your backup data to a remote location via Ftp or Email it to your mail server.
How Jaback backup the files?
First create a folder in your computer to place the backup file. So for example create a folder named backup in your D drive. Now run Jaback program. Jaback main window will open. Now from Tasks menu choose backup. Backup window will be like below.
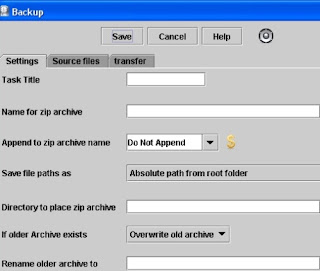
Type a task title for example sample. Now enter a name for backup zip file, say for example samplezip. Now browse the directory to place the zip file as D:\backup. Now click Source files tab. Now click Add Local tab. Now open dialogbox will open. Now browse for the file or folder you want to backup. For example I browse for a file named source in D drive. After selecting that file click open. Now click Save button. Now Jaback's main window will open. In main window you will observe sample under tasks. Now select sample then click Run button. Now Jaback runs the task sample and saves the file source as samplezip in D:\backup folder. So Jaback backup the file Source to D:\backup folder as a zip file named samplezip.
How to extract the backup file with Jaback's Zip viewer utility?
Now run Jaback program. Jaback main window will open. From Utilities menu select ZipViewer. Now Zip Archive Viewer window will open. Now browse for the file samplezip which is in D:\backup. Select that file then click open. Now Zip Archive viewer display the original file named Source in it's window. Now click Extract. Now select a directory to extract the zip file then click open. Now the zip file will be extracted to the directory you specified.
Jaback supports Windows 95, 98, ME, NT, 2000, XP, NTserver, 2000server, 2000AdvServer, and Vista
Download Jaback
Monday, July 16, 2007
Grand Theft Auto IV is coming on 16 october 2007
Grand Theft Auto IV is coming on PlayStation 3, Xbox 360 on 16 October 2007 in USA and then in the UK on 19 October 2007. You can pre-order GTA IV from Rockstar Warehouse, Amazon, Game(UK), GameStop, EB Games stores for 59.99 dollars. It is available for the XBOX 360 and PlayStation 3 in US and Europe.
Grand Theft Auto IV is written by Rockstar co-founder Dan Houser. Rockstar team has taken 3 years to make the game. Rockstar uses Rockstar Advanced Graphics Engine (RAGE) for developing the game. Grand Theft Auto IV looks beautiful with excellent graphics due to the new Graphics Engine. Rockstar has created the biggest and most detailed Liberty City map for the game. So Liberty City in GTA IV looks more realistic than the former GTA games.
Cars, Helicopters, Boats are common in this latest GTA game also but no Planes. You can not steal a car by simply opening the door in GTA IV. First you have to break the window of the car then hotwire the steering column.
In Grand Theft Auto IV the player can freely climb trees and telephone poles, can push people who bump into him, can call a woman for a date. The player can also make use of the internet as a means of communication in addition to the cell phone.
Niko Bellic is the hero of Grand Thefy Auto IV. He arrives in Liberty City from Eastern Europe due to his cousin Roman. Roman is Niko Bellic's cousin who resides in Liberty City. Roman is one of our hero's main friends. Some other characters include female character Elizabeta, arms dealer Little Jacob, corrupt cop McReary, and lawyer Goldberg.
See the screenshots below.


Sunday, July 15, 2007
How to track your site's visitors, page views, site page traffic, incoming site traffic, outgoing site traffic with FeedBurner Stats PRO Service?
Now I will explain how to turn on FeedBurner Stats PRO service, how to track your blogger site's visitors, page views, site traffic etc.
First sign in to your FeedBurner account. Now click your feed title. This will take you to the Analyze tab of your feed. Now click FeedBurner Stats PRO service which is at the bottom left hand corner of the window. Now click the Item Views checkbox, Item link clicks checkbox, Visitors checkbox, select your Time Zone then click Save button. Now FeedBurner Stats PRO service is activated.
Now in the same page you can get html code to collect stats on your site. First turn off Pop-up Blocker from the Tools menu of Internet Explorer. Now choose Blogger. Then html code will be displayed in a Pop-up window.Now in the Pop-up window go to Editing Blogger Templates. Now copy the html code present in the box.
Now Sign in to your Blogger account. At your DashBoard click Template. Now your template html code window will open. In your template code, scroll to <p class=“post-footer”>. Just paste the copied html code just above <p class=“post-footer”>.
If you donot see this <p class=“post-footer”>code, Do not panic. Just Paste the code near the post metadata (author, date, comments, etc) as shown below.

Now Click Save Template Changes. Be patient up to one or two hours. Now sign in to your FeedBurner account. Go to FeedBurner Stats PRO service. Now this service will display your blogger site's visitors, page views, site traffic etc.
Friday, July 13, 2007
PeaZip
PeaZip is an open source portable file archiver. You can compress, extract, and split a file with Peazip. It supports Windows all versions and Linux.
PeaZip supports its native PEA archive format. Also PeaZip supports many archive formats like 7Z, 7Z-sfx, BZip2, GZip/TGZ, PAQ8F, PAQ8JD, PAQ8L, PEA, QUAD, split (.001), TAR, ZIP. PeaZip reads many archive formats like ACE, ARJ, CAB, CHM, CPIO, ISO, Java archives (JAR, EAR, WAR), Linux installers (DEB, PET/PUP, RPM, SLP), LHA, LZH, Open Office file types, PAK/PK3/PK4, RAR, Windows installers (NSIS, some MSI), Z/TZ.
Compression
Just right click the file you want to archive. Then select Add to separate archive. Then PeaZip program window will open.
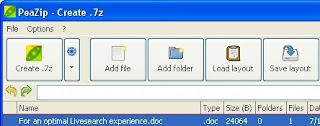
Now click customize orchive options button(small down triangle). Then select your archive format type, Compression level. Now click Create archive button. Now choose the save directory, file name then click Save button.
Extraction
Right click the archive file you want to extract. Then select Extract archives here.
Split
Right click the file you want to split. Then select Split file. Now type the split volume size in Megabytes then click O.K.
Download PeaZip
Free Uninstaller
Free Uninstaller is the freeware uninstall tool. You can use this tool instead of Add/Remove program.
Free Uninstaller displays list of the installed applications, invalid entries, and System components. Invalid elements are highlighted with red color. System components are highlighted with dark blue. System components are hidden by default since removing System components can damage the operating system. Free Uninstaller display System components by selecting Show system components from the view menu.
You can easily uninstall a installed application or invalid entry with Free Uninstaller. Simply select the application or invalid entry in the list then click Uninstall button. You can also remove any application or entry from the displayed list. Simply select it and click Remove button. You can get additional information about the selected application on the bottom panel. You can hide the bottom panel also. Just deselect Show/Hide bottom panel from the view menu.
You can generate backup of the system uninstall list to a REG file with Free Uninstaller.
Download Free Uninstaller
Thursday, July 12, 2007
Windows Live OneCare 2.0 Beta released
Windows Live OneCare 2.0 protects your system from viruses, hackers, and other threats. It also performs regular tune-ups to help keep your PC running at top speed, and helps you back up important documents.
Windows Live OneCare 2.0 Beta will regularly update itself based on emerging Internet threats. It runs in the background. It provides anti-virus, anti-spyware, online identity and scam protection and firewall protection.
Windows Live OneCare 2.0 Beta is supported in Australia, Austria, Belgium, Canada, France, Germany, Ireland, Italy, Japan, Mexico, Netherlands, New Zealand, Singapore, Spain, Switzerland, UK, and US only.
Windows Live OneCare 2.0 Beta supports all editions of Windows XP SP2, Windows Vista Home Basic, Home Premium, Business, Ultimate editions, and X64 for Windows Vista.
Sign up Windows Live OneCare 2.0 Beta
Wednesday, July 11, 2007
Autoruns
Autoruns utility shows you what programs are configured to run during system bootup and shows you the entries in the order Windows processes them. These programs include ones in your startup folder, Run, RunOnce, and other Registry keys.
Autoruns shows you the currently configured auto-start applications as well as the full list of Registry and file system locations available for auto-start configuration. Autostart locations displayed by Autoruns include logon entries, Explorer add-ons, Internet Explorer add-ons including Browser Helper Objects (BHOs), Appinit DLLs, image hijacks, boot execute images, Winlogon notification DLLs, Windows Services and Winsock Layered Service Providers.
Run Autoruns and it shows you the currently configured auto-start applications as shown in the figure below. Due to limited place I crop the picture. So you can observe some applications only.

Disabling and Deleting Entries
If you don't want an entry to active the next time you boot you can either disable or delete it. To disable an entry uncheck it. You delete items by choosing Delete in the Entry menu. Only the currently selected item will be deleted.
Getting More Information about an Entry
There are several ways to get more information about an entry. To view a location or entry in Explorer or Regedit chose Jump To in the Entry menu. Autoruns automatically execute an Internet search in your browser by selecting Search Online in the Entry menu.
Autoruns works on all versions of Windows including 64-bit versions.
Download Autoruns
Windows Vista Hardware Assessment version 2.0
The Windows Vista Hardware Assessment is a tool that will find computers on a network and perform a detailed inventory of the computers using Windows Management Instrumentation (WMI). Then the tool will assess and report whether the computers can run Windows Vista or not, with the use of the detailed inventory data. This tool will find drivers for devices on the computers, and provide recommendations for hardware upgrades.
System Requirements
Supported Operating Systems:
Windows Server 2003 R2 (32 Bit x86), Windows XP Service Pack 2, Windows Vista
Hardware Requirements:
1.6-GHz or high speed processor minimum
1 GB of RAM minimum
1 GB of free hard-disk space
10/100 Mbps network adapter card
Software Requirements:
Microsoft SQL Server 2005 Express Edition for storing inventory and assessment data. Microsoft Word 2003 SP2 or Microsoft Word 2007 and Microsoft Excel 2003 SP2 or Microsoft Excel 2007 for generating reports.
Download Vista Hardware Assessment tool
Microsoft announces Windows Server 2008 release date
At the Worldwide Partner Conference, Microsoft announced that it will release Windows Server 2008, Visual Studio 2008 and SQL Server 2008 on Feb 27, 2008. It has already released Windows Server 2008 Beta 3, Visual Studio 2008 Beta 1 versions.
Microsoft Windows Server 2008 is the next generation of the Windows Server operating system with more secure, reliable, and robust server environment than ever before. Windows Server 2008 provides powerful improvements to the base operating system over Windows Server 2003. It made powerful improvements to networking, advanced security features, remote application access, centralized server role management, performance and reliability monitoring tools, failover clustering, deployment, and the file system.
Monday, July 09, 2007
Sony's 80 GB PS3 model will be available in August
How to bypass “Check online for a solution later and close the Program” message in Windows Vista?
Some Programs may not work if Windows Vista Problem Reports and Solutions is turned on. If you try to run a program you will encounter the following message.
Check online for a solution later and close the Program
If you encounter the above message for a program then first simply uninstall the program. Now Freshly install the Program. Do not run the program at present.
Now turn off Windows Vista problem Reports and Solutions feature as explained below.
Open Control Panel. Then click System and Maintenance. Now click Problem Reports and Solutions. Now click Change Settings. Now click Advanced Settings. Now select Off button, Remove the tick mark at Automatically send more information, and add the exe file of the problematic Program to the block list then click O.K. Again click O.K.
Now run the Program. Now you won't encounter Check Online for a solution later and close the Program problem.
Saturday, July 07, 2007
CPU-Z
CPU-Z is a freeware program which gathers information about your CPU, Main Board, Memory and System information.
You can get information about your CPU name, codename, specification, clocks, cache etc.
You can get information about your Main Board vendor, model, chipset, south bridge, Bios model and date, graphic interface etc.
You can get information about your Memory type, size, Timings and Memory Slot Selection details.
You can get information about your windows version, directx version.
No need to install this program. Just unzip the files in a directory and run the .exe.
CPU-Z supports windows vista also.
Download CPU-Z
Apple launched Website for iPhone Web application Developers

iPhone uses Safari browser. So web applications developed for iPhone must be compatible with Safari.
The developers must Understand the capabilities of iPhone, Follow established design practices for the web, Adopt iPhone-specific design principles inorder to design a web application for iPhone.
The iPhone Developers must Understand User-iPhone Interaction, Use Standards and Tried-and-True Design Practices, Integrate with Phone, Mail, and Maps, Optimize for Page Readability, Ensure a Great Audio and Video Experience, Know What Safari Supports on iPhone, Connect With Web Developers inorder to design web applications for iPhone.
Detailed Development Guidelines for iPhone Developers
Friday, July 06, 2007
SIW 1.69
SIW 1.69 is an advanced System Information Tool for Windows that gathers detailed information about software, hardware of your system. It also gathers your detailed network information.
SIW 1.69 gathers detailed information about Operating System, System Directories, Installed Programs and Applications, Processes, Services, Users, Open Files, System Uptime, Installed Codecs, Software Licenses, Drivers, Loaded DLLs, Shared DLLs etc.
SIW 1.69 gathers detailed information about Motherboard, Sensors, BIOS, CPU, chipset, PCI/AGP, USB and ISA/PnP Devices, Memory, Network Cards, Video Card, Monitor, Disk Drives, CD/DVD Devices, SCSI Devices, S.M.A.R.T., Ports, Printers, Battery etc.
SIW 1.69 gathers detailed information about Network Cards, Network Shares, currently active Network Connections, Open Ports etc.
SIW 1.69 includes Tools like Mac Address Changer, CPU and Memory Usage, Win 9x Password Cracker, Shutdown/Restart, Open Gl Test and many more Tools. You can access these Tools from SIW 1.69 Tools menu.
No need to install SIW 1.69. Just doubleclick SIW 1.69 exe file. Then the program starts. On the left hand side all software and hardware items present. If you click any item then SIW 1.69 displays full information regarding that item.
SIW 1.69 available as Freeware version, Technician's Version and the Business Version. The Freeware Version can save the LOG file only as HTML where as the Technician's Version and the Business Version can save the LOG file as CSV , HTML, TXT or XML.
Download SIW 1.69
FeedBurner's FeedBurner Stats PRO service is free for all
FeedBurner is a Chicago-based company that provides media distribution and audience engagement services for blogs and RSS feeds. Its Web-based tools, including an extensive feed and blog advertising network, help publishers promote, deliver, and monetize their content on the Web and make feed-based content more accessible and manageable for its end users. It is offering so many free services to Bloggers. But FeedBurner Stats PRO service is not free. This service tracks your site visitors, site page traffic, Incoming site traffic, outgoing site traffic, item views etc. Previously this service is a paid service.
Recently Google has acquired FeedBurner. Now FeedBurner is part of the Google family. Google offering FeedBurner Stats PRO and MyBrand services for free now.
You can turn FeedBurner Stats PRO feature on by signing in to your account, navigating to the Analyze tab and go to the FeedBurner Stats PRO section. Click the Item Views checkbox to activate these PRO features.
Thursday, July 05, 2007
Tux Paint, a free drawing program for children
Tux Paint is a free, award-winning drawing program for young children. It combines an easy-to-use interface, fun sound effects, and an encouraging cartoon mascot who guides children as they use the program. It provides a blank canvas and a variety of drawing tools to help your child be creative.
Tux Paint supports all Windows versions, Mac, and Linux. Tux Paint for windows comes as two parts. One is main program and the other is a add-on Stamps collection. With this add-on you can get hundreds of photographic and cartoon stamps images. You can draw these photos with the help of Rubber stamp Tool. So first install main program. Then install add-on stamps collection in the same directory.
By default all images of Tux Paint are placed in a Saved folder when you click the Save button. This saved folder is inside user's Application Data folder that is in C drive. Application Data folder is hidden in windows. So inorder to view your saved images you have to open all these folders. There is a simple technique also. You can set an alternative save directory as explained now. For example first create a folder named Tux Pictures in F drive. You can set this folder as an alternative save directory. Now install Tux Paint program then install add-on stamps collection in the same directory. Now open Tux Paint folder in Program Files folder of C drive. Now search for tuxpaint-config file in Tux Paint folder. Double click that file. Then click the tab Saving. Put tick mark at Use Alternative Save Directory. Then in the box type F:/Tux Pictures then click Apply. Then quit the program. From now your images are placed in F:/Tux Pictures when you click the Save button. Tux Paint images are in PNG format. So if you want to edit an image file other than PNG format, you first convert that format to PNG format by using Paint.Net or by any image editing software. Then place that file in Tux Paint's Saved directory. Now you can edit the PNG format with Tux Paint.
Now I will explain how to use Tux Paint.
The main screen of Tux Paint will be as shown below.
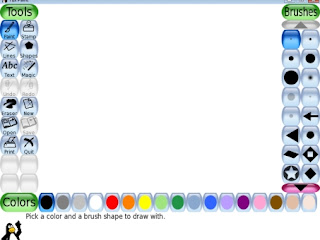
Toolbar will be present at the left side. The toolbar contains the drawing and editing tools. Drawing Canvas is present at the middle of the main screen. Selctor will be present at the right side. Depending on the current tool, the selector shows different images. For example when the Paint Brush tool is selected, it shows the various brushes available. When the Rubber Stamp tool is selected, it shows the different shapes you can use. Color palette will be present near the bottom of the screen. At the very bottom of the screen, Tux, the Penguin, provides tips and other information while you draw. Save button is present in the toolbar. When you click the Save button then the image on the Canvas will be placed in the Saved Directory of the Tux Paint.
Tools present in the Toolbar
Paint Brush
With Paint Brush Tool you can draw freehand images using various brushes (chosen in the Selector on the right) and colors (chosen in the Color palette towards the bottom).
Rubber Stamp Tool
With Rubber Stamp Tool you can paste pre-drawn or photographic images in your picture.
A lot of stamps are available (animals, plants, outer space, vehicles, people, etc.). Use the Left and Right arrows to cycle through the collections. Some stamps can be colored or tinted. If the color palette below the canvas is activated, you can click the colors to change the tint or color of the stamp before placing it in the picture. Stamps can be shrunk and expanded, and many stamps can be flipped vertically, or displayed as a mirror-image, using controls at the bottom right of the screen.
Line Tool
With Line Tool you can draw straight lines using the various brushes and colors.
Shape Tool
With Shape Tool you can draw various filled and unfilled polygonal shapes. Select a shape from the selector on the right side. Click the mouse in the canvas and hold it to stretch the shape out from where you clicked.
Text Tool
With this Tool you can type text on the screen.
Magic Tool
The Magic tool is a set of special tools. Select one special effect from the selector on the right, and then click and drag around the picture to apply the effect. For example the Grass effect paints grass on the screen.
Eraser Tool
With this Tool you can erase the picture.
Other Tools
Undo
Undo Tool will undo the last drawing action. You can undo so many times.
Redo
Redo Tool will redo the drawing action you just undid with the Undo button.
New
This will start a new drawing.
Open
You can get a list of all of the pictures you have saved by clicking this button.
Save
This saves your picture in a default Saved Directory. You can set an alternative save directory also. I already explained about this.
Print
Your picture will be printed by clicking this button.
Quit
You can close the Tux Paint window by clicking this button.
See the following figure drawn with Tux Paint program.

I have drawn the Leaves with the Paint Brush by selecting Leaves brush on the Selector. With the help of Magic Tool I painted Grass effect on the canvas by selecting Grass effect on the Selector. With the help of Rubber Stamp Tool I pasted birds and animals on the canvas. So Young children can draw a variety of paintings by using Tux Paint. Also Tux Paint is very easy to use.
Download Tux Paint
Flock 0.9 Beta Released
Flock is an amazing new social web browser. Flock is built on FireFox engine. So it works in the same manner as Firefox. We can view and share photos with a new photo bar in the Flock browser. Flock has built in support for Flickr and Photobucket. Flock has also a built in blog editor. The blog editor uses the native Mozilla editor, and has better support for various blog platforms.
Flock is built on fast and secure Mozilla technologies. Flock's Navigation Toolbar is different from FireFox as shown below.

In the Navigition Toolbar we will observe Forward Backward, Reload, Home, Pics, My News, Set up My Blog, and star buttons. There is no Stop button.
In Flock Stop and Reload buttons have been combined into one button. Usually by clicking the button, the current page will be reloaded. While a page is being loaded, the button has an X on it, and clicking the button will stop the page from being loaded. With Pics button we can view and share photos. My News button allows you to subscribe to RSS feeds. We can get latest news. News will be updated with fresh content every hour. Set up My Blog button supports our blogs. By clicking Star button we can mark any page as a favorite.
Download Flock
Tuesday, July 03, 2007
FireFox 3 (Gran Paradiso Alpha 6) Released
Gran Paradiso Alpha 6 is the next version of current FireFox version. FireFox 3 is built on Mozilla's next generation layout engine, Gecko 1.9.
Gecko 1.9 Alpha 6 introduces several new features like inclusion of the FUEL Javascript library for extension developers, new Page Info window, improvements to offline application support, many Cocoa user interface improvements and bug fixes.
Gran Paradiso Alpha 6 or FireFox 3 is now available for Windows, Linux, and Mac OS X.
Windows Users can download FireFox 3 at the location below
Windows version FireFox 3
MAC OS X Users can download FireFox 3 at the location below
Mac Version FireFox 3
Linux Users can download FireFox 3 at the location below
Linux Version FireFox3
Windows Users can also download FireFox 3 at the following location
ftp://ftp-mozilla.netscape.com/pub/mozilla.org/firefox/
releases/granparadiso/alpha6/win32/en-US/
In FireFox, I.E 7.0 just type the above address then press enter. Then it will open the site then click Gran Paradiso Setup Alpha 6.exe link.
How to install and configure UltraVNC for Remote computer access?
UltraVNC is a free powerful software which displays the the screen of another computer on your own screen via internet or network. So you can easily control the other PC with your mouse and keyboard. So you can work on a remote computer right from your current location.
Suppose if you have computers in LAN network. you want to control system with IP Address 192.168.1.6 from a system with IP Address 192.168.1.7. Now I will explain how to control 192.168.1.6 from 192.168.1.7 using UltraVNC.
First install UltraVNC in both systems. During installation select full installation of UltraVNC. Full installation installs UltraVNC Server and UltraVNC Viewer. So install UltraVNC Server and UltraVNC Viewer in both of the systems.
After completing installation, now run UltraVNC as Server from system with IP Address 192.168.1.6. You will observe on the screen as shown below.

Now type a VNC Password as you like then click Apply then click O.K. Now UltraVNC Server runs on 192.168.1.6
Now if you want to control 192.168.1.6 from another sytem in the LAN network with IP Address 192.168.1.7 then run UltraVNC as Viewer from 192.168.1.7. You will observe on the screen as shown below.
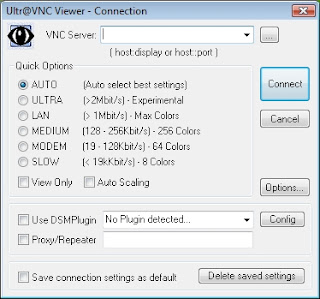
Now in VNC Server box type 192.168.1.6 then click Connect. Now it prompts you to type the VNC Password. So type the VNC Password that you already set to the VNC Server then click Logon. Now VNC Viewer starts on 192.168.1.7 as shown below.
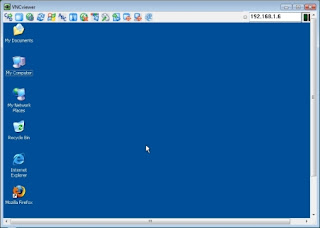
So the desktop of 192.168.1.6 now appears on 192.168.1.7 as shown above. So now you can control 192.168.1.6 as you like from 192.168.1.7.
Suppose if you open I.E and starts surfing the net on 192.168.1.6 then you can observe all your activities in 192.168.1.7 also. All of your sites will also open in VNC Viewer of 192.168.1.7.
We can also chat with 192.168.1.6 from 192.168.1.7 by clicking Open Chat button from VNC Viewer of 192.168.1.7. The chat window will be as shown below.
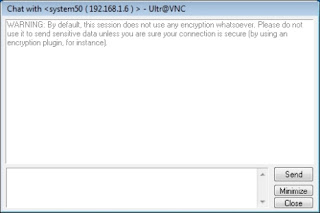
Now you learnt how to configure UltraVNC to control a PC from another PC in a LAN Network. You can also apply the same procedure for controlling a Remote computer via internet using UltraVNC.
Download UltraVNC
Microsoft .NET Framework 3.5 Beta 1 Released
All existing applications built for .Net Framework 2.0, 3.0 also run in .Net Framework 3.5. Microsoft planned to release the final package at the end of 2007.
New features are added in major technology areas. They are
Deep integration of Language Integrated Query and data awareness
ASP.NET AJAX for quickly creating more efficient, more interactive and highly-personalized Web experiences that work across all the most popular browsers
New web protocol support for building WCF services including AJAX, JSON, REST, POX, RSS, ATOM and several new WS standards
Full tooling support for WF, WCF and WPF including the new workflow-enabled services technology
New classes in the base class library for the .NET Framework 3.5 address the most common customer requests.
Download .Net Framework 3.5 Beta
Monday, July 02, 2007
ooVoo
ooVoo is a free program which is used to connect with friends, family, and colleagues using full video and sound. You need Broadband internet connection, webcam, microphone, and speakers to use ooVoo. ooVoo supports Windows 2000/XP/Vista. At present beta version is available for windows only. At present ooVoo is not available for Mac and Linux. ooVoo contains no spyware, no cookies.
Features:
Talk face to face with up to 6 people at a time
Smooth video displayed in 3D with clear sound
When No one answering your call then you can leave a voice, video or text message
Adjust/Mute microphone, speakers or camera
Choose your ringtone
View call history (missed calls, incoming calls, etc.)
Record and send video messages to ooVoo users or friends who don't have ooVoo yet. Then your friends will receive a notification email with a link to download ooVoo.
Send to as many people as you want at once
Play video message on any computer
Save the video message to your computer
Use video messages for birthday party invites, sales contacts or as postcards from your travels
Chat with one person or with up to six people at once
Easily invite your contacts to join a text chat session
Send chat messages to offline contacts
With ooVoo you can send large files to your contacts anytime
Send large files (up to 25 MB per file)
Send up to 20 files at a time to as many contacts as you want
Send files to contacts who are offline
Download ooVoo
