Thursday, July 26, 2007

Shup v0.14 - Free Screen capture Utility


Shup is a free Program which captures your desktop and uploads files to many different hosts. Shup also includes a built in Image Editor. You can share your screenshots, images, and other files by turning them into web links with this small utility program Shup. Shup supports Windows 2000, Windows XP, and Windows Vista.

How to Use Shup?
When you run Shup program then Shup Icon will sit in system tray. If you want to take a screenshot of your desktop or the currently active window, then right click on the Shup icon at the system tray, then select Capture Desktop. Wait for sometime. Shup will take the screenshot of the desktop or active window and store it in default directory C:\Program Files\Shup\Archive. The image is saved in PNG format only. Also the image is automatically uploaded to any one of the supported hosts like ImageShack, Stasbox etc. Also the URL is placed into your clipboard so that you can easily copy and share that image url with your friends.

See the screenshot below, taken by Shup
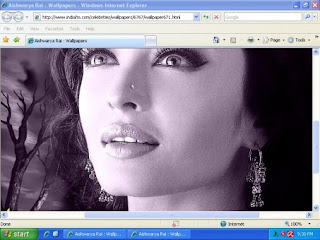


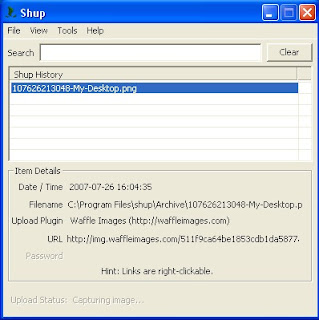
You can also get the URL details in another way. Just doubleclick on Shup icon at the system tray. Then Shup history window will open. Just click an item in history window. Then Shup will display the item details as shown in the figure below.

You can upload files to different hosts like Flickr, ImageShack, PhotoBucket, Stashbox, and Waffle Images with Shup. Just right click the file you want to upload then select Shup, then select the host. It is very simple process.

You can do Image editing also with Shup. Just right click the image you want to edit then select Shup, then select Open In Shup. Now Shup will open the image. Remember Shup supports only PNG format. Shup provides Paint Brush Tool, Highlighter Tool, Rectangular selection Tool and Crop Tool. You can do Image editing with these Tools.

Download Shup


Wednesday, July 25, 2007

Process Monitor v 1.2


Process Monitor is an advanced monitoring tool for Windows. It shows real-time file system, Registry and process/thread activity. Process Monitor's user interface and options are similar to those of Filemon and Regmon. But Process Monitor includes numerous significant enhancements over Filemon and Regmon.

Process Monitor displays file system activity for all Windows file systems, including local storage and remote file systems. Process Monitor automatically detects the arrival of new file system devices and monitors them. To remove file system operations from the display de-select the file system push-button in the Process Monitor toolbar and to add back file system operations depress the button.

Process Monitor logs all Registry operations and displays Registry paths. To remove Registry operations from the display de-select the Registry push-button in the Process Monitor toolbar and to add back Registry operations depress the button.

In its process/thread monitoring subsystem Process Monitor tracks all process and thread creation and exit operations as well as DLL and device driver load operations. To remove Process operations from the display de-select the process push-button in the Process Monitor toolbar and to add back process operations depress the button.

Process Monitor supports Windows 2000 SP4 with Update Rollup 1, Windows XP SP2, Windows Server 2003 SP1, and Windows Vista. Also supports 64 bit versions of Windows XP, Windows Server 2003 and Windows Vista.

Download Process Monitor


How to rectify DLL Errors like MSVCR71.dll was not found or MSVCP71.dll was not found or any dll was not found?


Have you received the following DLL error messages when try to install a program?

The application has failed to start because MSVCR71.dll was not found.

The application has failed to start because MSVCP71.dll was not found.

The application has failed to start because xxx.dll was not found.

I think everyone has received this type of messages. We can rectify this type of messages very easily.

First I will explain what is a DLL file and it's uses. Then I will give the solution to the above type of dll error messages.

A dynamic-link library (DLL) is a module that contain functions and data that can be used by another module. Module can be another DLL or a Windows application. A DLL can be used by several programs at the same time. Windows operating system provides some DLLs. Some DLLs are particularly written for a application and these DLLs are loaded with that particular application.

DLLs save memory, reduce swapping, save disk space, upgrade easier, provide after-market support, provide a mechanism to extend the MFC library classes, support multilanguage programs, and ease the creation of international versions. DLL file will be loaded in to RAM when a program needs it only. Thus DLLs save memory. It saves Disk space since same DLL is used by several applications. If each application has it's own DLL then a lot of space is required.

Rectification of DLL Errors:

If you get the application has failed to start because MSVCR71.dll was not found error message, then you have to download MSVCR71.dll zip file. Then extract it. Then copy MSVCR71.dll file and paste it in Windows/System directory.

Download MSVCR71.dll

If you get the application has failed to start because MSVCP71.dll was not found error message, then you have to download MSVCP71.dll zip file. Then extract it. Then copy MSVCP71.dll file and paste it in Windows/System directory.

Download MSVCP71.dll

Other DLL Errors:
If you get any other dll errors then just goto the above site http://www.dll-files.com. In that site you will find Search for DLL Files. Just type the DLL you want in the box, then click O.K. Now it will display that DLL informaton. On the same page you will find the download link for that DLL file. After downloading the DLL file paste it in Windows/System directory.


Tuesday, July 24, 2007

Intel announced the world's first 40G silicon laser modulator


Today Intel announced the the world's first 40G silicon laser modulator. This laser modulator encodes optical data at 40 billion bits per second. This is the Fastest Laser Modulator made from silicon. This laser Modulator is Capable of putting one's and zeros on a beam of laser light - 40 Billion time per second.

In 2004 Intel announced a One Giga-bit per second silicon laser modulator. Now they have achieved 40 Giga-bits/second. By Using 25 Silicon Laser Modulators at 40Gb/s Intel can build a Tera-bit per second Optical link.

One Tera-bit = 1000 Billion bits

Today's commercially available optical modulators at 10 Gbps are based on lithium niobate and III-V compound semiconductors. These devices have deployed at speeds up to 40 Gbps. But these are more costlier than silicon laser modulators.


Windows Vista Drivers for HP LaserJet 1018(for all other models also) are now available


Not only HP LaserJet 1018 Windows Vista drivers, but also other HP printers Windows Vista drivers are now available.

Two types of Driver Packages are available for HP LaserJet 1018 printer. One is HP LaserJet 1018 Basic Plug and Play Driver. This package provides drivers and software to assist with device installation for devices connected via hi speed USB 2.0 port. Second one is HP LaserJet 1018 Basic Print Driver. You can use this software for first time USB installations only. Do NOT attach a USB cable until prompted by the installation program.

HP LaserJet 1018 Plug and Play Driver installation:
First download the driver software. Then just double click on the file and follow the on screen instructions. The installer will extract all the driver files to a default directory C:\Program Files\Hewlett-Packard\LaserJet 1018 Drivers. This driver supports Microsoft Windows 2000, Microsoft Windows XP, Microsoft Windows Vista, Microsoft Windows Server 2003.

Download HP LaserJet 1018 Basic Plug and Play Driver

HP LaserJet 1018 Basic Print Driver installation:
Now I will explain how to install HP LaserJet 1018 Basic Print Driver. This HP LaseJet 1018 driver also supports Microsoft Windows 2000, XP (32-bit), Server 2003 (32-bit).

Be ready with your printer. But do not attach the USB cable to the printer.

First download HP LaserJet 1018 Print Driver Package and save that package in a directory.

After download has completed then double click on that file. This will extract the driver files into a default directory C:\Program Files\Hewlett-Packard\LaserJet 1018 Drivers.

Now go to that default directory then click EZInstall. Then follow the instructions on the screen. Attach the USB cable to the printer when the install program prompts you to do. Also switch on the power supply to the printer.

Now if Found new Hardware screen appears, then click Locate and install driver software (recommended). (Windows Vista only).

Download HP LaserJet 1018 Basic Print Driver

For Other Printers drivers visit this link

HP recently (July 30) released HP Universal print Driver 4.0 for Windows Vista, XP, 2000, 2003 Server. HP Universal Print Driver 4.0 is a single driver that supports PCl5, PCl6, and HP postscript level 2 and level 3 emulation. Details of HP Universal print Driver 4.0 are available here.