Saturday, May 19, 2007

The Smallest Web Browser(60 kb file)


MA Internet Browser is the smallest browser with 60 kb size only. This browser is based on the IE technology. It was developed by Mahmoud, 18 years old student in Ain Shams University faculty of Engineering in Egypt. We can run this program in Windows(English version) only.

It is very easy to use. First download the zip file. Then unzip it. Simply copy the folder to the location you want on your HD. Double click it to run the program. Some times it will give error message like COMDLG32.OCX missing or invalid. MA Internet Browser needs this library file. In order to fix the above problem, you shall need to set up and register that library file. Download the following Library Installer and install it, then all problems regarding library files will be solved.

Download Ascentive Library Installer

When you start the program the browser window will be like this.

Download MA Internet Browser


Wednesday, May 16, 2007

Check your link partners sites to verify reciprocal links back to you by QuidProQuo Reciprocal Link Checker Software


How can you know whether your link partner kept reciprocal link back to you or not? Generally we visit their site, and check their links page for our link. Sometimes it may be very difficult for us to check for our link in our link partner's site if he kept hundreds of links. We can do the link checking easily by QuidProQuo Reciprocal Link Checker Software. QuidProQuo Reciprocal Link Checker Software is a Freeware. It is available as Lite version only. Later we can make it as Full version very easily. Both are doing the same work. QuidProQuo Lite version will spider the websites slowly. QuidProQuo Lite version allows up to 2 threads only. QuidProQuo Full version allows up to 16 threads. It will spider multiple websites at the sametime. So QuidProQuo Full version will spider the websites fastly than Lite version. Only speed is the difference. Other functions are same for both Lite and Full versions.

QuidProQuo Reciprocal Link Checker Software automatically scans your site and locates your link partners.

QuidProQuo Reciprocal Link Checker Software spiders through your link partners sites and verifies reciprocal links back to you.

QuidProQuo Reciprocal Link Checker Software finds link cheaters. Link cheaters are those to whom we are linking but they are not linking back to our sites.

How to use QuidProQuo Reciprocal Link Checker Software?

Start the QuidProQuo Reciprocal Link Checker Software. Now from the Spider menu select Enter your site URL. Type your URL name in the box then click O.K. If you have Full version then increase your Connections to 16 by clicking on up arrow tab.

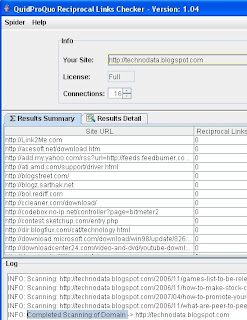
Now again from Spider menu select Find on your Website from Select Sites to Spider option. Then it will start scanning your site for any website links on your site. It will take time for scanning. After scanning completed it will display all website URL's on your site. These URL's includes your link partners also. So after scanning the software displays each and every website link on your site. The display window will be like below.

Now from the Spider menu select Spider Partner Sites then QuidProQuo Reciprocal Link Checker Software spiders through all the displayed URL's and verifies reciprocal links back to you. It will take long time for verification since Reciprocal Link Checker Software scans all pages of displayed URL's completely. After verification of a particular URL, it displays all reciprocal links back to you from that particular site.

With QuidProQuo Reciprocal Link Checker Software we can scan a particular page of our website also.Suppose you want to scan a page http://www.example.com/links.html on your website http://www.example.com. Procedure is also same as above. Start QuidProQuo Reciprocal Link Checker Software program. Now from the Spider menu select Enter your site URL. Type your URL http://www.example.com in the box then click O.K. If you have Full version then increase your Connections to 16 by clicking on up arrow tab. Now again from Spider menu select Find on a page from Select Sites to Spider option. Now enter http://www.example.com/links.html in the box displayed then click O.K. Then it displays each and every website link on that page. Now from the Spider menu select Spider Partner Sites then QuidProQuo Reciprocal Link Checker Software spiders through all the displayed URL's in that particular page http://www.example.com/links.html and verifies reciprocal links back to you.

With QuidProQuo Reciprocal Link checker Software we can also check whether a particular site has link backed to you or not. Procedure is like below.

Start the QuidProQuo Reciprocal Link Checker Software. Now from the Spider menu select Enter your site URL. Type your URL name in the box then click O.K. If you have Full version then increase your Connections to 16 by clicking on up arrow tab.

Now again from Spider menu select Edit Sites to Spider from Select Sites to Spider option. Now type the website address which you want to check then click O.K. Now from the Spider menu select Spider Partner Sites then QuidProQuo Reciprocal Link Checker Software spiders through that particular site and verifies reciprocal links back to you.

How to Upgrade Lite version to Full version?
It is very easy for website owners. Just place a reciprocal link to http://www.webmastersloom.com on any page of your site.. Now start QuidProQuo Reciprocal Link Checker Software. Now from Help menu select Upgrade to a Free Full License then click Get Upgrade button. Now type your site address then click O.K. Then QuidProQuo Reciprocal Link Checker Software scans your site for reciprocal link back to their site. You already put a reciprocal link to their site. So QuidProQuo Reciprocal Link Checker Software verifies the reciprocal link. After scanning completed Just close the program and again start the program. From now it upgrades to full version.

Download QuidProQuo Reciprocal Link Checker Software


Saturday, May 12, 2007

Capture and Record Gloopitcam video, Webcam video and any video playing on your screen with StudioPRO

Broadcaster's StudioPRO is a Freeware software. First I will tell about it's features. Later I will explain how to capture video with StudioPRO.

It allows you to capture any video playing on your screen. So you can capture Gloopitcam or IVBot video, Webcam video, Live streaming video, Pre-recorded video clips playing on any media player. StudioPRO also allows you to record and save the video in so many file formats and compression qualities.

We can play video files with StudioPRO. We can broadcast our webcam output simultaneously on multiple camera chat sites like Yahoo Messenger, MSN Messenger and Skype. Also we can build playlists from our own video files stored on our harddisk and we can play those files to friends who are viewing our webcam.

Capture and Record Gloopitcam or IVBot video as explained below.

I already explained about Gloopit or IVBot in my previous article. Once read it then follow this article. Start your Gloopit or IVBot program. Place the webcam in right place and adjust it's angle until it finds your face correctly. Also apply your favourite video emoticon like evil mask. If your PC has microphone connection then your audio will also be recorded.

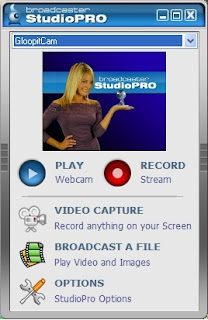
For recording your movements via Webcam, now you have to start broadcaster studiopro program. Now you will have the following options as shown in the figure.

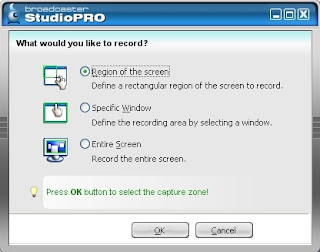
Now from the dropdown menu select Gloopitcam or IVBot as shown above in the figure. Now click Video Capture. Now you will observe the following options.


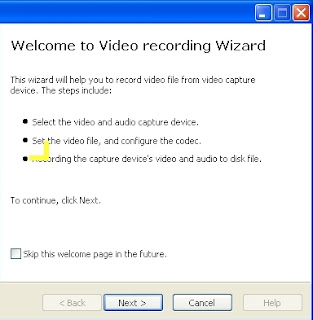
Select the option Region of the screen . With this option we can define a rectangular region of the screen to record. Just click O.K. Now a rectangular marquee appears on the screen. Now put the pointer on the marquee and drag it on to the image of the Gloopitcam(IVBot) or Webcam. Also with the help of pointer you can resize the marquee by dragging one of the corners of the marquee. After setting the marquee on the image, then click Record button on the studiopro program. Then Welcome to Video recording Wizard will come on the screen as shown below.


Just click next. Again click next. Now File selection window will come on the screen as shown below.

Now select the file type of your captured video. Also enter the file name for your captured video. Also select a place to save your captured video. Then click next. Again click next. Now click Start Capture button. Now it will capture the video and save it in the location specified by you. After finishing your work just click Stop Capture.

You can not only capture a Webcam Video, You can also capture any video playing on your screen. Same procedure is applied for capturing any video. You can capture You tube online videos also as explained above. But for online videos some disturbance is coming in the recorded videos. Gloopitcam or IVBot, Webcam recorded videos are very good in quality. Observe the following captured Gloopitcam video by me.


Download StudioPRO

Wednesday, May 09, 2007

Boost your Videochat with Gloopit


Recently (19th may) Gloopit was renamed as IVBot

All we know about emoticons. When we are chatting with our friends by using yahoo, msn messengers, then we use emoticons along with words. Sometimes words are not enough to express our feelings. In that case we use emoticons.

when we are chatting using Webcams(Video Chat), all the above messengers are unable to send emoticons with our video. But with Gloopit or IVBot(Freeware software) we can send a variety of emoticons during our MSN, Skype, Yahoo video chats. We can call this Gloopit video emoticons as Gloops.

Gloops are live video emoticons used to express our feelings when words alone just aren't enough during our Webcam chat by MSN, Skype, Yahoo messengers etc. We can choose a variety of emoticons like Hearts Bursting Out of our Eyes, Eyes Rolling After a Dumb Joke, Balls on our Cheeks, Tears Pouring Down from our Face and many more.

A lot of video emoticons are available with Gloopit or IVBot. By default some Gloops bundled with IVBot software. Those Gloops are available at free of cost. You can get more Gloops from Gloopit website. But you have to buy them. Only about 7 to 8 Gloops are at free of cost from the list given on Gloopit website.

How to use GloopitCam with Windows Live Messenger?
First connect your webcam to the PC. Install the necessary Webcam software. Check whether it is working O.K. If it is O.K then install Gloopit or IVBot software. Now run Gloopit or IVBot. Then it will ask some details like username, password, email address etc. So type a username you like. Then type a password you like. Enter the remaining details and start the program. The important thing is, you have to keep your Webcam in a right place and adjust it's angle position so that the camera will focus your face correctly. Then only video emoticons will work perfectly. For example if you sit in a chair in front of your computer, then keep your Webcam on the monitor in a right place so that it will focus your face correctly. If Gloopit or IVBot is unable to track your face, then it will give a message Face Lost. You can observe this message near the Gloopit or IVBot Tray Icon at the bottom right hand corner of your screen. Then just adjust the camera angle position until it focus your face correctly. Then it will give a message Face Found. Then only you can send emoticons via your Webcam. So placing Webcam in right place, adjusting camera angle position is most important.

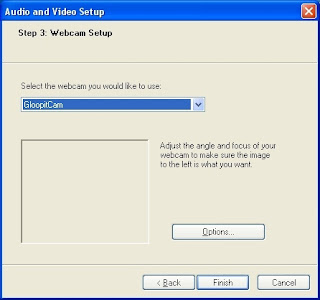
Now login into your Windows Live messenger. Then from Tools menu choose Audio and Video setup. Then after setting speaker, microphone volume (both are not necessary) select the webcam as IVBot then click Finish.


Now with your Windows Live Messenger, you can send your video emoticons via your webcam. See the following free Gloops.


For example if you select the fourth emoticon in the above fig. Then with that emoticon you can threaten your friends via webcam like below.


In Skype you can enable Gloopitcam like below.
From Tools menu select Options. Now select Gloopitcam.

Observe the following captured Gloopitcam video. Then you will understand how Gloopit or IVBot will boost your videochat.

Also for how to capture Gloopitcam video, I have given a link below the video. That article will teach you how to capture video from Gloopitcam. I have captured this video from Gloopitcam by using Studiopro program.


For how to capture Gloopitcam video read my article

Download IVBot

The common problems that will occur when you run Gloopit or IVBot for the First time:
The first time when we try to run Gloopit it will give the following error messages.
1. The application has failed to start because MSVCR71.dll was not found. So you have to download MSVCR71.dll zip file. Then extract it. Then copy MSVCR71.dll file and paste it in Windows/System directory.

Download MSVCR71.dll

2. The application has failed to start because MSVCP71.dll was not found. So you have to download MSVCP71.dll zip file. Then extract it. Then copy MSVCP71.dll file and paste it in Windows/System directory.

Download MSVCP71.dll

After copying the above two dll files now run Gloopit. Still it is giving a error then simply uninstall Gloopit. After uninstallation, remove 3Dsolar directory from program files directory of C drive. Now install Gloopit freshly. This time it will work perfectly.

Other DLL Errors:
If you get any other dll errors then just goto the above site http://www.dll-files.com. In that site you will find Search for DLL Files. Just type the DLL you want in the box, then click O.K. Now it will display that DLL informaton. On the same page you will find the download link for that DLL file. After downloading the DLL file paste it in Windows/System directory.


Saturday, May 05, 2007

GX Transcoder


GX Transcoder is a Freeware universal audio and video file transcoder. The video converter converts video files into many formats like MPEG1, MPEG2, AVI and WMV formats.

The audio file transcoder transcodes audio files into many formats like AAC, MP4, M4A, Bonk, FLAC, LA, LPAC, MIDI, MP2, MP3, MPC, MPP, MP+, OptiomFrog, Ogg Vorbis, rkAudio, VQF, WavPack, TTA, WMA, Shorten, PCM, GSM, ADPCM, VOX, G721, G723, G726, uLaw, aLaw, DSP, Raw PCM, Monkeys Audio, AVI (Audio), MOD, Bonk and more.

Also GX Transcoder has a Cue-Cutter, a DB based Player, a NetRadio Stream Player with recording function.

Anyone can use this transcoder with ease. After installing GX Transcoder, you can find the Transcoder exe file in GXTranscoder v2 folder. This folder is in program files of C drive. Double click that file. Then GXTranscoder program starts. Click the Function menu then choose Video Coverter. Now you can convert videos with converter very easily.
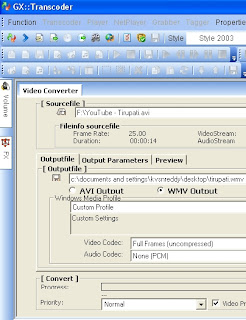
Simply browse the video file you want to convert. Browse the output directory in which you want to save the converted video file. Then type a name for the file. Also select the format to which you want to convert the video. Then click Start Convert button. The converter simply converts the video to the required format and save the file in the directory specified by you.

Download GX Transcoder

Important Note: Check the source file once before do the conversion with GX Transcoder. Sometimes source file audio works but video not works. This happens due to video codec missing. Install the FFDShow MPEG-4 Video Decoder codec. With this codec you will see the video also. You can download this codec at the following site. So do the conversion after checking the source file once.

http://www.free-codecs.com/FFDShow_download.htm