Process Lasso is a unique new technology which takes control of your processes. Process Lasso automatically adjust the allocation of CPU cycles so that system responsiveness, system performance and stability is improved in high-load situations.
Process Lasso temporarily lowers the priorities of processes that are consuming too many CPU cycles and give a chance to other processes to run. Process Lasso offers default process priorities, default process CPU affinities, termination of disallowed processes, and logging of processes executed.
It configures processes to always start at a desired priority. It configures processes to always start at a desired CPU affinity. Process Lasso supports Windows 2000, XP, 2003, 32 and 64 bit Vista. Process Lasso is not a task manager even though it does have some task manager capabilities.
You can download Process Lasso from here.
Tuesday, February 12, 2008
Improve your system stability, performance, responsiveness with Process Lasso


Saturday, February 02, 2008
How to configure PPPOE mode in UT300R2U, WA3002G4 adsl routers for BSNL DATAONE?
Recently Huawei MT 880 adsl router's are not working in PPPOE mode. It is working in Bridge mode only. For multiple computers using the same internet connection, we can configure PPPOE mode very easily. But Bridge mode configuration is little bit difficult when multiple computers are using the same internet connection.
If anybody wants PPPOE mode, they have to replace their MT 880 routers with utstarcom modems like UT300R2U or WA3002G4 adsl wireless routers. UT300R2U modem is available at Rs 1250, so it is better to buy it. PPPOE configuration is same in both UT300R2U and WA3002G4 modems. So I will explain it now for WA3002G4 model. It is same for UT300R2U model also.
BSNL people will do Modem, splitter, phone line connections etc. They will connect the modem to your computer.
Now open http://192.168.1.1 in internet explorer. It asks DSL Router's username and password. So enter admin as username and admin as password. Then it will display Device Info window as shown below.
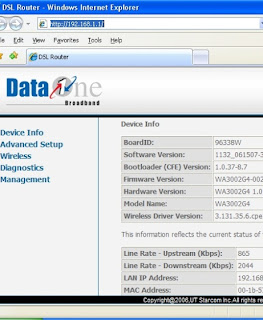
Click advanced setup. Then it will display Wide Area Network (WAN) Setup.
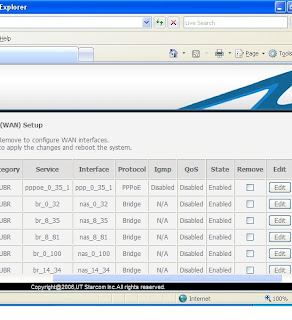
First row will display details about PPPOE protocol. At the end you will observe EDIT button. Just click that button. Then ATM PVC Configuration window will come. Just click NEXT. Connection Type window will come. Now select PPP over Ethernet (PPPoE). Then click NEXT. Now enter your PPP username and PPP password which are given by BSNL. Then click NEXT. NAT settings window will come. Just click NEXT(For UT300R2U model here Enable IGMP Multicast and WAN service window will come. Just click NEXT). Now WAN setup summary window will come. Now click Save button. WAN Setup window will come. Click Save/Reboot button.
This completes the router settings for PPPOE mode. There is no need to enter DNS numbers.
Now right click MY Network Places then select properties. Now right click Local Area connection then select properties. Then double click TCP/IP. Then select Obtain an IP address automatically. Also select Obtain DNS server address automatically. Then click O.K, then again click O.K as shown below. In Windows XP machines there is no need to enter gateway address 192.168.1.1.
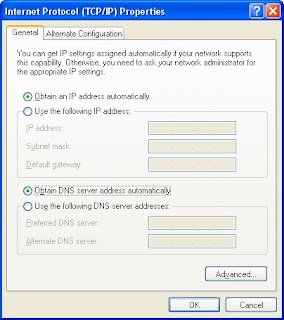
Now your system is O.K for BSNL Broadband.
How to share the internet connection among more than one Computer?
Just connect LAN cable from Ethernet port of ADSL Modem to a HUBs first port(uplink) instead of P.C. All P.C's will be connected to Hub through LAN cables. Remember one important thing that is all computers in LAN must have same workgroup. So set Unique workgroup to all of the computers in the LAN.
In all machines set the TCP/IP properties as 1. Obtain an IP address automatically and 2. Obtain DNS server address automatically. In Windows XP, Vista machines there is no need to enter gateway address 192.168.1.1 but in Windows 98 machines you have to set the gateway address as 192.168.1.1 in TCP/IP properties. After these settings internet will come in all machines.
Tuesday, January 29, 2008
Download video clips from video websites with xVideoServiceThief
xVideoServiceThief is a tool for downloading video clips from video websites. This tool supports nearly 30 video websites. xVideoServiceThief tool can convert videos to AVI, WMV, MPEG1, MPEG2, Appli iPod, 3GP and MP3 formats.
This tool supports the following platforms:
Windows 98/Me, NT4, 2000, XP, Server 2003, Vista
Mac OS X, 10.3 and 10.4
Linux, Solaris, HP-UX, IRIX, AIX, and many other Unix variants
How to use xVideoServiceThief Tool?
Start the program. You will find Add Video tab on the right hand side. Click that tab. Then Add Video URL dialog box will open. Just enter the video URL to download then click O.K. Then the tool will download the video to a default folder specified by the tool. You can change this default download location to another folder also. For this just click More Options button. Then Options window will open. Under downloads specify a folder you like to save in your computer.
Converting videos:
For converting videos to different formats you also need FFDShow MPEG-4 Video Decoder. You can download it from this site. Install it first. Now start xVideoServiceThief program. Now click More Options tab.
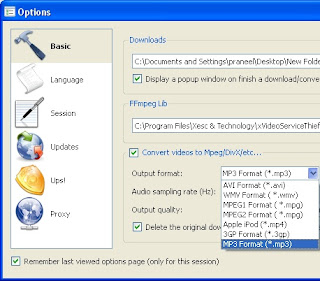
As shown in fig you can select a format from Output format then click O.K. Now enter the video URL to download through Add Video tab. Then the xVideoServiceThief tool will download the video to the format specified by you.
You can download this tool from this website.
Play video files on any player with Vista Codec Package
With Vista Codec package installed, You can use any media player to play DVD's, movies and video clips of any format. There is no need to install any other codecs by installing this codec. The Vista Codec Package no longer includes any QuickTime components. Vista Codec Package is fully capable of MOV and 3GP playback without any QuickTime software installed. This package supports English, Chinese Simplified/Traditional, Japanese, Czech, Dutch, Finnish, French, German, Greek, Italian, Portuguese, Russian, Spanish, Polish, Swedish and Turkish languages.
You can download Vista Codec package from this website.
Monday, January 28, 2008
WolfQuest - Free 3D wildlife simulation game
The Minnesota Zoo and St. Paul-based eduweb, award winning developer of digital learning games have developed this 3D multiplayer wildlife simulation game WolfQuest. WolfQuest game will be available as a free download for Windows and Macintosh computers at wolfquest.org.
The Minnesota Zoo leads a national network of zoos and science education centers including the International Wolf Center in Ely, Minnesota, Yellowstone National Park, Smithsonian National Zoological Park, Washington, D.C. and the Phoenix Zoo in Arizona.

WolfQuest game will teach wolf behavior and ecology through its gameplay and intense social interactions. Both single player and multiplayer options are available in this game. In this game Players join a wolf pack made up of computer-controlled wolves. You can create your wolf avatar by selecting male or female. You can learn about wolf ecology by living the life of a wild wolf in Yellowstone National Park. You can hunt elks, challenge other wolves for territory, defend territory, avoid danger, find a mate and protect your pups. Gameplay will create a strong emotional connection between players and wolves. So players can change their attitudes toward wolves and habitat conservation in the real world.
System Requirements:
Minimum NVIDIA GeForce 2 3D card is necessary. But Intel 865G integrated graphics or higher, NVIDIA GeForce 6 series or higher, ATI Radeon 7500 or higher is recommended for good Graphics Quality. Remember you can use Geforce 2 or Geforce 4 cards to run the game, but 1 GB RAM must be compulsory, otherwise the game runs slowly or jerkily.