Wednesday, April 11, 2007

CCleaner (Crap Cleaner)


CCleaner is a free software. CCleaner is available in 31 different languages. It cleans Temporary internet files, Cookies, History, Recently typed URLs, Index.dat files, Last download location, Auto complete form history of Internet Explorer.

It cleans Temporary files, URL history, cookies, download history of Firefox. It cleans Temporary files, URL history, cookies of Opera.

It also cleans Recycle Bin, Temporary files, Clipboard, Memory dumps, Chkdsk file fragments, Windows log files, Recent documents, Search assistant auto complete, Run(in start menu).

It also cleans IIS log files, Menu order cache, Old prefetch data, Tray notifications cache, Window size/location cache, User assistant history, Custom files and folders, Hotfix uninstallers.

It also cleans registry. It removes unused and old entries, including File Extensions, ActiveX Controls, ClassIDs, ProgIDs, Missing Shared DLLs, Fonts, Help Files, Application Paths, Icons, Invalid Shortcuts.

It also cleans temp files and recent file lists from from third party applications like winrar, winzip, windows media player, adobe reader etc.

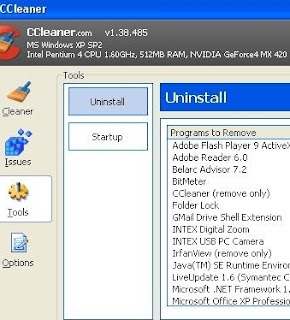
With the help of Tools button we can uninstall any program in our system.

Download CCleaner


Monday, April 09, 2007

Make your Windows XP look like Vista with Vista Transformation Pack Final


The Vista Transformation Pack is a system transformation pack which will change the Microsoft Windows XP/Windows Server 2003 interface to Windows Vista operating system. This is a free pack.

After installing the pack Go to Display Properties then click Appearances Tab. Then select a cool Longhorn or Vista theme and apply. Now your computer will look like Vista. At anytime you can change back to Windows XP style. At the time of installation, carefully read and follow all instructions. Usually no problems will come if you follow the instructions. You can uninstall Vista Transformation pack like any other program.

After installing the pack you will observe changes in the following things.

Boot screen
Welcome Screen / Logon Screen
New msstyles files (visual styles)
New desktop and file icons
New toolbar icons
Progress Dialogs
Sounds scheme
System Tray icons
New Wallpapers
Windows Media Player Skins
And much more

Download Vista Transformation Pack

Download Vista Transformation Pack from this link also


Wednesday, April 04, 2007

How can you make Firefox to open IE needed sites?


Some websites are not opening with Firefox browser. Those sites need only Internet Explorer. When we try to open those sites, Firefox will give error message like Sorry, IE is needed. For example if you try to open BSNL Broadband Usage Details site http://10.240.89.199, then Firefox will give error message Sorry, IE is needed. There are also some other sites that need only Internet Explorer.

There is a solution for this problem. We can make Firefox to open all IE needed sites with a Free Mozilla Firefox Add On IE TAB. Add-ons are small pieces of software that can add new features to Firefox. Firefox ie tab is Embedding Internet Explorer in tabs of Mozilla Firefox.

I will explain it's use. First open Firefox window. Then in address bar enter https://addons.mozilla.org/en-US/firefox/addon/1419. Now the page will open. Then click Install Now For Windows button. Then it will display that firefax ie tab is unsigned. Just click Install Now. After installation is completed it display Restart Firefox. Simply click Restart Firefox. Then Firefox simply restarted itself.

Now you will observe IE Tab Options on the Tools menu of Mozilla Firefox. Open it. You will observe like below.


Now if you want to open http://10.240.89.199 with Firefox, then enter the site in url field and click ADD. Then you will observe like below.


Then click APPLY and click O.K.

Now form View menu select Toolbars then select Customize. Now you will observe IE Tab like below.


Now just drag the IE Tab to the Toolbar of Firefox as shown below.


Now click on the IE Tab on the toolbar, then the rendering engine switches to IE and you will observe IE icon in address bar like below.(Now you will observe Firefox tab inplace of IE tab. So by clicking this tab we can switch rendering engine to and fro).


Now type http://10.240.89.199, then firefox open the site normally.


Sunday, April 01, 2007

How to promote your Blog or Website?


1. First submit your Site or Blog to all Search Engines.

First learn how to submit to Google. First create Google Account. So open Google site. At the top right corner of the page you will find Sign in link. Click that link. Then Google Accounts page will come. So click create an account now link. Then it will ask your current email address and ask to choose some password for google account. After giving all details click create my account link. Then Google will send verificarion link to your email address. First open your email box and click the verification link then only Google will activate your account. So your google account is created. Remember one thing, if you submit sitemap of your site also then search engines crawl your site correctly. If suppose you have a blogger.com blog, http://myblog.blogspot.com then your sitemap is http://myblog.blogspot.com/rss.xml. For blogger.com bloggers their sitemap is always theirsite/rss.xml as explained above. Other website owners have to create their own sitemaps.

Now open https://www.google.com/webmasters/sitemap. Then sign into your account by typing email address and password. Then in your account you will find add site box. Type your website(suppose your site is http://myblog.blogspot.com) in that box and click OK. If you have sitemap you can add it. You can add sitemap later also. You can add your sitemap later like this. After entering into your account you will observe Manage http://myblog.blogspot.com link. Just click that link. Now click Sitemaps tab. Now you will observe Add a Sitemap link. Now choose Add General Web Sitemap. Now type http://myblog.blogspot.com/rss.xml in the box provided. Then click Add Web Sitemap. Google will take 12 to 24 hours for Sitemap inclusion. Google will take it's owntime for indexing your webpages in Google. Also one more thing you have to do. You have to verify your site so that Google will know that you are the owner of the site. In the above webmasters account google will supply a meta tag. Just copy that meta tag. Then paste that meta tag in your blogger Template code just after the head tag. Then save template changes. Very simple. Now you verified your site.

Now submit your site to yahoo. Open http://search.yahoo.com. You will observe submit link at the bottom right corner of the page. Click Submit your site link. Then click submit your site for free link. Then it will ask your yahoo ID and password. Type your yahoo ID and password and sign in. In that page it will ask submit url. Type your complete url and submit it. In the same page you can submit your sitemap also.

Now submit your site to Msn Search. Open www.live.com site. In Live search box type your site and click search. It will display: We did not find your site. In the same page at bottom you will find send the address to us. Click that link then type your url and submit it.

Now if you want to submit your site to some more search engines, then open Google site and type search engines in the search box then click search. Google will display sites of search engines. Open each site and check for Submit your site link. Then Submit your site as explained above.

2. Submit your site to Blog directories, Blog Search Engines, RSS feed directories and RSS Search Engines. See the list of Directories, Search Engines below.

Blog Digger

Blogarama

Globe of Blogs

Kmax Blog Links

BlogHop

BlogWise

BlogTree.com

BlogStreet

Blooz

Blog Directory

{Search with Blogz}

BlogPulse

BlogCatalog

Blog-Search.com

BlogSweet

Directory of Technology Blogs

FindingBlog

Search Engine Submission & Optimization

Blogion.com - the definitive blog directory

BlogTopSites

Blog Directory Submit

BlogTopList

DayPop Search Engine

Ping O Matic

RSS Feeds

Feedplex

nfeeds.com

Plazoo

Feed24

FeedCat

Feeds2Read

RSS Mad

Feedooyoo

FeedAge

RSS Micro

Octora RSS Feeds

FeedFury

Find RSS

Day Time News

Feed God

3. Ask the fellow Bloggers and Website owners to link to your blog. Exchange links with other bloggers and websites of similar type. Post comments on other blogs of similar type.

4. Allow people to bookmark your blog. You will get visitors through Social bookmarking sites like Digg.

5. Email about your blog to all your friends, relatives etc. Maintain rich content in your blog. So now you learnt different ways to promote your blog or website.


Wednesday, March 28, 2007

Deep Freeze


Deep Freeze keeps the computer in Frozen State. This means If your system is infected by viruses, trojans, worms, adware, spyware and hackers, then all these bad things will be eliminated by just rebooting your computer. So after installing Deep Freeze, If your computer is affected by any virus, then you just Restart your computer. Then all viruses will be eliminated from your computer. At the time of installation Deep freeze software preserves all your computer applications, settings and every thing as an image. So if any virus attacks your computer then Deep Freeze restores your computer to this state by just rebooting your computer. Suppose already you have Deep Freeze software, now if you have downloaded or stored or installed new applications in your computer, then all these changes will be removed after rebooting your computer. We can do one thing to prevent this. At the time of installation we can specify which volumes(drives) to be freezed. If you freezed C drive only, then you can store files, downloaded items in other drives D,E,F etc. Now changes made in C drive will only be removed after rebooting the computer. But one risk here. Since other drives are not freezed by Deep Freeze, viruses may attack other drives. This software is a fully functional 60 day evaluation version. We can use it freely for 60 days.

This software functions like the famous Norton Ghost software. In Norton Ghost we can save changes made to our computer as an image after it's installation also. Here I have tested Deep Freeze Evaluation Version only. I think in full version they will give option to save all the changes made to our computer as an image after it's installation also. So with Deep Freeze image save option our saved files, downloaded files wo'nt be removed from the computer after rebooting it.

Installation
First make your system virus free by scanning with a powerful latest anti-virus software. Also scan with powerful anti-malware software like Prevx1. Now download the evaluation copy of Deep Freeze Standard edition. Double click it. Then it will display Volumes to Freeze. Select the Volumes to freeze as you wish then complete the installation. After completing installation, system will automatically restart(Deep Freeze will take image of the present condition of the system and stores it. Whenever we restart the system it will take the system to this condition only).

After restart the system it will ask Do you want to set the password? Click yes and enter your required password two times then click O.K. Now Your Software is ready and computer will be set in Freeze condition.

If any virus attacks, just restart your sytem. Then Deep freeze will restore the computer to the stored image condition. So your system will be free from virus.

Uninstallation
To uninstall the software, Deep Freeze must first be disabled and then uninstalled. You can disable Deep Freeze by doing like this.

Hold down the shift key, then double click the Deep Freeze icon on the system tray. Then it will ask the password. Enter the password set by you previously. Then click O.K. Now you will observe as shown in fig below.


In the fig by default Boot Frozen option is ticked. Deep Freeze is enabled by choosing this option. Third option Boot Thawed will be used to disable Deep Freeze. Now Select Boot Thawed and click OK. Now reboot the system. Now Deep freeze will be disabled. Now You can uninstall it. To uninstall Locate the installation file you used to install Deep Freeze to your machine. Now run that installation file. Then select the option to uninstall. The software should uninstall and reboot the machine. When the machine reboots, Deep Freeze should be uninstalled.

Download deep Freeze Standard

After the site is loaded you will observe Download option by the side of DeepFreeze Standard. Just tick that option. Come to the bottom of the screen, there you will observe submit button. Click submit. Then it will ask your details. Enter those details then click submit. Then download starts.